溫馨提示×
您好,登錄后才能下訂單哦!
點擊 登錄注冊 即表示同意《億速云用戶服務條款》
您好,登錄后才能下訂單哦!
這篇文章主要講解了“vue3怎么使用vueup/vue-quill富文本并限制輸入字數”,文中的講解內容簡單清晰,易于學習與理解,下面請大家跟著小編的思路慢慢深入,一起來研究和學習“vue3怎么使用vueup/vue-quill富文本并限制輸入字數”吧!

npm install @vueup/vue-quill@alpha --save
import { QuillEditor } from '@vueup/vue-quill'
import '@vueup/vue-quill/dist/vue-quill.snow.css';
app.component('QuillEditor',QuillEditor)<quill-editor
v-model:content="htmlValue"
ref="myQuillEditor"
contentType="html"
:options="editorOption"
@update:content="onEditorChange($event)">
</quill-editor>
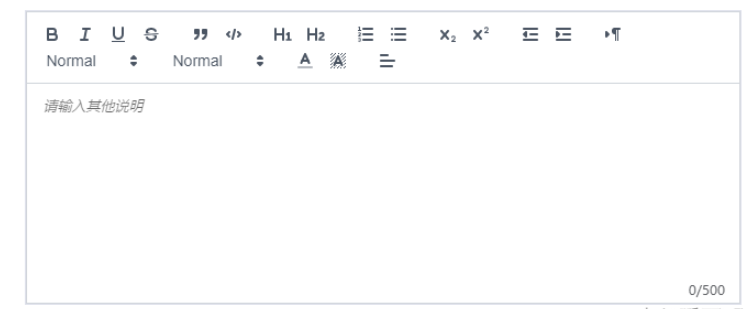
<div class="editor_length">{{ TiLength }}/500</div> const htmlValue=ref("")
const TiLength =ref(0)
const myQuillEditor=ref(null)
const editorOption=reactive({
theme: "snow", // 主題
// debug: 'info',
placeholder: "請輸入其他說明",
modules: {
toolbar: {
container: [
["bold", "italic", "underline", "strike"],
["blockquote", "code-block"],
[{ header: 1 }, { header: 2 }],
[{ list: "ordered" }, { list: "bullet" }],
[{ script: "sub" }, { script: "super" }],
[{ indent: "-1" }, { indent: "+1" }],
[{ direction: "rtl" }],
[{ size: ["small", false, "large", "huge"] }],
[{ header: [1, 2, 3, 4, 5, 6, false] }],
[{ color: [] }, { background: [] }],
// [{ font: [] }],
[{ align: [] }]
// ["clean", "link", "image"]
// ['addBtn']
] // 自定義工具欄選項
}
}
})
const onEditorChange=(e)=>{
// console.log(myQuillEditor.value.getText().length);
// console.log(TiLength.value);
TiLength.value =myQuillEditor.value.getText().length-1
if(TiLength.value>500){
myQuillEditor.value.setText(myQuillEditor.value.getText().slice(0,500))
return
}
}
return{
htmlValue,editorOption,onEditorChange,TiLength,myQuillEditor }感謝各位的閱讀,以上就是“vue3怎么使用vueup/vue-quill富文本并限制輸入字數”的內容了,經過本文的學習后,相信大家對vue3怎么使用vueup/vue-quill富文本并限制輸入字數這一問題有了更深刻的體會,具體使用情況還需要大家實踐驗證。這里是億速云,小編將為大家推送更多相關知識點的文章,歡迎關注!
免責聲明:本站發布的內容(圖片、視頻和文字)以原創、轉載和分享為主,文章觀點不代表本網站立場,如果涉及侵權請聯系站長郵箱:is@yisu.com進行舉報,并提供相關證據,一經查實,將立刻刪除涉嫌侵權內容。