您好,登錄后才能下訂單哦!
您好,登錄后才能下訂單哦!
今天小編給大家分享一下Spring AOP的概念與實現過程是什么的相關知識點,內容詳細,邏輯清晰,相信大部分人都還太了解這方面的知識,所以分享這篇文章給大家參考一下,希望大家閱讀完這篇文章后有所收獲,下面我們一起來了解一下吧。
什么是Aop?
AOP就是面向切面編程,通過預編譯方式以及運行期間的動態代理技術來實現程序的統一維護功能。
什么是切面,我理解的切面就是兩個方法之間,兩個對象之間,兩個模塊之間就是一個切面。假設在兩個模塊之間需要共同執行一系列操作,并且最后將這一系列操作注入到兩個模塊之間的指定位置。此時這一系列操作就是切面,注入這些操作的位置稱之為切點。
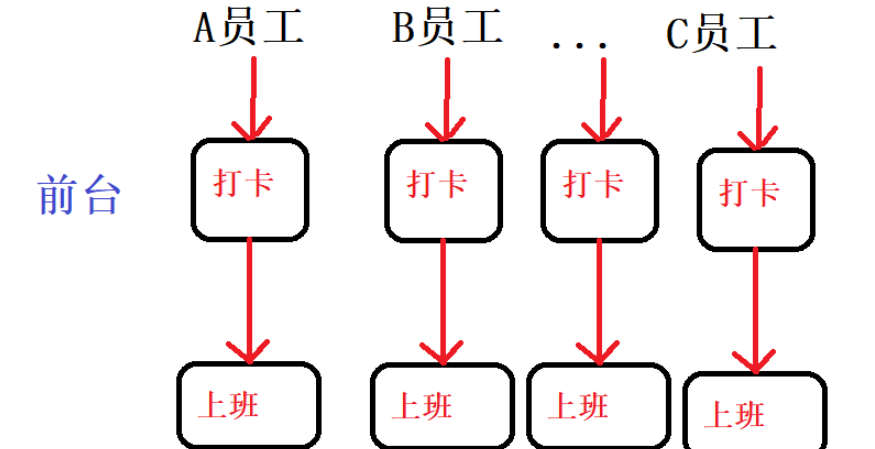
舉例:公司員工上班
A員工上班需要在前臺進行打卡,同樣的B員工…其他員工都需要在前臺打卡,那么如果為每一位員工提供單獨的打卡通道就有些過于浪費資源。像這樣

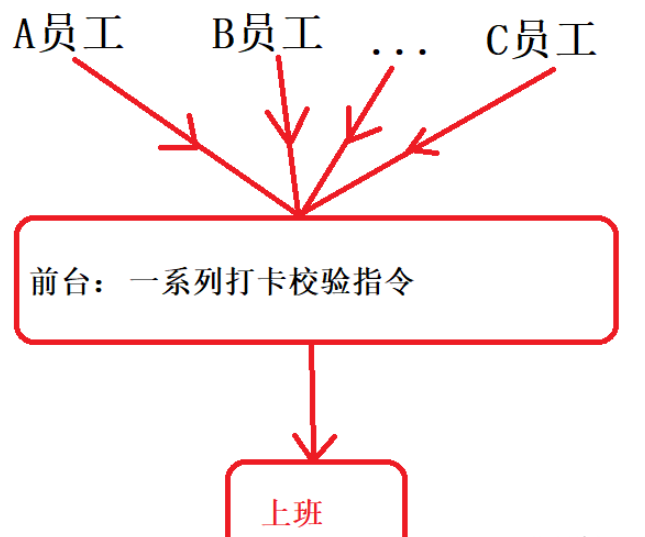
于是,在前臺這個位置設置接口,聲明公共的打卡方法,所有員工共同通過該接口進行打卡,那么在打卡時的一系列校驗或者記錄的整個操作就可以被稱之為切面,前臺這個空間位置就被稱之為切點,如下圖所示

aop主要作用就是進行日志記錄、事務/異常處理等功能以便更好地維護開發,主要目的就是將這些行為從項目的業務邏輯代碼中分離出來并且降低各個業務邏輯模塊之間的耦合度。保證在執行aop操作的同時不會影響到項目的業務邏輯代碼
幾個概念
Aspect:切面 Aspect中會包含一些pointCut切入點以及一些Advice
Advice:通知 切面需要完成的工作,通過before、after、around來區別是在連接點之前或者之后 或者環繞
Target:目標 目標對象,該對象會被織入advice
PointCut:切點 即切面通知執行的地點 advice將會在這里發生
JointPoint:連接點 所有方法的執行點
PointCut用來修飾JointPoint,PointCut是advice執行的點,而JointPoint表示所有方法的執行點,通過PointCut可以確定哪些JointPoint是可以被織入的點
我們通常不希望advice會在所有的JointPoint點執行,PointCut的作用就是可以進行校驗來更精準的匹配執行點。簡單概括就是Jointpoint可以執行但未必執行,只有PointCut匹配到了JointPoint才可以在該點執行
Aspect切面可以理解為PointCut+Advice
使用AOP織入導入包
<!-- https://mvnrepository.com/artifact/org.aspectj/aspectjweaver -->
<dependency>
  <groupId>org.aspectj</groupId>
  <artifactId>aspectjweaver</artifactId>
  <version>1.9.7</version>
  <scope>runtime</scope>
</dependency>
使用spring內置的API接口
準備:UserService、UserServiceImpl簡單實現CRUD
在spring核心配置文件applicationContext.xml中配置aop:
<?xml version="1.0" encoding="UTF-8"?>
<beans xmlns="http://www.springframework.org/schema/beans"
       xmlns:xsi="http://www.w3.org/2001/XMLSchema-instance"
xmlns:aop="http://www.springframework.org/schema/aop"
xsi:schemaLocation="http://www.springframework.org/schema/beans      https://www.springframework.org/schema/beans/spring-beans.xsd                     http://www.springframework.org/schema/aop                  https://www.springframework.org/schema/aop/spring-aop.xsd">
  <bean id="userServiceImpl" class="com.mount.service.UserServiceImpl"/>
  <bean id="log" class="com.mount.log.log"/>
  <bean id="afterLog" class="com.mount.log.AfterLog"/>
  <!--  配置AOP  -->
  <aop:config>
    <!-- 切入點 expression表達式  表示從哪里開始執行   -->
    <aop:pointcut id="pointcut" expression="execution(* com.mount.service.UserServiceImpl.*(..))"/>
    <!--      執行環繞增強  -->
    <aop:advisor advice-ref="log" pointcut-ref="pointcut"/>
    <aop:advisor advice-ref="afterLog" pointcut-ref="pointcut"/>
  </aop:config>
</beans>
編寫執行前后日志
// 執行前  實現spring內置接口MethodBeforeAdvice
public class log implements MethodBeforeAdvice {
    public void before(Method method, Object[] args, Object target) throws Throwable {
        System.out.println(target.getClass().getName()+"執行了"+method.getName()+"方法");
    }
}
// 執行后 實現AfterReturningAdvice
public class AfterLog implements AfterReturningAdvice {
  public void afterReturning(Object returnValue, Method method, Object[] args, Object target) throws Throwable {
    System.out.println(target.getClass().getName()+"調用了"+method.getName()+"方法"+"返回的結果為"+returnValue);
  }
}
測試:
@Test
public void test01(){
  ApplicationContext context = new ClassPathXmlApplicationContext("applicationContext.xml");
  UserService bean = context.getBean("userServiceImpl", UserService.class);
  bean.insert();
}使用自定義類,只需要在applicationContext.xml中重新配置aop,并且自己diy一個類即可,在配置時可以選擇任一方法為前置日志或后置日志即可
<!--  配置AOP 方式二  -->
<bean id="diy" class="com.mount.diyLog.diyLogImpl"/>
<aop:config>
  <!--     自定義切面 ref引入的類   -->
  <aop:aspect ref="diy">
    <aop:pointcut id="pointcut" expression="execution(* com.mount.service.UserServiceImpl.*(..))"/>
    <aop:before method="before" pointcut-ref="pointcut"/>
    <aop:after method="after" pointcut-ref="pointcut"/>
  </aop:aspect>
</aop:config>
diylog類
public class diyLog {
  public void before(){
    System.out.println("===before方法執行===");
  }
  public void after(){
    System.out.println("===after方法執行===");
  }
}首先需要在applicationContext.xml文件中打開SpringAOP對注解的支持
<!-- SpringAop開啟注解支持 -->
<aop:aspectj-autoproxy/>
<!-- 映射自定義注解實現log類 -->
<bean id="annoLog" class="com.mount.annoLog.annoLogImpl"/>
annoLog
// Aspect標注該類是一個切面
@Aspect
public class annoLogImpl {
  // 前置增強
  @Before("execution(* com.mount.service.UserServiceImpl.*(..))")
  public void before(){
    System.out.println("---方法執行前---");
  }
  // 后置增強
  @After("execution(* com.mount.service.UserServiceImpl.*(..))")
  public void after(){
    System.out.println("---方法執行后---");
  }
  // 環繞增強
  @Around("execution(* com.yuqu.dao.UserMapperImpl.*(..))")
    public Object around(ProceedingJoinPoint pjp) throws Throwable {
        System.out.println("環繞前");
        Object proceed = pjp.proceed();
        System.out.println("環繞后");
        System.out.println("執行信息:"+pjp.getSignature());
        return proceed;
    }
}
最終打印:
環繞前
---方法執行前---
刪除成功!
---方法執行后---
方法簽名Integer com.mount.service.UserService.delete()
方法執行返回=1
環繞后
注意around環繞增強,如果我們執行的sql中是有返回值的話,那么必須顯式的將pjp.proceed();返回回去,否則在調用處將會無法獲取到結果集,報空指針異常
可以發現,around環繞增強首先執行,在執行到joinPoint.proceed()時,會執行對應方法,執行對應方法的時候才會執行前置或后置的其他增強操作
以上就是“Spring AOP的概念與實現過程是什么”這篇文章的所有內容,感謝各位的閱讀!相信大家閱讀完這篇文章都有很大的收獲,小編每天都會為大家更新不同的知識,如果還想學習更多的知識,請關注億速云行業資訊頻道。
免責聲明:本站發布的內容(圖片、視頻和文字)以原創、轉載和分享為主,文章觀點不代表本網站立場,如果涉及侵權請聯系站長郵箱:is@yisu.com進行舉報,并提供相關證據,一經查實,將立刻刪除涉嫌侵權內容。