您好,登錄后才能下訂單哦!
您好,登錄后才能下訂單哦!
本篇內容主要講解“Uniapp自定義的vue導航菜單組件完成菜單動態高亮”,感興趣的朋友不妨來看看。本文介紹的方法操作簡單快捷,實用性強。下面就讓小編來帶大家學習“Uniapp自定義的vue導航菜單組件完成菜單動態高亮”吧!
前幾日使用Uniapp框架寫項目, 需要自定義vue導航菜單組件,并且完成菜單動態高亮,簡而言之,tab組件內完成點哪哪個發生高亮。
這里需要使用uniapp scroll-view組件,實現導航菜單的橫向滑動,這里全部使用的是flex布局。
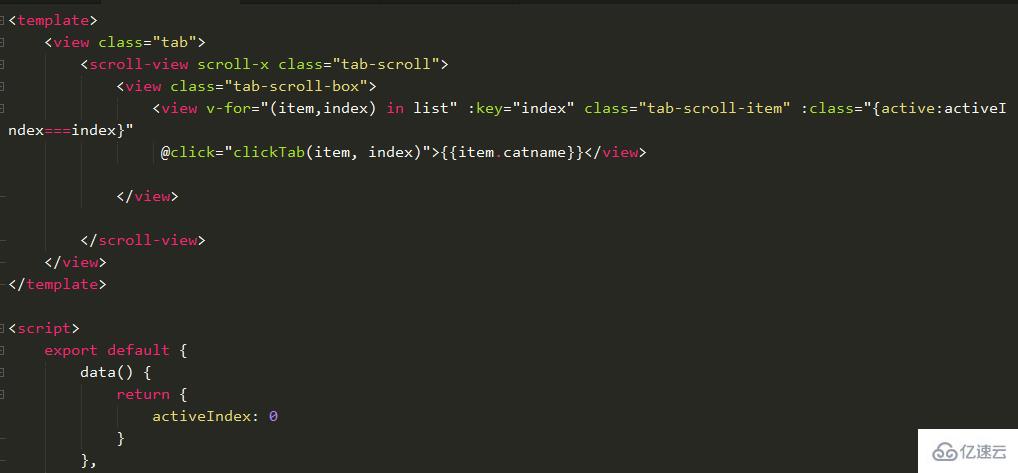
子組件 tab.vue(自定義導航菜單組件)如下

默認activeIndex的值為0,也就是默認是導航菜單第一項高亮,循環的list數組是從主組件接收的,在子組件中可以使用props接收主組件的值:
    <script>
	export default {
		name: "tab",
		data() {
			return {
				 activeIndex:0
			};
		},
		// 組件實例的作用域是孤立的。這意味著不能(也不應該)在子組件的模板中直接飲用父組件的數據。要讓子組件使用父組件的數據,需要通過子組件的 props 選項。子組件要顯示的用 props 聲明它期望獲得的數據
		// 借助watch可以監聽data或者 props 值的變化
		watch:{
			tabIndex(newVal,oldVal)
			{
				// console.log(newVal,oldVal);
				this.activeIndex = newVal
			}
		},
		//接收來自主組件的值 list
		props: {
			list: {
				type: Array,
				default () {
					return []
				}
			}

		},
		methods:{
			clickTab(item,index)
			{
				// console.log(item,index);
				this.activeIndex = index
				// tab是自定義事件名 派發給組件的調用者 index.vue
				this.$emit("tab",{
					data:item,
					index:index
				})
			}
		}
	}
</script>
tab.vue樣式如下:
    <style>
    .tab{
        display: flex;
        width: 100%;
        border-bottom: 1px solid #f5f5f5;
        .tab-srcoll{
        display: flex;
        overflow: hidden;
        box-sizing: border-box;
            .tab-srcoll-box{
                display: flex;
                height: 45px;
                align-items: center;
                flex-wrap: nowrap;
                box-sizing: border-box;
                .tab-srcoll-item{
                    color: #333;
                    flex-shrink: 0;
                    font-size: 14px;
                    padding: 0 10px;
                    &.active{
                        color: $chloe-base-color;
                    }
                }

            }
        }
    }
</style>
在主組件index.vue頁面中調用tab.vue組件,并接收子組件派發的tab事件
    <template>
	<view class="home">
		<tab :list="list" @tab="tab" ></tab>
	</view>
    </template>
    <script>
	export default {
		data() {
			return {
				list: [],
				activeIndex:0
			};
		},
		onLoad() {
			this.getTabList()

		},
		onShow(){

		},
		methods: {
			tab({
				data,
				index
			}) {
				// console.log(data.catname,index);
				this.activeIndex = index
			},

			async getTabList() {
				const res = await this.$myRequest({
					url: 'tab'
				})
				const {
					data
				} = res
				this.list = data
			}

		}
	}
</script>
在getTabList方法中使用的$myRequest是封裝的promise網絡請求,內容如下:
    const BASE_URL = 'http://inews.io/'這里可以換成你后端接口的域名
export const myRequest = (options) => {
	const {
		url,
		method,
		data,
		timeout
	} = options
	return new Promise((resolve, reject) => {
		uni.request({
			url: BASE_URL + url,
			method: method || 'GET',
			data: data || {},
			timeout:timeout || 3000,
			success: (res) => {
				if (res.statusCode !== 200) {
					uni.showToast({
						title: '請求數據失敗',
						duration: 1000,
						icon: 'none'
					});
				}

				resolve(res)
			},
			fail: (err) => {
				uni.showToast({
					title: '請求接口失敗',
					duration: 1000,
					icon: 'none'
				});
				reject(err)
			}

		})
	})
}
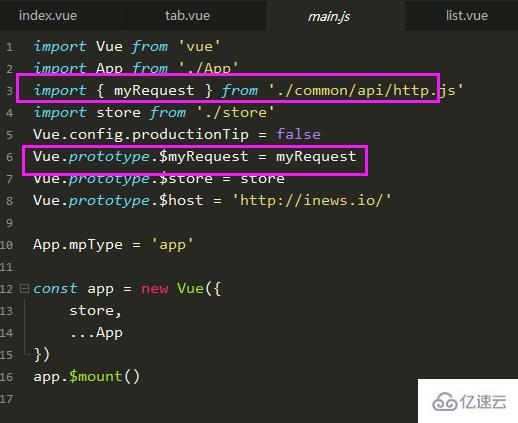
接著在main.js中引入注冊全局變量

到此,相信大家對“Uniapp自定義的vue導航菜單組件完成菜單動態高亮”有了更深的了解,不妨來實際操作一番吧!這里是億速云網站,更多相關內容可以進入相關頻道進行查詢,關注我們,繼續學習!
免責聲明:本站發布的內容(圖片、視頻和文字)以原創、轉載和分享為主,文章觀點不代表本網站立場,如果涉及侵權請聯系站長郵箱:is@yisu.com進行舉報,并提供相關證據,一經查實,將立刻刪除涉嫌侵權內容。