您好,登錄后才能下訂單哦!
您好,登錄后才能下訂單哦!
這篇文章主要講解了“怎么用Python3實現Two-Pass算法”,文中的講解內容簡單清晰,易于學習與理解,下面請大家跟著小編的思路慢慢深入,一起來研究和學習“怎么用Python3實現Two-Pass算法”吧!
技術背景
Two-Pass算法
測試數據的生成
Two-Pass算法的實現
算法的執行流程
標簽的重映射
其他的測試用例
總結概要
連通性檢測是圖論中常常遇到的一個問題,我們可以用五子棋的思路來理解這個問題五子棋中,橫、豎、斜相鄰的兩個棋子,被認為是相連接的,而一樣的道理,在一個二維的圖中,只要在橫、豎、斜三個方向中的一個存在相鄰的情況,就可以認為圖上相連通的。比如以下案例中的python數組,3號元素和5號元素就是相連接的,5號元素和6號元素也是相連接的,因此這三個元素實際上是屬于同一個區域的:
array([[0, 3, 0],
       [0, 5, 0],
       [6, 0, 0]])
而再如下面這個例子,其中的1、2、3三個元素是相連的,4、5、6三個元素也是相連的,但是這兩個區域不存在連接性,因此這個網格被分成了兩個區域:
array([[1, 0, 4],
       [2, 0, 5],
       [3, 0, 6]])
那么如何高效的檢測一張圖片或者一個矩陣中的所有連通區域并打上標簽,就是我們所關注的一個問題。
一個典型的連通性檢測的方案是Two-Pass算法,該算法可以用如下的一張動態圖來演示:
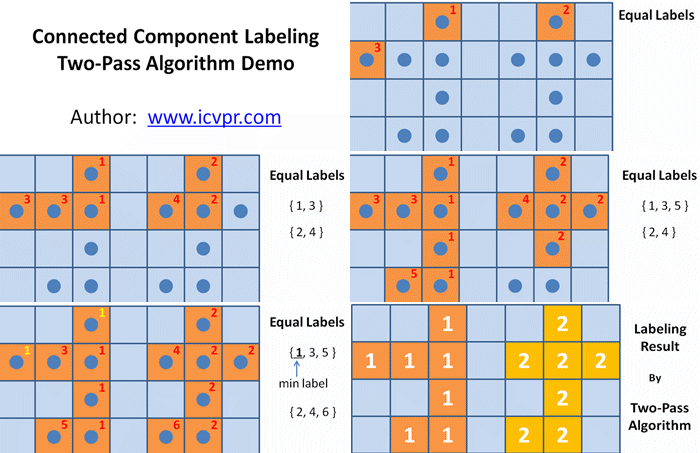
該算法的核心在于用兩次的遍歷,為所有的節點打上分區的標簽,如果是不同的分區,就會打上不同的標簽。其基本的算法步驟可以用如下語言進行概述:
遍歷網格節點,如果網格的上、左、左上三個格點不存在元素,則為當前網格打上新的標簽,同時標簽編號加一;
當上、左、左上的網格中存在一個元素時,將該元素值賦值給當前的網格作為標簽;
當上、左、左上的網格中有多個元素時,取最低值作為當前網格的標簽;
在標簽賦值時,留意標簽上邊和左邊已經被遍歷過的4個元素,將4個元素中的最低值與這四個元素分別添加到Union的數據結構中(參考鏈接1);
再次遍歷網格節點,根據Union數據結構中的值刷新網格中的標簽值,最終得到劃分好區域和標簽的元素矩陣。
這里我們以Python3為例,可以用Numpy來產生一系列隨機的0-1矩陣,這里我們產生一個20*20大小的矩陣:
# two_pass.py

import numpy as np
import matplotlib.pyplot as plt

if __name__ == "__main__":
    np.random.seed(1)
    graph = np.random.choice([0,1],size=(20,20))
    print (graph)

    plt.figure()
    plt.imshow(graph)
    plt.savefig('random_bin_graph.png')
執行的輸出結果如下:
$ python3 two_pass.py
[[1 1 0 0 1 1 1 1 1 0 0 1 0 1 1 0 0 1 0 0]
 [0 1 0 0 1 0 0 0 1 0 0 0 1 1 1 1 1 0 0 0]
 [1 1 1 1 1 1 0 1 1 0 0 1 0 0 1 1 1 0 1 0]
 [0 1 1 0 1 1 1 1 0 0 1 1 0 0 0 0 1 1 1 0]
 [1 0 0 1 1 0 1 1 0 1 0 0 1 1 1 0 1 1 0 1]
 [1 1 1 0 0 0 0 0 1 1 1 1 1 1 1 0 0 0 0 0]
 [0 1 1 1 1 1 1 0 0 1 1 0 0 1 0 0 0 1 1 1]
 [1 1 0 1 0 1 0 0 0 1 1 1 0 1 0 0 0 0 1 0]
 [1 0 1 1 1 0 0 0 0 0 0 1 0 0 1 0 0 1 1 0]
 [0 0 1 0 0 0 0 1 0 0 0 0 1 1 0 0 1 1 1 0]
 [0 0 0 0 1 1 1 0 1 1 0 0 0 1 1 0 1 1 1 0]
 [1 1 1 1 0 1 0 0 1 0 1 0 1 1 0 1 1 0 1 1]
 [1 0 1 0 1 0 1 1 1 1 1 1 0 0 1 1 0 0 0 1]
 [1 0 0 0 0 0 1 1 1 1 1 1 1 0 0 1 0 0 0 1]
 [0 1 0 1 0 0 0 0 1 1 0 0 0 1 0 1 1 0 0 1]
 [0 1 0 0 0 1 0 1 0 1 1 1 0 1 0 1 1 1 1 0]
 [0 1 0 0 0 0 1 1 0 1 1 0 0 1 1 1 1 1 1 1]
 [0 0 0 0 0 0 0 1 0 0 0 0 0 1 1 1 1 0 0 0]
 [1 0 1 0 1 0 0 0 0 0 0 1 0 0 0 1 0 1 1 0]
 [0 1 1 0 1 0 1 0 1 1 0 0 1 0 0 0 0 0 1 1]]
同時會生成一張網格的圖片:
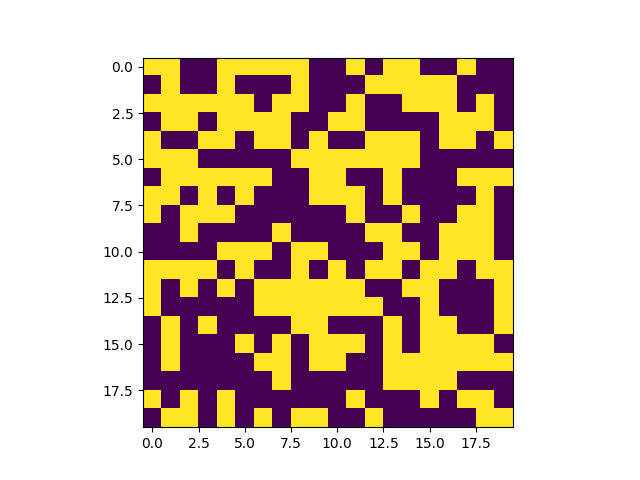
其實從這個圖片中我們可以看出,圖片的上面部分幾乎都是連接在一起的,只有最下面存在幾個獨立的區域。
這里需要說明的是,因為我們并沒有使用Union的數據結構,而是只使用了Python的字典數據結構,因此代碼寫起來會比較冗余而且不是那么美觀,但是這里我們主要的目的是先用代解決這一實際問題,因此代碼亂就亂一點吧。
# two_pass.py

import numpy as np
import matplotlib.pyplot as plt
from copy import deepcopy

def first_pass(g) -> list:
    graph = deepcopy(g)
    height = len(graph)
    width = len(graph[0])
    label = 1
    index_dict = {}
    for h in range(height):
        for w in range(width):
            if graph[h][w] == 0:
                continue
            if h == 0 and w == 0:
                graph[h][w] = label
                label += 1
                continue
            if h == 0 and graph[h][w-1] > 0:
                graph[h][w] = graph[h][w-1]
                continue
            if w == 0 and graph[h-1][w] > 0:
                if graph[h-1][w] <= graph[h-1][min(w+1, width-1)]:
                    graph[h][w] = graph[h-1][w]
                    index_dict[graph[h-1][min(w+1, width-1)]] = graph[h-1][w]
                elif graph[h-1][min(w+1, width-1)] > 0:
                    graph[h][w] = graph[h-1][min(w+1, width-1)]
                    index_dict[graph[h-1][w]] = graph[h-1][min(w+1, width-1)]
                continue
            if h == 0 or w == 0:
                graph[h][w] = label
                label += 1
                continue
            neighbors = [graph[h-1][w], graph[h][w-1], graph[h-1][w-1], graph[h-1][min(w+1, width-1)]]
            neighbors = list(filter(lambda x:x>0, neighbors))
            if len(neighbors) > 0:
                graph[h][w] = min(neighbors)
                for n in neighbors:
                    if n in index_dict:
                        index_dict[n] = min(index_dict[n], min(neighbors))
                    else:
                        index_dict[n] = min(neighbors)
                continue
            graph[h][w] = label
            label += 1
    return graph, index_dict

def remap(idx_dict) -> dict:
    index_dict = deepcopy(idx_dict)
    for id in idx_dict:
        idv = idx_dict[id]
        while idv in idx_dict:
            if idv == idx_dict[idv]:
                break
            idv = idx_dict[idv]
        index_dict[id] = idv
    return index_dict

def second_pass(g, index_dict) -> list:
    graph = deepcopy(g)
    height = len(graph)
    width = len(graph[0])
    for h in range(height):
        for w in range(width):
            if graph[h][w] == 0:
                continue
            if graph[h][w] in index_dict:
                graph[h][w] = index_dict[graph[h][w]]
    return graph

def flatten(g) -> list:
    graph = deepcopy(g)
    fgraph = sorted(set(list(graph.flatten())))
    flatten_dict = {}
    for i in range(len(fgraph)):
        flatten_dict[fgraph[i]] = i
    graph = second_pass(graph, flatten_dict)
    return graph

if __name__ == "__main__":
    np.random.seed(1)
    graph = np.random.choice([0,1],size=(20,20))
    graph_1, idx_dict = first_pass(graph)
    idx_dict = remap(idx_dict)
    graph_2 = second_pass(graph_1, idx_dict)
    graph_3 = flatten(graph_2)
    print (graph_3)

    plt.subplot(131)
    plt.imshow(graph)
    plt.subplot(132)
    plt.imshow(graph_3)
    plt.subplot(133)
    plt.imshow(graph_3>0)
    plt.savefig('random_bin_graph.png')
完整代碼的輸出如下所示:
$ python3 two_pass.py
[[1 1 0 0 1 1 1 1 1 0 0 1 0 1 1 0 0 1 0 0]
 [0 1 0 0 1 0 0 0 1 0 0 0 1 1 1 1 1 0 0 0]
 [1 1 1 1 1 1 0 1 1 0 0 1 0 0 1 1 1 0 1 0]
 [0 1 1 0 1 1 1 1 0 0 1 1 0 0 0 0 1 1 1 0]
 [1 0 0 1 1 0 1 1 0 1 0 0 1 1 1 0 1 1 0 1]
 [1 1 1 0 0 0 0 0 1 1 1 1 1 1 1 0 0 0 0 0]
 [0 1 1 1 1 1 1 0 0 1 1 0 0 1 0 0 0 1 1 1]
 [1 1 0 1 0 1 0 0 0 1 1 1 0 1 0 0 0 0 1 0]
 [1 0 1 1 1 0 0 0 0 0 0 1 0 0 1 0 0 1 1 0]
 [0 0 1 0 0 0 0 1 0 0 0 0 1 1 0 0 1 1 1 0]
 [0 0 0 0 1 1 1 0 1 1 0 0 0 1 1 0 1 1 1 0]
 [1 1 1 1 0 1 0 0 1 0 1 0 1 1 0 1 1 0 1 1]
 [1 0 1 0 1 0 1 1 1 1 1 1 0 0 1 1 0 0 0 1]
 [1 0 0 0 0 0 1 1 1 1 1 1 1 0 0 1 0 0 0 1]
 [0 1 0 2 0 0 0 0 1 1 0 0 0 1 0 1 1 0 0 1]
 [0 1 0 0 0 1 0 1 0 1 1 1 0 1 0 1 1 1 1 0]
 [0 1 0 0 0 0 1 1 0 1 1 0 0 1 1 1 1 1 1 1]
 [0 0 0 0 0 0 0 1 0 0 0 0 0 1 1 1 1 0 0 0]
 [3 0 3 0 4 0 0 0 0 0 0 5 0 0 0 1 0 1 1 0]
 [0 3 3 0 4 0 6 0 7 7 0 0 5 0 0 0 0 0 1 1]]
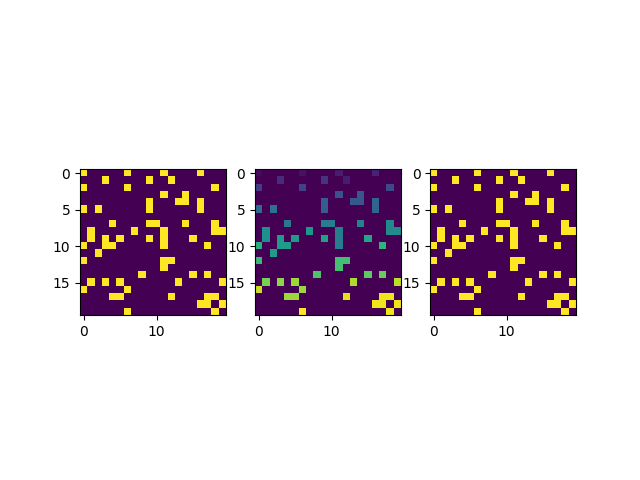
同樣的我們可以看看此時得到的新的圖像:
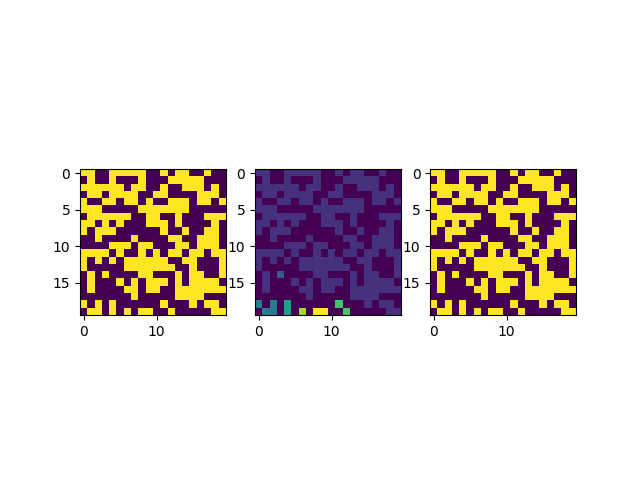
這里我們并列的畫了三張圖,第一張圖是原圖,第二張圖是劃分好區域和標簽的圖,第三張是對第二張圖進行二元化的結果,以確保在運算過程中沒有丟失原本的信息。經過確認這個標簽的結果劃分是正確的,但是因為涉及到一些算法實現的細節,這里我們還是需要展開來介紹一下。
if __name__ == "__main__":
    np.random.seed(1)
    graph = np.random.choice([0,1],size=(20,20))
    graph_1, idx_dict = first_pass(graph)
    idx_dict = remap(idx_dict)
    graph_2 = second_pass(graph_1, idx_dict)
    graph_3 = flatten(graph_2)
這個部分是算法的核心框架,在本文中的算法實現流程為:先用first_pass遍歷一遍網格節點,按照上一個章節中介紹的Two-Pass算法打上標簽,并獲得一個映射關系;然后用remap將上面得到的映射關系做一個重映射,確保每一個級別的映射都對應到了最根部(可以聯系參考鏈接1的內容進行理解,雖然這里沒有使用Union的數據結構,但是本質上還是一個樹形的結構,需要做一個重映射);然后用second_pass執行Two-Pass算法的第二次遍歷,得到一組打上了新的獨立標簽的網格節點;最后需要用flatten將標簽進行壓平,因為前面映射的關系,有可能導致標簽不連續,所以我們這里又做了一次映射,確保標簽是連續變化的,實際應用中可以不使用這一步。
關于節點的遍歷,大家可以直接看算法代碼,這里需要額外講解的是標簽的重映射模塊的代碼:
def remap(idx_dict) -> dict:
    index_dict = deepcopy(idx_dict)
    for id in idx_dict:
        idv = idx_dict[id]
        while idv in idx_dict:
            if idv == idx_dict[idv]:
                break
            idv = idx_dict[idv]
        index_dict[id] = idv
    return index_dict
這里的算法是先對得到的標簽進行遍歷,在字典中獲取當前標索引所對應的值,作為新的索引,直到鍵跟值一致為止,相當于在一個樹形的數據結構中重復尋找父節點直到找到根節點。
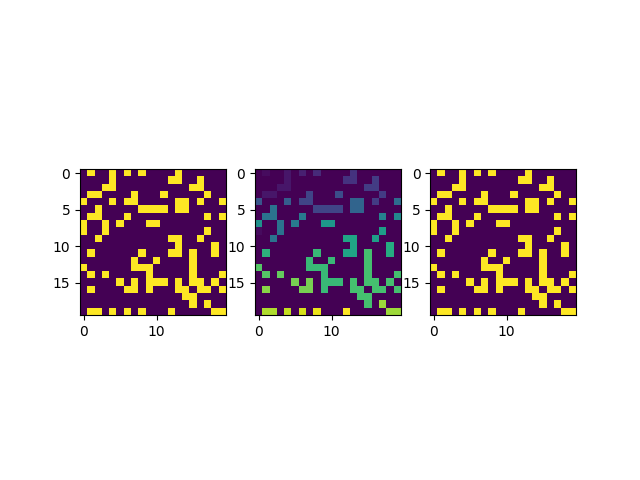
這里我們可以再額外測試一些案例,比如增加幾個0元素使得網格節點更加稀疏:
graph = np.random.choice([0,0,0,1],size=(20,20))
得到的結果圖片如下所示:
還可以再稀疏一些:
graph = np.random.choice([0,0,0,0,0,1],size=(20,20))
得到的結果如下圖所示:
越是稀疏的圖,得到的分組結果就越分散。
在本文中我們主要介紹了利用Two-Pass的算法來檢測區域連通性,并給出了Python3的代碼實現,當然在實現的過程中因為沒有使用到Union這樣的數據結構,僅僅用了字典來存儲標簽之間的關系,因此效率和代碼可讀性都會低一些,單純作為用例的演示和小規模區域劃分的計算是足夠用了。在該代碼實現方案中,還有一點與原始算法不一致的是,本實現方案中打新的標簽是讀取上、上左和左三個方向的格點,但是存儲標簽的映射關系時,是讀取了上、上左、上右和左這四個方向的格點。
感謝各位的閱讀,以上就是“怎么用Python3實現Two-Pass算法”的內容了,經過本文的學習后,相信大家對怎么用Python3實現Two-Pass算法這一問題有了更深刻的體會,具體使用情況還需要大家實踐驗證。這里是億速云,小編將為大家推送更多相關知識點的文章,歡迎關注!
免責聲明:本站發布的內容(圖片、視頻和文字)以原創、轉載和分享為主,文章觀點不代表本網站立場,如果涉及侵權請聯系站長郵箱:is@yisu.com進行舉報,并提供相關證據,一經查實,將立刻刪除涉嫌侵權內容。