您好,登錄后才能下訂單哦!
您好,登錄后才能下訂單哦!
這篇文章主要講解了“OpenCV哈里斯角檢測怎么應用”,文中的講解內容簡單清晰,易于學習與理解,下面請大家跟著小編的思路慢慢深入,一起來研究和學習“OpenCV哈里斯角檢測怎么應用”吧!
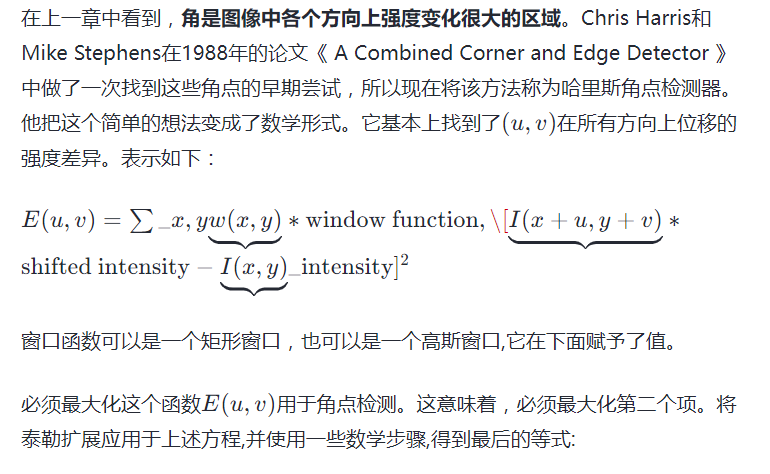
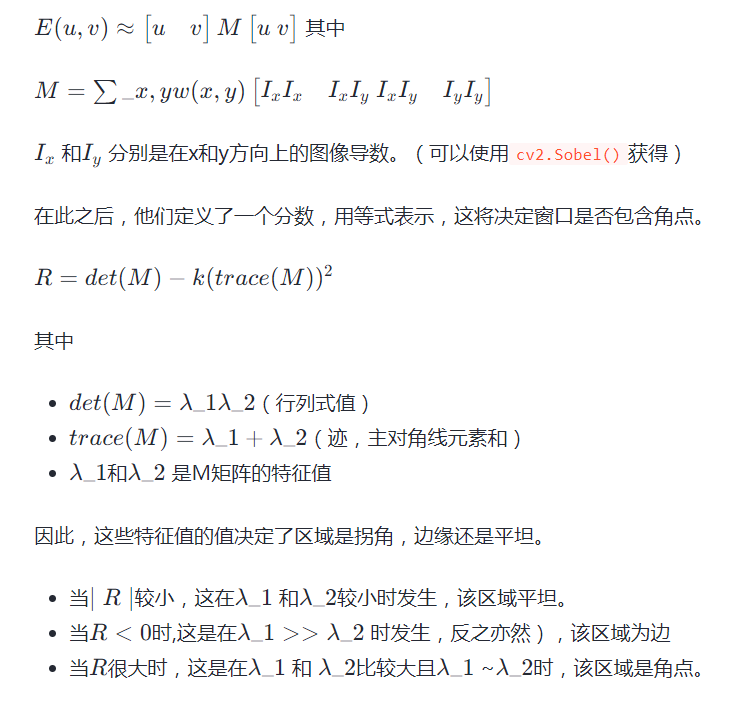
可以用如下圖來表示:
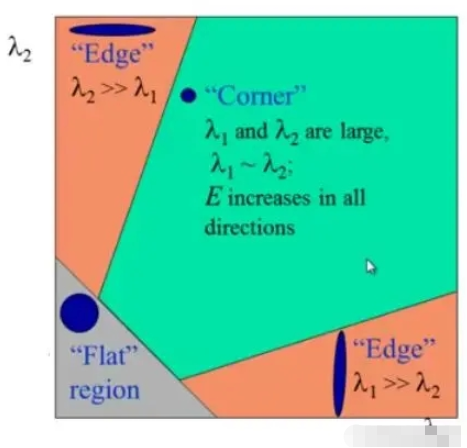
因此,Harris Corner Detection的結果是具有這些分數的灰度圖像。合適的閾值可提供圖像的各個角落。
在OpenCV中有實現哈里斯角點檢測,cv2.cornerHarris()。其參數為:
dst = cv2.cornerHarris(src, blockSize, ksize, k[, dst[, borderType]] )
src - 輸入圖像,灰度和float32類型
blockSize - 是拐角檢測考慮的鄰域大小
ksize - 使用的Sobel導數的光圈參數
k- 等式中的哈里斯檢測器自由參數
import cv2
import numpy as np
from matplotlib import pyplot as plt
img = cv2.imread('chessboard.png')
img_copy = img.copy()
gray = cv2.cvtColor(img, cv2.COLOR_BGR2GRAY)
dst = cv2.cornerHarris(gray, 2, 3, 0.04)
# result is dilated for marking the corners, not important
dst = cv2.dilate(dst, None)
# Threshold for an optimal value, it may vary depending on the image.
img[dst >0.01*dst.max()]=[255,0,0]
# plot
plt.subplot(121)
plt.imshow(img_copy, cmap='gray')
plt.xticks([])
plt.yticks([])
plt.subplot(122)
plt.imshow(img, cmap='gray')
plt.xticks([])
plt.yticks([])
plt.show()
以下是結果:
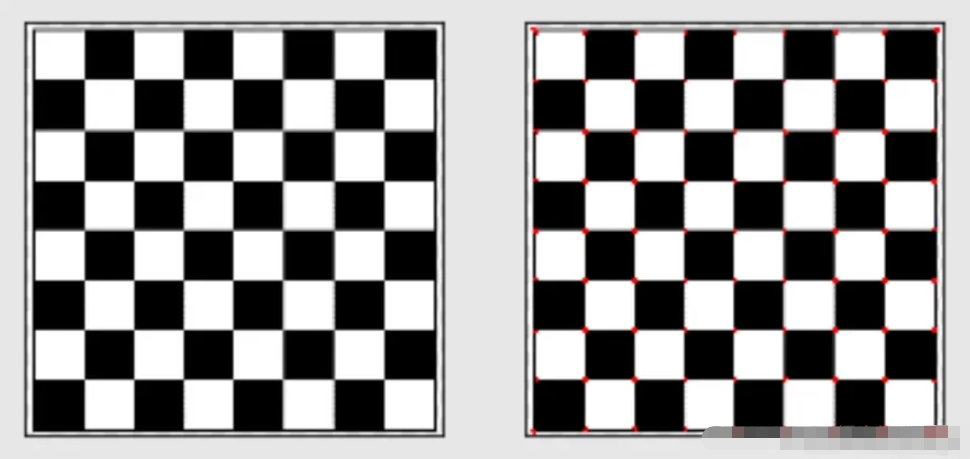
可以看到,各個角點已經標紅。
有時候可能需要找到最精確的角點。OpenCV附帶了一個函數cv2.cornerSubPix(),它進一步細化了以亞像素精度檢測到的角點。下面是一個例子。
和之前一樣,首先需要先找到哈里斯角點
然后通過這些角的質心(可能在一個角上有一堆像素,取它們的質心)來細化它們
Harris角用紅色像素標記,SubPixel角用綠色像素標記
對于cv2.cornerSubPix()函數,必須定義停止迭代的條件。我們可以在特定的迭代次數或達到一定的精度后停止它。此外,還需要定義它將搜索角點的鄰居的大小。
corners = cv.cornerSubPix( image, corners, winSize, zeroZone, criteria )
image: 輸入圖像,單通道
corners: 輸入的初始坐標和為輸出提供的精制坐標
winSize: 搜索窗口的一半側面長度
zeroZone: 搜索區域中間的死區大小的一半在下面的公式中的求和,有時用于避免自相關矩陣的可能奇點。(−1,−1)(-1,-1)(−1,−1) 的值表示沒有這樣的尺寸
criteria: 終止角點細化過程的條件
# sub pixel更精度角點
import cv2
import numpy as np
img = cv2.imread('chessboard2.png')
gray = cv2.cvtColor(img, cv2.COLOR_BGR2GRAY)
# find Harris corners
dst = cv2.cornerHarris(gray,2, 3, 0.04)
dst = cv2.dilate(dst, None)
ret, dst = cv2.threshold(dst, 0.01*dst.max(), 255,0)
dst = np.uint8(dst)
# find centroids
ret, labels, stats, centroids = cv2.connectedComponentsWithStats(dst)
# define the criteria to stop and refine the corners
criteria = (cv2.TERM_CRITERIA_EPS + cv2.TERM_CRITERIA_MAX_ITER, 100, 0.001)
corners = cv2.cornerSubPix(gray, np.float32(centroids), (5, 5), (-1, -1), criteria)
# Now draw them
res = np.hstack((centroids,corners))
res = np.int0(res)
img[res[:,1],res[:,0]]=[0,0,255]
img[res[:,3],res[:,2]] = [0,255,0]
cv2.imshow('subpixel', img)
cv2.waitKey(0)
cv2.destroyAllWindows()
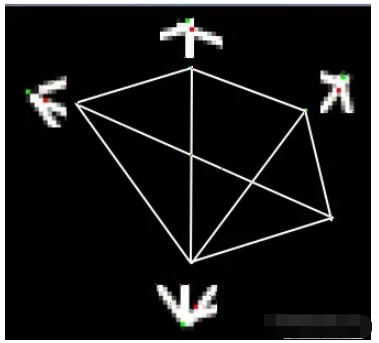
以下是結果, 可以看到SubPixel更精確一點:
感謝各位的閱讀,以上就是“OpenCV哈里斯角檢測怎么應用”的內容了,經過本文的學習后,相信大家對OpenCV哈里斯角檢測怎么應用這一問題有了更深刻的體會,具體使用情況還需要大家實踐驗證。這里是億速云,小編將為大家推送更多相關知識點的文章,歡迎關注!
免責聲明:本站發布的內容(圖片、視頻和文字)以原創、轉載和分享為主,文章觀點不代表本網站立場,如果涉及侵權請聯系站長郵箱:is@yisu.com進行舉報,并提供相關證據,一經查實,將立刻刪除涉嫌侵權內容。