您好,登錄后才能下訂單哦!
您好,登錄后才能下訂單哦!
這篇文章主要介紹“Element如何實現復雜table表格結構”,在日常操作中,相信很多人在Element如何實現復雜table表格結構問題上存在疑惑,小編查閱了各式資料,整理出簡單好用的操作方法,希望對大家解答”Element如何實現復雜table表格結構”的疑惑有所幫助!接下來,請跟著小編一起來學習吧!
Element-UI組件el-table用于展示多條結構類似的數據,可對數據進行排序、篩選、對比或其他自定義操作。
將使用到以下兩項,來完成今天demo演示:
多級表頭:數據結構比較復雜的時候,可使用多級表頭來展現數據的層次關系。
合并行或列:多行或多列共用一個數據時,可以合并行或列。
需要實現的表格如下圖:
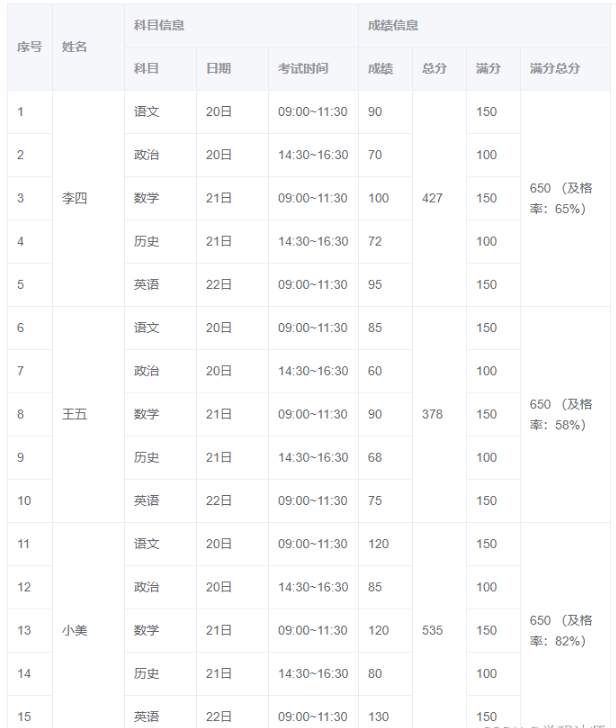
使用npm進行安裝:
npm i element-ui -S
這里表頭實現比較簡單,代碼如下:
<template>
  <div>
    <el-table :data="tableStudentData" :span-method="reconstructionStuCell" >
      <el-table-column type="index" label="序號" width="50"></el-table-column>
      <el-table-column prop="name" label="姓名" width="80"></el-table-column>
      <el-table-column label="科目信息">
        <el-table-column prop="courseName" label="科目" width="80"></el-table-column>
        <el-table-column prop="date" label="日期" width="80"></el-table-column>
        <el-table-column prop="timeStr" label="考試時間" width="100"></el-table-column>
      </el-table-column>
      <el-table-column label="成績信息">
        <el-table-column prop="score" label="成績" width="60"></el-table-column>
        <el-table-column prop="scoreTotal" label="總分" width="60"></el-table-column>
        <el-table-column prop="total" label="滿分" width="60"></el-table-column>
        <el-table-column prop="totalAll" label="滿分總分" width="100">
          <template slot-scope="scope">
            <span v-if="scope.row.totalAll">{{scope.row.totalAll}} (及格率:{{parseInt(scope.row.scoreTotal/scope.row.totalAll*100)}}%)</span>
          </template>
        </el-table-column>
      </el-table-column>
    </el-table>

  </div>
</template>

<script>
  export default {
    data(){
      return {
        tableData: [],
        tableStudentData: []
      }
    },
    created() {

    },
    methods: {
      /**
       * 合并單元格數據
       */
      reconstructionStuCell({ row, column, rowIndex, columnIndex }){

      }
      //end
    }
  }
</script>

<style lang="scss">

</style>
此時表頭效果已形成,如下圖:

數據渲染這里較為復雜,這里為方便大家理解,進行逐步拆解敘述。如有更好方法,也歡迎大家指點。
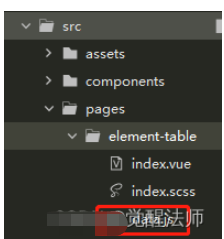
如上圖,在element-table目錄中,新建data.js文件,用于存儲模擬數據,代碼如下:
export const studentData = [
  {name: "李四", subject: [
    {courseName: "語文", date: "20日", timeStr: "09:00~11:30", score: 90, total: 150},
    {courseName: "政治", date: "20日", timeStr: "14:30~16:30", score: 70, total: 100},
    {courseName: "數學", date: "21日", timeStr: "09:00~11:30", score: 100, total: 150},
    {courseName: "歷史", date: "21日", timeStr: "14:30~16:30", score: 72, total: 100},
    {courseName: "英語", date: "22日", timeStr: "09:00~11:30", score: 95, total: 150},
  ]},
  {name: "王五", subject: [
    {courseName: "語文", date: "20日", timeStr: "09:00~11:30", score: 85, total: 150},
    {courseName: "政治", date: "20日", timeStr: "14:30~16:30", score: 60, total: 100},
    {courseName: "數學", date: "21日", timeStr: "09:00~11:30", score: 90, total: 150},
    {courseName: "歷史", date: "21日", timeStr: "14:30~16:30", score: 68, total: 100},
    {courseName: "英語", date: "22日", timeStr: "09:00~11:30", score: 75, total: 150},
  ]},
  {name: "小美", subject: [
    {courseName: "語文", date: "20日", timeStr: "09:00~11:30", score: 120, total: 150},
    {courseName: "政治", date: "20日", timeStr: "14:30~16:30", score: 85, total: 100},
    {courseName: "數學", date: "21日", timeStr: "09:00~11:30", score: 120, total: 150},
    {courseName: "歷史", date: "21日", timeStr: "14:30~16:30", score: 80, total: 100},
    {courseName: "英語", date: "22日", timeStr: "09:00~11:30", score: 130, total: 150},
  ]}
];
頁面中引入模擬數據,并賦值給表格的變量,代碼如下:
<script>
  import { studentData } from './data.js'
  export default {
    data(){
      return {
        tableStudentData: studentData
      }
    },
    created() { },
    methods: {
      /**
       * 合并單元格數據
       */
      reconstructionStuCell({ row, column, rowIndex, columnIndex }){

      }
      //end
    }
  }
</script>
此時表格中可以正常渲染出部分數據了,效果圖如下:
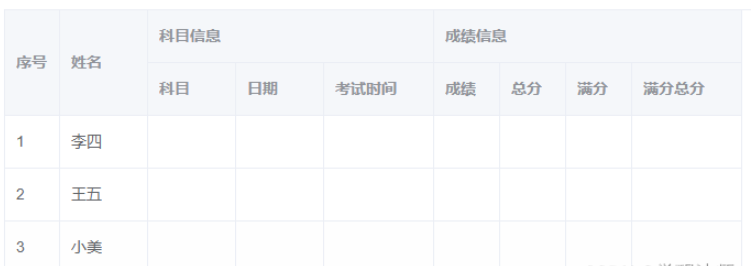
如上圖會發現,科目和成績相關信息,未顯示出來。這里需要對數據進行處理下,將所有科目信息調整到 和姓名字段為同一行數據中。需要做以下幾步:
將subject二級數據全部移至name同級的同一行數據中。
將name字段原數據移至subject的第一行數據中;item和sub進行合并。
無subject子項數據的,保持原數據輸出。
在data.js中,添加重構數據reconstructionStuData()函數,代碼如下:
/**
 * 重構學生數據 并返回
 */
export const reconstructionStuData = data => {
  if(!Array.isArray(data)) return [];

  let tmpData = [];
  data.forEach((item, i) => {
    //有二級數據的進行處理
    if(Array.isArray(item.subject)&&item.subject.length>0){
      //循環成績
      item.subject.forEach((sub, j) => {
        let subData = {};
        if(j==0){
          //子項第一行數據,和姓名信息同行
          subData = Object.assign({ }, item, sub);
        }
        //其他行數據無須添加 姓名字段信息(第一行數據會合并到結束位置,填充后也會被覆蓋)
        else{
          subData = Object.assign({ }, sub);
        }
        //if end
        tmpData.push( subData );
      });
    }
    //subject無子項數據,保留當前位置輸出
    else{
      tmpData.push(
        Object.assign({ }, item)
      );
    }
  });

  return tmpData;
}
引入reconstructionStuData()函數,代碼如下:
<script>
  import { reconstructionStuData, studentData } from './data.js'
  export default {
    data(){
      return {
        tableStudentData: studentData
      }
    },
    created() {
      this.tableStudentData = reconstructionStuData(studentData);
    },
    methods: {
      /**
       * 合并單元格數據
       */
      reconstructionStuCell({ row, column, rowIndex, columnIndex }){

      }
      //end
    }
  }
</script>
此時表格效果圖如下:
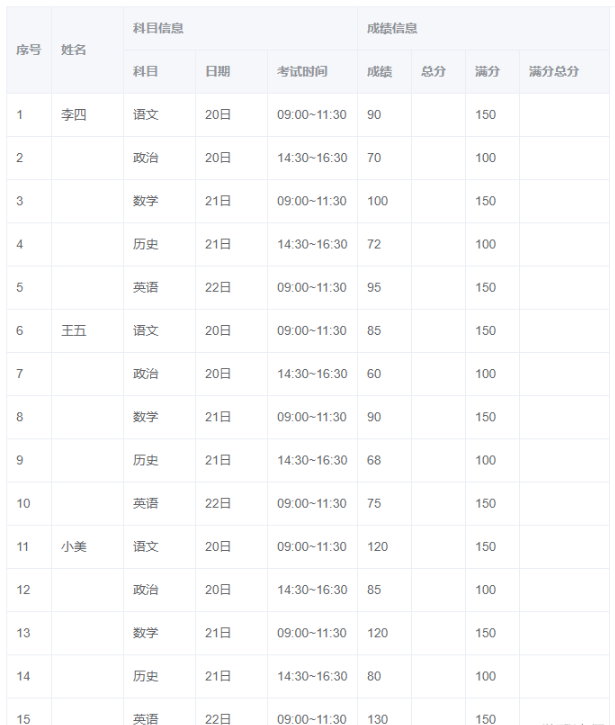
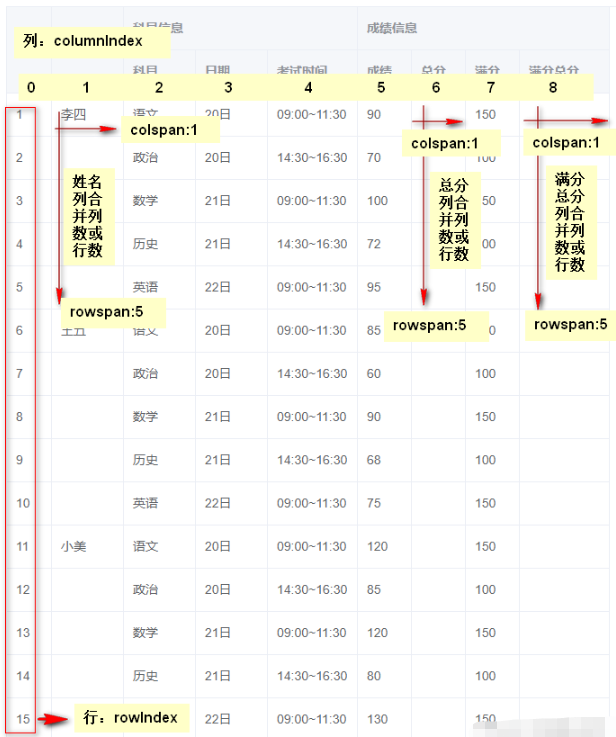
如上圖,
列(姓名)位于列的第1位置(起始從0開始,所以序號為第0位置),往下合并subject數組長度位置即可。
列(總分)位于列的第6位置,往下合并subject數組長度位置即可。
列(滿分總分)位于列的第8位置,往下合并subject數組長度位置即可。
這是我們會發現,methods中定義的reconstructionStuCell()函數還未使用,通過給table傳入span-method方法可以實現合并行或列,方法的參數是一個對象,里面包含當前行row、當前列column、當前行號rowIndex、當前列號columnIndex四個屬性。該函數可以返回一個包含兩個元素的數組,第一個元素代表rowspan,第二個元素代表colspan。 也可以返回一個鍵名為rowspan和colspan的對象。
span-method相當于從數據單元格第一行開始,每行每列開始循環執行,想當于 9 * 15 執行135次,通過函數中 rowIndex, columnIndex字段進行判斷當前循環是哪行哪列,并作對應處理。
這里我們添加以下邏輯,在每行數據中添加姓名、總分,滿分總分對應columnIndex1、columnIndex6、columnIndex8字段,用來存儲需要返回的colspan和rowspan數據,代碼如下:
reconstructionStuCell({ row, column, rowIndex, columnIndex }){
    let column1Data = row['columnIndex1'];
    let column6Data = row['columnIndex6'];
    let column8Data = row['columnIndex8'];

    //判斷條件滿足情況下,返回對應的rowspan和colspan數據
    if(
      (column1Data&&column1Data.columnIndex==columnIndex) ||      //姓名組合并
      (column6Data&&column6Data.columnIndex==columnIndex) ||      //總分組合并
      column8Data&&column8Data.columnIndex==columnIndex           //滿分總分組合并
    ){
      return {
        rowspan: column1Data.rowspan,
        colspan: column1Data.colspan
      }
    }
    //if end
  }
比如執行span-method方法時,此時獲取row數據中columnIndex1,columnIndex1中的columnIndex值為1,與span-method方法中columnIndex進行對比。
1、此時每行中列1都會被匹配到,列1行1返回{colspan: 1, rowspan: 5},則往下合并5個單元格;
2、列1行2返回{colspan: 0, rowspan: 0},則單元格不渲染,否則此行多一個單元格會錯位;
3、列1行3,列1行4...... 同理。
列6(總分)、列8(滿分總分)同理,通過columnIndex6和columnIndex8進行判斷,進行單元格合并。
以上代碼添加后,發現表格并無任何變化,這是因為重構數據函數中,還未添加對應的columnIndex1、columnIndex6、columnIndex8字段。
首先,我們來合并(姓名)這列數據,將每行數據中添加columnIndex1,子屬性變量columnIndex表示合并對應的列位置。
subject有子項數據除第一行數據,后面所有rowspan和colspan為0,第1個單元往下合并后,會填充其他行空缺位置。
subject無子項數據rowspan和colspan為1,保留原位置渲染。如為0則當前單元格不被渲染,表格會錯亂。
代碼如下:
export const reconstructionStuData = data => {
  if(!Array.isArray(data)) return [];

  let tmpData = [];
  data.forEach((item, i) => {
    //有二級數據的進行處理
    if(Array.isArray(item.subject)&&item.subject.length>0){
      //循環成績
      item.subject.forEach((sub, j) => {
        let subData = {};
        if(j==0){
          //子項第一行數據,和姓名信息同行
          subData = Object.assign({ columnIndex1: { columnIndex: 1, rowspan: item.subject.length, colspan: 1 } }, item, sub);
        }
        //其他行數據無須添加 姓名字段信息(第一行數據會合并到結束位置,填充后也會被覆蓋)
        else{
          subData = Object.assign({ columnIndex1: { columnIndex: 1, rowspan: 0, colspan: 0 } }, sub);
        }
        //if end
        tmpData.push( subData );
      });
    }
    //無子項數據,保留當前位置輸出
    else{
      tmpData.push(
        Object.assign({ columnIndex1: { columnIndex: 1, rowspan: 1, colspan: 1 } }, item)
      );
    }
  });

  return tmpData;
}
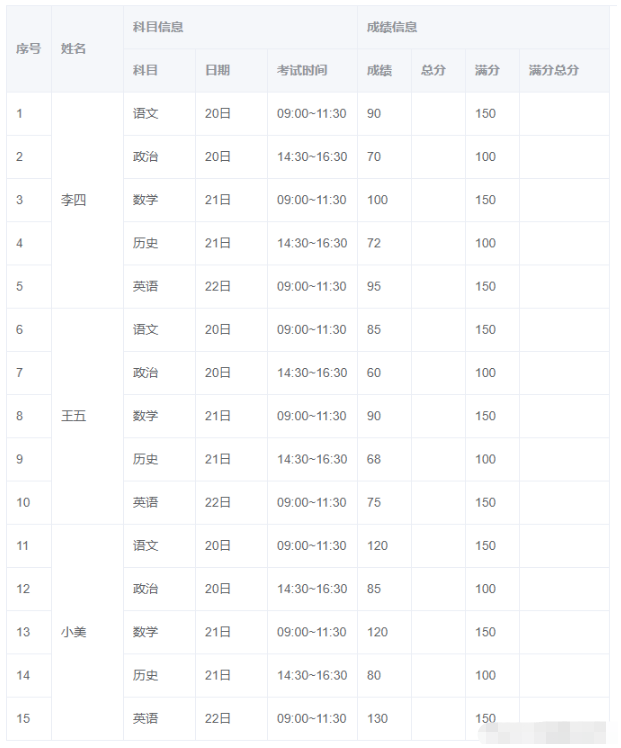
此時大家看到表格的(姓名)列,已合并到對應長度,效果圖如下:
總分和滿分總分合并部分,和(姓名)列同理,但多出一步則需計算出對應科目的總分 和 所有科目的滿分總分。
增加第6列和第8列合并數據columnIndex6和columnIndex8,并新增scoreTotal和totalAll分別保存總分和滿分總分結果。
代碼如下:
export const reconstructionStuData = data => {
  if(!Array.isArray(data)) return [];

  let tmpData = [];
  data.forEach((item, i) => {
    //有二級數據的進行處理
    if(Array.isArray(item.subject)&&item.subject.length>0){
      //循環成績
      item.subject.forEach((sub, j) => {
        let subData = {};
        if(j==0){
          //子項第一行數據,和姓名信息同行
          subData = Object.assign({ columnIndex1: { columnIndex: 1, rowspan: item.subject.length, colspan: 1 } }, item, sub);

          //計算總分
          subData['scoreTotal'] = item.subject.reduce((total, value) => {
            return total + value.score;
          }, 0);
          subData['columnIndex6'] = { columnIndex: 6, rowspan: item.subject.length, colspan: 1 };
          //計算滿分總分
          subData['totalAll'] = item.subject.reduce((total, value) => {
            return total + value.total;
          }, 0);
          subData['columnIndex8'] = { columnIndex: 8, rowspan: item.subject.length, colspan: 1 };
        }
        //其他行數據無須添加 姓名字段信息(第一行數據會合并到結束位置,填充后也會被覆蓋)
        else{
          subData = Object.assign({ columnIndex1: { columnIndex: 1, rowspan: 0, colspan: 0 } }, sub);

          //總分和滿分總分 被合并部分單元格填寫為0
          subData['columnIndex6'] = { columnIndex: 6, rowspan: 0, colspan: 0 };
          subData['columnIndex8'] = { columnIndex: 8, rowspan: 0, colspan: 0 };
        }
        //if end
        tmpData.push( subData );
      });
    }
    //無子項數據,保留當前位置輸出
    else{
      tmpData.push(
        Object.assign({ columnIndex1: { columnIndex: 1, rowspan: 1, colspan: 1 } }, item)
      );
    }
  });

  return tmpData;
}
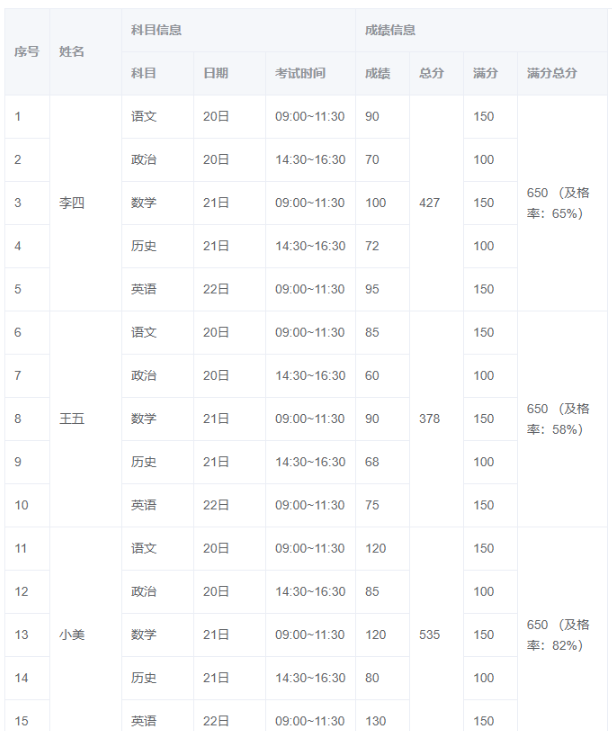
此時,咱們需要的表格就被渲染出來了,如下圖:
這里reconstructionStuData()函數處理能力還是相對不足,只能處理特定的表格合并。
到此,關于“Element如何實現復雜table表格結構”的學習就結束了,希望能夠解決大家的疑惑。理論與實踐的搭配能更好的幫助大家學習,快去試試吧!若想繼續學習更多相關知識,請繼續關注億速云網站,小編會繼續努力為大家帶來更多實用的文章!
免責聲明:本站發布的內容(圖片、視頻和文字)以原創、轉載和分享為主,文章觀點不代表本網站立場,如果涉及侵權請聯系站長郵箱:is@yisu.com進行舉報,并提供相關證據,一經查實,將立刻刪除涉嫌侵權內容。