您好,登錄后才能下訂單哦!
您好,登錄后才能下訂單哦!
這篇文章主要介紹了vue如何實現列表固定列滾動的相關知識,內容詳細易懂,操作簡單快捷,具有一定借鑒價值,相信大家閱讀完這篇vue如何實現列表固定列滾動文章都會有所收獲,下面我們一起來看看吧。
在移動端開發中,會用到列表作為信息展示方式,一般希望上下滾動時,可以固定表頭,左右滾動時,可以固定最左列。
1、列表可以使用數組循環遍歷;
2、上下滾動時,可以固定表頭在最頂端顯示;
3、左右滾動時,可以固定左邊一列或多列可以固定顯示;
4、列表的列寬允許在數組中設置;
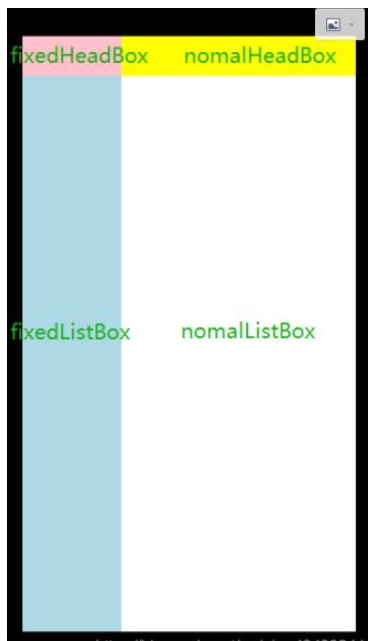
1、頁面使用四個bom元素分別存儲四種元素:
1)固定在左上角,完全不參與滾動表頭元素;
2)固定在頂部,只允許左右滾動表頭元素;
3)固定在左側,只允許上下滾動列元素;
4)右下角,左右上下均可隨意滾動列元素;
2、表頭數組與列表數據數組之間互相聯系,表頭屬性可以控制列表列排序、列表寬度、是否為固定列等;
3、四個dom之間增加聯動,使用@scroll、scrollLeft、scrollTop;

<!-- 寬度增加動態設置 -->
<div class="box">
  <div class="table-box">
    <div class="fixedHeadBox"
      :></div>
    <div class="nomalHeadBox"

    ></div>
    <div class="fixedListBox"
      :></div>
      <div class="nomalListBox"
        :
      ></div>
    </div>
  </div>
</div>
export default {
  data() {
    return {
      fixedWid: ''
    };
  }
}
.box {
width: 100vw; height: 100vh;
box-sizing: border-box;
padding: 5vh 5vw;
background: #000;
}
$headHei: 40px;
.table-box {
width: 100%; height: 100%;
display: flex;
flex-wrap: wrap;
overflow: hidden;
.fixedHeadBox {
background: pink;
height: $headHei;
}
.nomalHeadBox {
background: yellow;
height: $headHei;
overflow: hidden;
}
.fixedListBox{
height: calc(100% - #{$headHei});
background: lightblue;
overflow: hidden;
}
.nomalListBox {
background: #fff;
height: calc(100% - #{$headHei});
overflow: auto;
}
}應用到v-for遍歷表頭、列表數據,并計算列表寬度:
<div class="fixedHeadBox" :>
  <ul>
    <li v-for="(item, index) in fixedHead" :key="index"
      :>
        {{item.name}}
    </li>
  </ul>
</div>
<div class="nomalHeadBox"
  :>
  <div ref="nomalHeadBox">
    <ul :>
      <li v-for="(item, index) in nomalHead"
        :key="index" :>
        {{item.name}}
      </li>
    </ul>
  </div>
</div>
<div class="fixedListBox" :>
  <div ref="fixedListBox">
    <ul v-for="(item, index) in list" :key="index" >
      <li v-for="(it, index) in fixedHead" :key="index"
        :>
        {{item[it.prop]}}
      </li>
    </ul>
  </div>
</div>
<div class="nomalListBox" ref="nomalListBox"
  :>
  <ul :
    v-for="(item, index) in list" :key="index">
    <li v-for="(it, index) in nomalHead" :key="index"
      :>
      {{item[it.prop]}}
    </li>
  </ul>
</div>
data() {
return {
tableHead: [
{ name: '', prop: 'a', width: '100px', isfixed: true },
{ name: '', prop: 'b', width: '80px' },
{ name: '', prop: 'c', width: '80px' },
{ name: '', prop: 'd', width: '100px' },
{ name: '', prop: 'e', width: '100px' },
{ name: '', prop: 'f', width: '100px' },
{ name: '', prop: 'g', width: '120px' }
],
list: [
{ a: '', b: '', c: '', d: '', e: '', f: '', g: '' }
],
fixedHead: [],
nomalHead: [],
fixedWid: '',
nomalWid: ''
};
},
mounted() {
this.initData();
},
methods: {
initData() {
this.fixedHead = this.tableHead.filter((item) => {
return item.isfixed
});
this.nomalHead = this.tableHead.filter((item) => {
return !item.isfixed
});
this.initSize();
},
initSize() {
let fwid = 0; let nwid = 0;
this.fixedHead.forEach((item) => {
// 此處以px單位為例
const len = item.width.length - 2;
const width = item.width.substring(0, len) - 0;
fwid += width;
});
this.nomalHead.forEach((item) => {
const len = item.width.length - 2;
const width = item.width.substring(0, len) - 0;
nwid += width;
});
this.fixedWid = fwid + 'px';
this.nomalWid = nwid + 'px';
}
}除左上角元素外,其余三個元素均有聯動滾動效果,增加滾動監聽事件@scroll。
<div class="nomalHeadBox"
    :>
    <div ref="nomalHeadBox" @scroll="scrollHList">
        ......
    </div>
</div>
<div class="fixedListBox" :>
    <div ref="fixedListBox" @scroll="scrollFList">
        ......
    </div>
</div>
<div class="nomalListBox" ref="nomalListBox"
    @scroll="scrollList"
    :>
    ......
</div>
methods: {
  scrollHList() {
    this.$refs.nomalListBox.scrollLeft =
      this.$refs.nomalHeadBox.scrollLeft;
  },
  scrollFList() {
    this.$refs.nomalListBox.scrollTop =
      this.$refs.fixedListBox.scrollTop;
  },
  scrollList() {
    this.$refs.fixedListBox.scrollTop =
      this.$refs.nomalListBox.scrollTop;
    this.$refs.nomalHeadBox.scrollLeft =
      this.$refs.nomalListBox.scrollLeft;
  }
}.nomalHeadBox {
>div {
overflow: auto;
height: calc(100% + 10px);
}
}
.fixedListBox{
>div {
overflow: auto;
height: 100%;
width: calc(100% + 10px);
}
}關于“vue如何實現列表固定列滾動”這篇文章的內容就介紹到這里,感謝各位的閱讀!相信大家對“vue如何實現列表固定列滾動”知識都有一定的了解,大家如果還想學習更多知識,歡迎關注億速云行業資訊頻道。
免責聲明:本站發布的內容(圖片、視頻和文字)以原創、轉載和分享為主,文章觀點不代表本網站立場,如果涉及侵權請聯系站長郵箱:is@yisu.com進行舉報,并提供相關證據,一經查實,將立刻刪除涉嫌侵權內容。