您好,登錄后才能下訂單哦!
您好,登錄后才能下訂單哦!
這篇“怎么用Three.js實現雪糕地球”文章的知識點大部分人都不太理解,所以小編給大家總結了以下內容,內容詳細,步驟清晰,具有一定的借鑒價值,希望大家閱讀完這篇文章能有所收獲,下面我們一起來看看這篇“怎么用Three.js實現雪糕地球”文章吧。
style
* {
    -webkit-user-select: none;
       -moz-user-select: none;
        -ms-user-select: none;
            user-select: none;
  }
  body {
    height: 100vh;
    background-color: hotpink;
    margin: 0;
    padding: 0;
    overflow: hidden;
  }
  .loader {
    display: flex;
    color: white;
    display: flex;
    justify-content: center;
    align-items: center;
    font-size: 5em;
    width: 100%;
    height: 100%;
    font-family: "Baloo Bhaijaan", cursive;
  }
  .loader span {
    text-shadow: 0 1px #bbb, 0 2px #bbb, 0 3px #bbb, 0 4px #bbb, 0 5px #bbb,
      0 6px transparent, 0 7px transparent, 0 8px transparent,
      0 9px transparent, 0 10px 10px rgba(0, 0, 0, 0.4);
    text-shadow: 0 1px #bbb, 0 2px #bbb, 0 3px #bbb, 0 4px #bbb,
        0 5px #bbb, 0 6px #bbb, 0 7px #bbb, 0 8px #bbb, 0 9px #bbb,
        0 50px 25px rgba(0, 0, 0, 0.2);
      transform: translateY(-20px);
  }
script
/*
 * 基礎配置
 */
let isLoaded = false; // 紋理資源是否加載完畢
const loadingScreen = {
  scene: new THREE.Scene(),
  camera: new THREE.PerspectiveCamera(
    75,
    window.innerWidth / window.innerHeight,
    0.1,
    1000
  ),
  // 移除加載標志的函數
  removeText() {
    const loadingText = document.querySelector("#canvas-loader");
    if (loadingText.parentNode) {
      loadingText.parentNode.removeChild(loadingText);
    }
  },
};
// 初始化加載器
let loadingManager = new THREE.LoadingManager();
// 監聽加載器 onLoad 事件
loadingManager.onLoad = () => {
  loadingScreen.removeText();
  isLoaded = true;
};
// 創建場景
const scene = new THREE.Scene();
// 創建渲染器
const renderer = new THREE.WebGLRenderer({ antialias: true });
// 渲染器基本設置
renderer.setClearColor("hotpink");
renderer.setPixelRatio(window.devicePixelRatio);
renderer.setSize(window.innerWidth, window.innerHeight);
// canvas 外部容器
const canvasWrapper = document.querySelector("#canvas-wrapper");
// 創建透視相機
const camera = new THREE.PerspectiveCamera(
  75,
  window.innerWidth / window.innerHeight,
  0.1,
  1000
);
// 設置相機位置
camera.position.set(0, 0, 220);
// 創建平行光源
const light = new THREE.DirectionalLight();
light.position.set(0, 0, 1);
scene.add(light);
// 創建點光源
const point = new THREE.PointLight(0xeeeeee);
point.position.set(400, 200, 300); //點光源位置
scene.add(point); //點光源添加到場景中
// 創建球體
const cRadius = 100;
const geometry = new THREE.SphereBufferGeometry(
  cRadius,
  cRadius * 6.4,
  cRadius * 6.4
);
// 紋理圖
const textureLoader = new THREE.TextureLoader(loadingManager);
const textureSurface = textureLoader.load(
  "https://s3-us-west-2.amazonaws.com/s.cdpn.io/249663/world-surface.jpg"
);
const textureElevation = textureLoader.load(
  "https://s3-us-west-2.amazonaws.com/s.cdpn.io/249663/world-elevation.jpg"
);
const textureSpecular = textureLoader.load(
  "https://s3-us-west-2.amazonaws.com/s.cdpn.io/249663/world-specular.jpg"
);
// 材質信息
const materialOpt = {
  map: textureSurface,
  normalMap: textureElevation,
  specularMap: textureSpecular,
  shininess: 80,
};
const material = new THREE.MeshPhongMaterial(materialOpt);
// 創建網格體
const sphere = new THREE.Mesh(geometry, material);
// 設置環境貼圖的顏色深淺
sphere.material.normalScale.set(0.5, 0.5);
// 將模型添加到場景中
scene.add(sphere);
// 將 canvas 元素添加到頁面中
canvasWrapper.appendChild(renderer.domElement);
/*
 * 事件監聽實現動效
 */
let mouseX = 0;
let mouseY = 0;
const moveAnimate = {
  coordinates(clientX, clientY) {
    const limit = 270;
    const limitNeg = limit * -1;
    mouseX = clientX - window.innerWidth / 2;
    mouseY = clientY - window.innerHeight / 2;
    mouseX = mouseX >= limit ? limit : mouseX;
    mouseX = mouseX <= limitNeg ? limitNeg : mouseX;
    mouseY = mouseY >= limit ? limit : mouseY;
    mouseY = mouseY <= limitNeg ? limitNeg : mouseY;
  },
  onMouseMove(e) {
    moveAnimate.coordinates(e.clientX, e.clientY);
  },
  onTouchMove(e) {
    const touchX = e.changedTouches[0].clientX;
    const touchY = e.changedTouches[0].clientY;
    moveAnimate.coordinates(touchX, touchY);
  },
};
document.addEventListener("mousemove", moveAnimate.onMouseMove);
document.addEventListener("touchmove", moveAnimate.onTouchMove);
const onWindowResize = () => {
  const w = window.innerWidth;
  const h = window.innerHeight;
  camera.aspect = w / h;
  camera.updateProjectionMatrix();
  renderer.setSize(w, h);
};
window.addEventListener("resize", onWindowResize);
const createAnimRotation = () => {
  const speed = 0.005;
  sphere.rotation.z += speed / 2;
  sphere.rotation.y += speed;
};
// 渲染函數
const render = () => {
  if (!isLoaded) {
    renderer.render(loadingScreen.scene, loadingScreen.camera);
    requestAnimationFrame(render);
    return;
  }
  camera.position.x += (mouseX * -1 - camera.position.x) * 0.05;
  camera.position.y += (mouseY - camera.position.y) * 0.05;
  camera.lookAt(scene.position);
  createAnimRotation();
  renderer.render(scene, camera);
  requestAnimationFrame(render);
};
render();
在線體驗(支持PC與移動端): 雪糕地球線上預覽
源碼倉庫: 雪糕地球
Three.js 是一款運行在瀏覽器中的 3D 引擎,你可以用它創建各種三維場景,包括了攝影機、光影、材質等各種對象,大家或多或少應該都見識過 Three 的傳說。這是小包第一次使用 Three,因此小包會圍繞雪糕地球實現的各種細節講起。
下面首先來看一下 Three 框架的基本組成要素
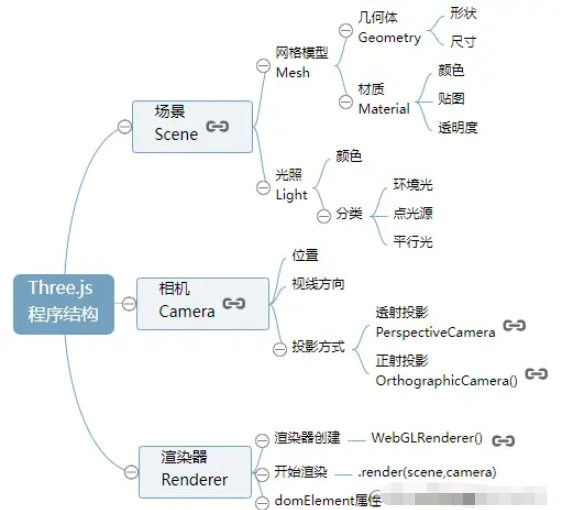
Three 中最重要的三個對象即場景、相機和渲染器。場景即放置模型、光照的場地;相機設置以何種方式何種角度來觀看場景,渲染器將效果渲染到網頁中。這三個概念都不難理解,下面我們用代碼實現這三個對象。
// 場景
const scene = new THREE.Scene();
// 透視相機
const camera = new THREE.PerspectiveCamera(
  75,
  window.innerWidth / window.innerHeight,
  0.1,
  1000
);
// 渲染器
const renderer = new THREE.WebGLRenderer();
// 設置渲染區域尺寸
renderer.setSize(window.innerWidth, window.innerHeight);
// body元素中插入canvas對象
document.body.appendChild(renderer.domElement);
// 設置背景顏色
renderer.setClearColor("hotpink");
// 執行渲染操作   指定場景、相機作為參數
renderer.render(scene, camera);
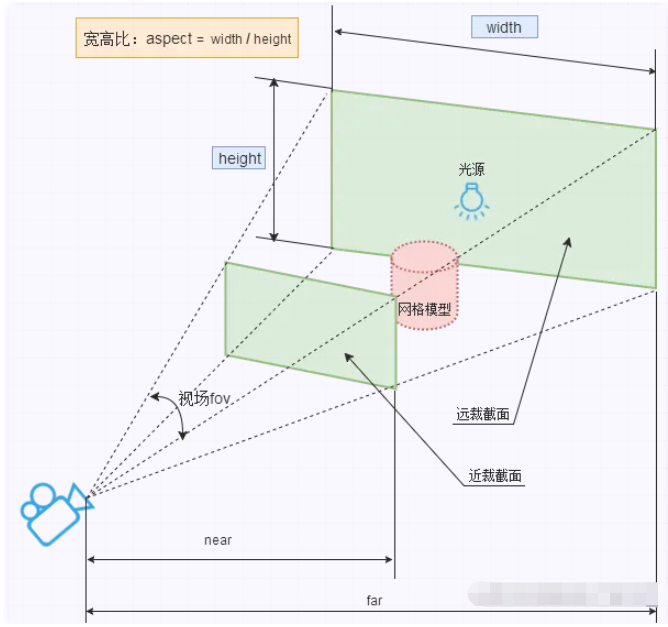
Three 中有多種相機,本文章主要使用透視相機(PerspectiveCamera),其原理與人眼所看的景象類似,共有四個參數:
PerspectiveCamera( fov : Number, aspect : Number, near : Number, far : Number )
fov: 表示能看到的角度范圍,值為角度,類似于人的視角。
aspect: 表示渲染窗口的長寬比,如果網頁中只有一個 canvas,其值通常設置為網頁視口的寬高比
near/far: near/far 分別代表攝像機的近剪切面和遠剪切面
文字有些難以理解,可以參考一下下圖:
打開瀏覽器,看一下會渲染出什么?目前只能看到全粉色的網頁,這是因為目前的場景中并沒有添加 3D 模型對象。
接下來我們來添加一個球體模型,作為地球的基底。
const cRadius = 100;
const geometry = new THREE.SphereBufferGeometry(
  cRadius,
  cRadius * 6.4,
  cRadius * 6.4
);
SphereBufferGeometry 是 Three 中實現球體的 API,參數非常多,這里只介紹前三個參數
radius: 球體半徑
widthSegments: 沿經線方向分段數
heightSegments: 沿緯線方向分段數
為球體添加材質 Material,目前我們只添加一個顏色屬性。
// 材質對象Material
const material = new THREE.MeshLambertMaterial({
  color: 0x0000ff,
});
渲染網格體 Mesh,并將其添加到場景 Scene 中。
// 網格體 Mesh,兩個參數分別為幾何體和材質
const sphere = new THREE.Mesh(geometry, material);
scene.add(sphere);
重新打開網站,并沒有看到球體,還是一片粉茫茫的寂寥,天理何在?

Three 相機的初始位置默認為 (0,0,0),相機焦點默認為 Z 軸負半軸方向,球體的半徑是 100,也就是說目前相機位于球體內部,因此我們需要調整相機位置。
// 設置相機的位置
camera.position.set(0, 0, 220);
// 設置相機焦點的方向
camera.lookAt(scene.position);
當當當當,網頁中就可以成功看到一個黑色球體了,額有點奇怪,我們明明設置的是 0x0000ff 顏色,怎么會顯示一個黑色模型?
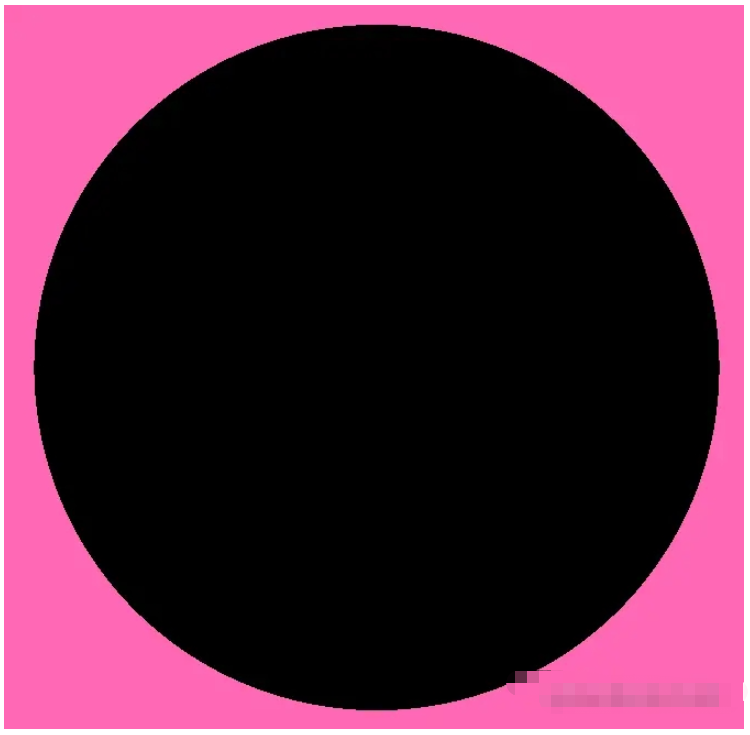
小包苦思冥想: 萬物本沒有顏色,顏色是光的反射。在整個場景中,目前是沒有光源的,因此下面分別添加平行光(DirectionalLight)和點光源(PointLight)
平行光是沿著特定方向發射的光,其表現類似無限遠的陽光,文章使用它來模擬太陽光。點光源是從一個點向各個方向發射的光源,使用它來增加整體的亮度。
// 聲明平行光
const light = new THREE.DirectionalLight();
// 設置平行光源位置
light.position.set(0, 0, 1);
// 將平行光源添加到場景中
scene.add(light);
// 聲明點光源
const point = new THREE.PointLight(0xeeeeee);
// 設置點光源位置
point.position.set(400, 200, 300);
// 點光源添加到場景中
scene.add(point);
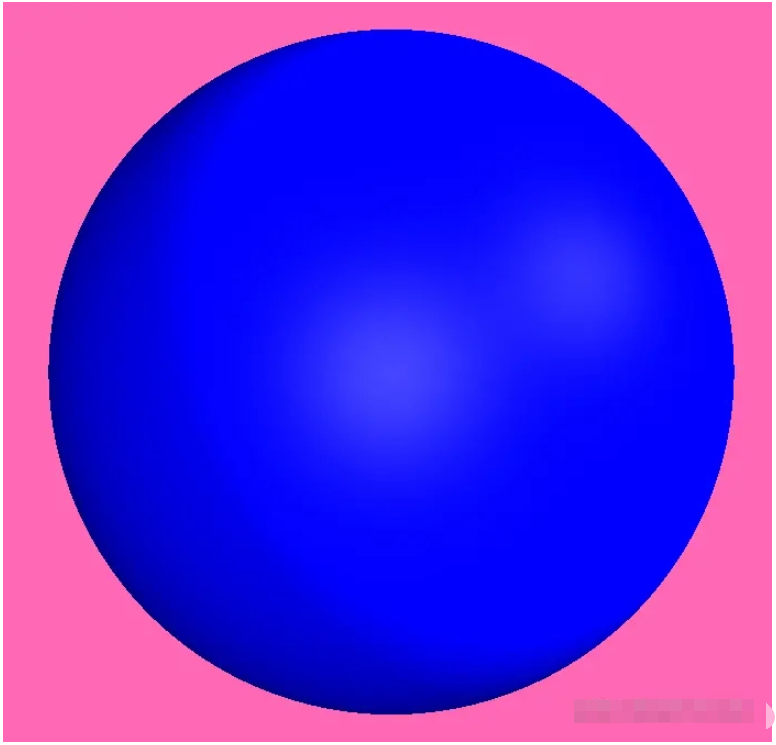
立體效果看起來不明顯,沒事,接下來我們讓球體動起來。接下來,給球體添加一個 z 軸和 y 軸的轉動。
const createAnimRotation = () => {
  const speed = 0.005;
  sphere.rotation.z += speed / 2;
  sphere.rotation.y += speed;
};
const render = () => {
  createAnimRotation();
  renderer.render(scene, camera);
  requestAnimationFrame(render);
};
render();
由于球體是對稱的,轉動看起來并不明顯,如果你特別想看到轉動效果,可以將 SphereBufferGeometry 暫時更換為 BoxBufferGeometry。
上文已經成功實現地球,接下來我們來為地球披上衣服。本文實現的是雪糕地球,因此小包直接為其披上雪糕外衣。
Three 可以將一張紋理圖映射到幾何體上,具體的映射原理我們不做探究,映射的思想可以參考下圖。
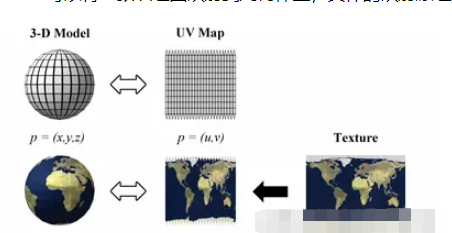
選取一張雪糕地球的紋理圖,使用下面的代碼實現紋理貼圖效果。
// 紋理加載器對象
const textureLoader = new THREE.TextureLoader();
const textureSurface = textureLoader.load(
  "https://s3-us-west-2.amazonaws.com/s.cdpn.io/249663/world-surface.jpg"
);
// 設置紋理貼圖
const material = new THREE.MeshLambertMaterial({ map: textureSurface });只使用普通貼圖的雪糕地球看起來已經非常不錯了,但還有進一步美化的空間,Three 提供了高光貼圖,使用高光貼圖,會有高亮部分顯示。
const textureSpecular = textureLoader.load(
  "https://s3-us-west-2.amazonaws.com/s.cdpn.io/249663/world-specular.jpg"
);
const material = new THREE.MeshPhongMaterial({
  map: textureSurface,
  specularMap: textureSpecular,
  shininess: 80, // 高光部分的亮度
});
雖然動圖錄制的幀數太低,還是依稀可以看到一些高亮區域。
Three 還提供了環境貼圖,環境貼圖可以增加表面的細節,使三維模型更加立體。
const textureElevation = textureLoader.load(
  "https://s3-us-west-2.amazonaws.com/s.cdpn.io/249663/world-elevation.jpg"
);
const material = new THREE.MeshPhongMaterial({
  map: textureSurface,
  normalMap: textureElevation,
  specularMap: textureSpecular,
  shininess: 80,
});
立體效果是有了,但是具體看起來一言難盡,顏色有些許暗淡,不符合雪糕的風格。
小包繼續開始查看文檔,環境貼圖中有 normalScale 屬性,可以設置顏色的深淺程度,減少對應屬性值為 0.5,0.5。
sphere.material.normalScale.set(0.5, 0.5);
給地球加一些交互效果:
當鼠標靠近,地球放大;鼠標遠離時,地球縮小
地球隨鼠標方向轉動
上述動效我們可以通過移動相機位置實現。首先設定地球旋轉的最大正負角度為 270。
// 定義動效對象
let mouseX = 0;
let mouseY = 0;
const moveAnimate = {
  coordinates(clientX, clientY) {
    const limit = 270;
    const limitNeg = limit * -1;
    mouseX = clientX - window.innerWidth / 2;
    mouseY = clientY - window.innerHeight / 2;
    mouseX = mouseX >= limit ? limit : mouseX;
    mouseX = mouseX <= limitNeg ? limitNeg : mouseX;
    mouseY = mouseY >= limit ? limit : mouseY;
    mouseY = mouseY <= limitNeg ? limitNeg : mouseY;
  },
  onMouseMove(e) {
    moveAnimate.coordinates(e.clientX, e.clientY);
  },
};
document.addEventListener("mousemove", moveAnimate.onMouseMove);
通過上述事件計算出 mouseX 與 mouseY 的值,在 render 函數中,修改 camera 的位置。
camera.position.x += (mouseX * -1 - camera.position.x) * 0.05;
camera.position.y += (mouseY - camera.position.y) * 0.05;
camera.lookAt(scene.position);
移動端同步監聽 touchmove 事件,手機也可以看到雪糕地球的動態效果。
const moveAnimate = {
  onTouchMove(e) {
    const touchX = e.changedTouches[0].clientX;
    const touchY = e.changedTouches[0].clientY;
    moveAnimate.coordinates(touchX, touchY);
  },
};
document.addEventListener("touchmove", moveAnimate.onTouchMove);紋理的加載需要一定的時間,因此添加一個轉場 loading 效果。
loading 效果使用小包前面的實現躍動的文字中的效果。
.loader {
  display: flex;
  color: white;
  display: flex;
  justify-content: center;
  align-items: center;
  font-size: 5em;
  width: 100%;
  height: 100%;
  font-family: "Baloo Bhaijaan", cursive;
}
.loader span {
  text-shadow: 0 1px #bbb, 0 2px #bbb, 0 3px #bbb, 0 4px #bbb, 0 5px #bbb, 0 6px
      transparent, 0 7px transparent, 0 8px transparent, 0 9px transparent, 0
      10px 10px rgba(0, 0, 0, 0.4);
  text-shadow: 0 1px #bbb, 0 2px #bbb, 0 3px #bbb, 0 4px #bbb, 0 5px #bbb, 0 6px
      #bbb, 0 7px #bbb, 0 8px #bbb, 0 9px #bbb, 0 50px 25px rgba(0, 0, 0, 0.2);
  transform: translateY(-20px);
}
Three 提供了 LoadingManager,其功能是處理并跟蹤已加載和待處理的數據。當所有加載器加載完成后,會調用 LoadingManager 上的 onLoad 事件。
因此我們定義一個 LoadingManager,當觸發 onLoad 事件后,將頁面中的加載標志移除。
const loadingScreen = {
  scene: new THREE.Scene(),
  camera: new THREE.PerspectiveCamera(
    75,
    window.innerWidth / window.innerHeight,
    0.1,
    1000
  ),
  // 移除加載標志的函數
  removeText() {
    const loadingText = document.querySelector("#canvas-loader");
    if (loadingText.parentNode) {
      loadingText.parentNode.removeChild(loadingText);
    }
  },
};
// 初始化加載器
let loadingManager = new THREE.LoadingManager();
// 監聽加載器 onLoad 事件
loadingManager.onLoad = () => {
  loadingScreen.removeText();
  isLoaded = true;
};
// 紋理圖加載器傳入 loadingManager
const textureLoader = new THREE.TextureLoader(loadingManager);
以上就是關于“怎么用Three.js實現雪糕地球”這篇文章的內容,相信大家都有了一定的了解,希望小編分享的內容對大家有幫助,若想了解更多相關的知識內容,請關注億速云行業資訊頻道。
免責聲明:本站發布的內容(圖片、視頻和文字)以原創、轉載和分享為主,文章觀點不代表本網站立場,如果涉及侵權請聯系站長郵箱:is@yisu.com進行舉報,并提供相關證據,一經查實,將立刻刪除涉嫌侵權內容。