溫馨提示×
您好,登錄后才能下訂單哦!
點擊 登錄注冊 即表示同意《億速云用戶服務條款》
您好,登錄后才能下訂單哦!
本篇內容主要講解“Java如何實現簡單GUI登錄和注冊界面”,感興趣的朋友不妨來看看。本文介紹的方法操作簡單快捷,實用性強。下面就讓小編來帶大家學習“Java如何實現簡單GUI登錄和注冊界面”吧!
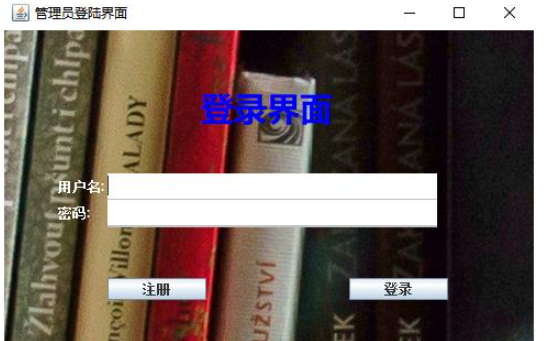
先看效果圖:
登陸界面:

注冊界面:

實現代碼如下:
package cn.bms.view;

import java.awt.Color;
import java.awt.Dimension;
import java.awt.Font;
import java.awt.event.ActionEvent;
import java.awt.event.ActionListener;

import javax.swing.ImageIcon;
import javax.swing.JButton;
import javax.swing.JFrame;
import javax.swing.JLabel;
import javax.swing.JPanel;
import javax.swing.JTextField;
import javax.swing.border.MatteBorder;

import cn.bms.tools.GUITools;

/*
 * 登錄窗口
 */
@SuppressWarnings("serial")
public class AdminLogin extends JFrame {
    private JPanel contentPanel = new JPanel();
    // Label標簽存放背景圖片
    private JLabel label;
    // 設置按鈕組件
    private JButton login = new JButton("登錄"), register = new JButton("注冊");

    private JLabel jlb1 = new JLabel("用戶名:"), jlb2 = new JLabel("密碼:"), jlbtitle = new JLabel("登錄界面");
    // 設置文本框組件
    private JTextField admin = new JTextField(), password = new JTextField();

    public AdminLogin() {
        this.init();
        this.addListener();
    }

    private void init() {
        this.setTitle("管理員登陸界面");
        this.setSize(500, 350);
        GUITools.center(this);
        ImageIcon image1 = new ImageIcon("837878.jpg"); // 界面背景圖片
        JLabel backLabel = new JLabel();
        backLabel.setIcon(image1);
        label = new JLabel(image1);
        label.setBounds(0, 0, 1000, 400);
        // 在LayeredPane最底層上添加兩個帶圖片的標簽,并且label2在label上方
        this.getLayeredPane().add(label, new Integer(Integer.MIN_VALUE));
        // 將內容面板設置為透明,就能夠看見添加在LayeredPane上的背景。
        ((JPanel) this.getContentPane()).setOpaque(false);

        /*
         * 添加組件到contentPanel容器中 布局方式為自由布局。
         */
        contentPanel.setLayout(null);
        add(admin);
        add(password);
        add(login);
        add(register);
        add(jlb1);
        add(jlb2);
        add(jlbtitle);

        /*
         * 組件絕對位置
         */
        jlb1.setBounds(50, 130, 90, 25);
        jlb1.setForeground(Color.WHITE);
        admin.setBounds(95, 130, 300, 25);
        password.setBounds(95, 154, 300, 25);
        jlb2.setBounds(50, 154, 90, 25);
        jlb2.setForeground(Color.WHITE);
        register.setBounds(95, 225, 90, 20);
        login.setBounds(315, 225, 90, 20);
        jlbtitle.setBounds(180, 45, 200, 50);
        Font f = new Font("微軟雅黑", Font.BOLD, 30);
        jlbtitle.setFont(f);
        jlbtitle.setForeground(Color.BLUE);

        /*
         * 組件透明化
         */
        admin.setOpaque(true);
        password.setOpaque(true);
        contentPanel.setOpaque(false);
        getContentPane().add(contentPanel);

        /*
         * 組件邊框顏色
         */
        textSet(admin);
        textSet(password);
    }

    /*
     * JTextField文本框設置方法.
     */
    private void textSet(JTextField field) {
        field.setBackground(new Color(255, 255, 255));
        field.setPreferredSize(new Dimension(150, 28));
        MatteBorder border = new MatteBorder(0, 0, 2, 0, new Color(192, 192, 192));
        field.setBorder(border);
    }

    /*
     * 事件監聽
     */
    private void addListener() {
        login.addActionListener(new ActionListener() {
            @Override
            public void actionPerformed(ActionEvent e) {
                forLogin(admin.getText(), password.getText());
            }

        });
        register.addActionListener(new ActionListener() {
            @Override
            public void actionPerformed(ActionEvent e) {
                forRegister();
            }

        });
    }

    // 登錄方法
    public void forLogin(String admin, String pwd) {
    }

    // 注冊方法
    public void forRegister() {
    }
}package cn.bms.view;
import java.awt.Color;
import java.awt.Dimension;
import java.awt.Font;
import java.awt.event.ActionEvent;
import java.awt.event.ActionListener;
import javax.swing.ImageIcon;
import javax.swing.JButton;
import javax.swing.JFrame;
import javax.swing.JLabel;
import javax.swing.JPanel;
import javax.swing.JTextField;
import javax.swing.border.MatteBorder;
import cn.bms.controller.AdminLoginController;
import cn.bms.tools.GUITools;
/*
* 注冊窗口
*/
@SuppressWarnings("serial")
public class AdminRegister extends JFrame {
private JPanel contentPanel = new JPanel();
// Label標簽存放背景圖片
private JLabel label;
// 設置按鈕組件
private JButton ok = new JButton("確定注冊"), back = new JButton("返回登錄");
private JLabel jlb1 = new JLabel("用戶名:"), jlb2 = new JLabel("密碼:"), jlb3 = new JLabel("確認密碼:"),
jlbtitle = new JLabel("注冊界面");
// 設置文本框組件
private JTextField admin = new JTextField(), password1 = new JTextField(), password2 = new JTextField();
public AdminRegister() {
this.init();
this.addListener();
}
private void init() {
this.setTitle("管理員注冊界面");
this.setSize(500, 350);
GUITools.center(this);
ImageIcon image1 = new ImageIcon("837878.jpg"); // 界面背景圖片
JLabel backLabel = new JLabel();
backLabel.setIcon(image1);
label = new JLabel(image1);
label.setBounds(0, 0, 1000, 400);
// 在LayeredPane最底層上添加兩個帶圖片的標簽,并且label2在label上方
this.getLayeredPane().add(label, new Integer(Integer.MIN_VALUE));
// 將內容面板設置為透明,就能夠看見添加在LayeredPane上的背景。
((JPanel) this.getContentPane()).setOpaque(false);
/*
* 添加組件到contentPanel容器中 布局方式為自由布局。
*/
contentPanel.setLayout(null);
add(admin);
add(password1);
add(password2);
add(ok);
add(back);
add(jlb1);
add(jlb2);
add(jlb3);
add(jlbtitle);
/*
* 組件絕對位置
*/
jlb1.setBounds(40, 130, 90, 25);
jlb1.setForeground(Color.WHITE);
admin.setBounds(95, 130, 300, 25);
password1.setBounds(95, 154, 300, 25);
jlb2.setBounds(40, 154, 90, 25);
jlb2.setForeground(Color.WHITE);
password2.setBounds(95, 178, 300, 25);
jlb3.setBounds(40, 178, 90, 25);
jlb3.setForeground(Color.WHITE);
ok.setBounds(315, 225, 90, 20);
back.setBounds(95, 225, 90, 20);
jlbtitle.setBounds(180, 45, 200, 50);
Font f = new Font("微軟雅黑", Font.BOLD, 30);
jlbtitle.setFont(f);
jlbtitle.setForeground(Color.BLUE);
/*
* 組件透明化
*/
admin.setOpaque(true);
password1.setOpaque(true);
password2.setOpaque(true);
contentPanel.setOpaque(false);
getContentPane().add(contentPanel);
/*
* 組件邊框顏色
*/
textSet(admin);
textSet(password1);
textSet(password2);
}
/*
* JTextField文本框設置方法.
*/
private void textSet(JTextField field) {
field.setBackground(new Color(255, 255, 255));
field.setPreferredSize(new Dimension(150, 28));
MatteBorder border = new MatteBorder(0, 0, 2, 0, new Color(192, 192, 192));
field.setBorder(border);
}
/*
* 事件監聽
*/
private void addListener() {
ok.addActionListener(new ActionListener() {
@Override
public void actionPerformed(ActionEvent e) {
setRegister(admin.getText(), password1.getText(), password2.getText());
}
});
back.addActionListener(new ActionListener() {
@Override
public void actionPerformed(ActionEvent e) {
new AdminLoginController().setVisible(true);
}
});
}
// 實現注冊賬戶方法
public void setRegister(String admin, String pwd1, String pwd2) {
}
}到此,相信大家對“Java如何實現簡單GUI登錄和注冊界面”有了更深的了解,不妨來實際操作一番吧!這里是億速云網站,更多相關內容可以進入相關頻道進行查詢,關注我們,繼續學習!
免責聲明:本站發布的內容(圖片、視頻和文字)以原創、轉載和分享為主,文章觀點不代表本網站立場,如果涉及侵權請聯系站長郵箱:is@yisu.com進行舉報,并提供相關證據,一經查實,將立刻刪除涉嫌侵權內容。