您好,登錄后才能下訂單哦!
您好,登錄后才能下訂單哦!
這篇文章將為大家詳細講解有關Android開發如何實現NFC刷卡讀取,小編覺得挺實用的,因此分享給大家做個參考,希望大家閱讀完這篇文章后可以有所收獲。
①:Manifest注冊方式:這種方式主要是在Manifest文件對應的activity下,配置過濾器,以響應不同類型NFC Action。使用這種方式,在刷卡時,如果手機中有多個應用都存在該NFC實現方案,系統會彈出能響應NFC事件的應用列表供用戶選擇,用戶需要點擊目標應用來響應本次NFC刷卡事件。目前我公司這邊項目中使用了該邏輯,比較簡便,這里先貼一下該方式的實現邏輯。
Manifest配置:
<!--權限要加,這是一個普通權限,不需要動態申請,但是在小米手機里需要動態申請-->
     <uses-permission android:name="android.permission.NFC" />

     <uses-feature
        android:name="android.hardware.nfc"
        android:required="false" />

     <application>
        ...
        <activity
            android:name=".NfcActivity"
            android:launchMode="singleTask"
            android:screenOrientation="portrait"
            android:theme="@android:style/Theme.Translucent">
            <!--透明主題,把刷卡變成一個無感知的過程-->
            <intent-filter>
                <action android:name="android.nfc.action.NDEF_DISCOVERED" />
            </intent-filter>
            <intent-filter>
                <action android:name="android.nfc.action.TAG_DISCOVERED" />

                <category android:name="android.intent.category.DEFAULT" />
            </intent-filter>
            <intent-filter>
                <action android:name="android.nfc.action.TECH_DISCOVERED" />
                <!--使用這個過濾器 這里其實還要用 meta-data 配置一下標簽過濾,-->
                <!--我項目中是 NDEF_DISCOVERED 這個TECH_DISCOVERED形同虛設-->
            </intent-filter>
            <meta-data
                android:name="android.nfc.action.TECH_DISCOVERED"
                android:resource="@xml/nfc_tech" />
        </activity>
</application>
nfc_tech.xml:這個文件就是TECH_DISCOVERED需要配置的,其中,tech-list之間是邏輯或關系,tech之間是邏輯與關系,與方案②中的techLists原理以及用途是類似的。
<?xml version="1.0" encoding="utf-8"?>
<resources xmlns:android="http://schemas.android.com/apk/res/android">

    <tech-list>
        <tech>android.nfc.tech.Ndef</tech>
        <tech>android.nfc.tech.NfcA</tech>
    </tech-list>

    <tech-list>
        <tech>android.nfc.tech.NfcB</tech>
    </tech-list>
    <tech-list>
        <tech>android.nfc.tech.NfcF</tech>
    </tech-list>
</resources>
NfcActivity:
public class NfcActivity extends Activity {

    @Override
    protected void onCreate(@Nullable Bundle savedInstanceState) {
        super.onCreate(savedInstanceState);
        setContentView(R.layout.activity_nfc);
        initData();
    }

    /**
     * 初始化數據
     */
    private void initData() {
        NfcAdapter adapter = NfcAdapter.getDefaultAdapter(this);
        if (null == adapter) {
            Toast.makeText(this, "不支持NFC功能", Toast.LENGTH_SHORT).show();
        } else if (!adapter.isEnabled()) {
            Intent intent = new Intent(Settings.ACTION_NFC_SETTINGS);
            // 根據包名打開對應的設置界面
            startActivity(intent);
        }

        //我項目中是拿了NFC卡的tag中的id數據,這根據具體情況來;
        // 可以在NfcAdapter源碼中查看,具體能拿到哪些數據
        Tag tag = getIntent().getParcelableExtra(NfcAdapter.EXTRA_TAG);
        String id = bytesToHex(tag.getId());

        //TODO 目前我這邊項目中,拿到數據后,通過EventBus分發到對應的activity,當然也能使用其他分發響應方式,

        //關閉動畫,畢竟對用戶來說,刷卡應當是一個無感知的過程
        overridePendingTransition(0, 0);
        finish();
    }

    @Override
    protected void onNewIntent(Intent intent) {
        super.onNewIntent(intent);
        initData();
    }

    /**
     *  2轉10
     * @param src
     * @return
     */
    private static String bytesToTenNum(byte[] src) {
        StringBuilder stringBuilder = new StringBuilder();
        if (src == null || src.length <= 0) {
            return null;
        }
        char[] buffer = new char[2];
        for (int i = 0; i < src.length; i++) {
            buffer[1] = Character.toUpperCase(Character.forDigit(
                    (src[i] >>> 4) & 0x0F, 16));
            buffer[0] = Character.toUpperCase(Character.forDigit(src[i] & 0x0F,
                    16));
            stringBuilder.append(buffer);
        }
        stringBuilder.reverse();
        BigInteger bigi = new BigInteger(stringBuilder.toString(), 16);
        return bigi.toString();
    }

    /**
     * 2轉16
     * @param src
     * @return
     */
    private static String bytesToHex(byte[] src){
        StringBuffer sb = new StringBuffer();
        if (src == null || src.length <= 0) {
            return null;
        }
        String sTemp;
        for (int i = 0; i < src.length; i++) {
            sTemp = Integer.toHexString(0xFF & src[i]);
            if (sTemp.length() < 2){
                sb.append(0);
            }
            sb.append(sTemp.toUpperCase());
        }
        return sb.toString();
    }
}②:前臺響應機制:這種方式與第一種的區別如下:方法一中,NFC事件由系統分發,需要選擇應用去響應事件;而方法二,直接使用前臺activity來捕獲NFC事件進行響應,并且優先級高于方案一。
下面對該方案進行解析,直接懟上代碼。這里我新建了一個NfcTestActivity進行測試,布局文件就補貼了,隨便丟一個就行。
NfcTestActivity:
/**
 * @author Flash
 * 創建時間:2021-07-30 11:14
 */
public class NfcTestActivity extends AppCompatActivity {

    NfcAdapter mNfcAdapter;
    PendingIntent pIntent;

    @Override
    protected void onCreate(Bundle savedInstanceState) {
        super.onCreate(savedInstanceState);
        setContentView(R.layout.activity_nfc_test);
        initNfc();
        Log.i("FlashTestNFC", "onCreate");
    }

    @Override
    protected void onStop() {
        super.onStop();
        Log.i("FlashTestNFC", "onStop");
    }

    @Override
    protected void onDestroy() {
        super.onDestroy();
        Log.i("FlashTestNFC", "onDestroy");
    }

    /**
     * 初始化
     */
    private void initNfc(){
        mNfcAdapter = NfcAdapter.getDefaultAdapter(this);
        pIntent = PendingIntent.getActivity(this, 0,
                //在Manifest里或者這里設置當前activity啟動模式,否則每次向陽NFC事件,activity會重復創建
                // 當然也要按照具體情況來,你設置成singleTask也不是不行,
                new Intent(this, getClass()).addFlags(Intent.FLAG_ACTIVITY_SINGLE_TOP),
                0);
    }

    @Override
    protected void onNewIntent(Intent intent) {
        super.onNewIntent(intent);
        //這里必須setIntent,set  NFC事件響應后的intent才能拿到數據
        setIntent(intent);
        Log.i("FlashTestNFC", "onNewIntent");
        Tag tag = getIntent().getParcelableExtra(NfcAdapter.EXTRA_TAG);

        //TODO 獲取數據進行下一步處理

        Log.i("FlashTestNFC--Tag", bytesToHex(tag.getId()));
    }

    @Override
    protected void onResume() {
        super.onResume();
        Log.i("FlashTestNFC", "onResume");
        if (mNfcAdapter != null) {
            //添加intent-filter
            IntentFilter ndef = new IntentFilter(NfcAdapter.ACTION_NDEF_DISCOVERED);
            IntentFilter tag = new IntentFilter(NfcAdapter.ACTION_TAG_DISCOVERED);
            IntentFilter tech = new IntentFilter(NfcAdapter.ACTION_TECH_DISCOVERED);
            IntentFilter[] filters = new IntentFilter[]{ndef, tag, tech};

            //添加 ACTION_TECH_DISCOVERED 情況下所能讀取的NFC格式,這里列的比較全,實際我這里是沒有用到的,因為測試的卡是NDEF的
            String[][] techList = new String[][]{
                    new String[]{
                            "android.nfc.tech.Ndef",
                            "android.nfc.tech.NfcA",
                            "android.nfc.tech.NfcB",
                            "android.nfc.tech.NfcF",
                            "android.nfc.tech.NfcV",
                            "android.nfc.tech.NdefFormatable",
                            "android.nfc.tech.MifareClassic",
                            "android.nfc.tech.MifareUltralight",
                            "android.nfc.tech.NfcBarcode"
                    }
            };
            mNfcAdapter.enableForegroundDispatch(this, pIntent, filters, techList);
        }
    }

    @Override
    protected void onPause() {
        super.onPause();
        Log.i("FlashTestNFC", "onPause");
        if (mNfcAdapter != null) {
            mNfcAdapter.disableForegroundDispatch(this);
        }
    }

    /**
     * 2進制to 16進制
     * @param src
     * @return
     */
    private static String bytesToHex(byte[] src){
        StringBuffer sb = new StringBuffer();
        if (src == null || src.length <= 0) {
            return null;
        }
        String sTemp;
        for (int i = 0; i < src.length; i++) {
            sTemp = Integer.toHexString(0xFF & src[i]);
            if (sTemp.length() < 2){
                sb.append(0);
            }
            sb.append(sTemp.toUpperCase());
        }
        return sb.toString();
    }
}解析:主要其實就是NfcAdapter.enableForegroundDispatch(),開啟前臺響應;在onNewIntent中獲取系統傳遞過來的數據,并解析;在前臺activity停止時,使用NfcAdapter.disableForegroundDispatch()關閉響應。下圖是該activity在設置啟動模式為singleTop或singleTask情況下,刷卡后該activity生命周期變化:

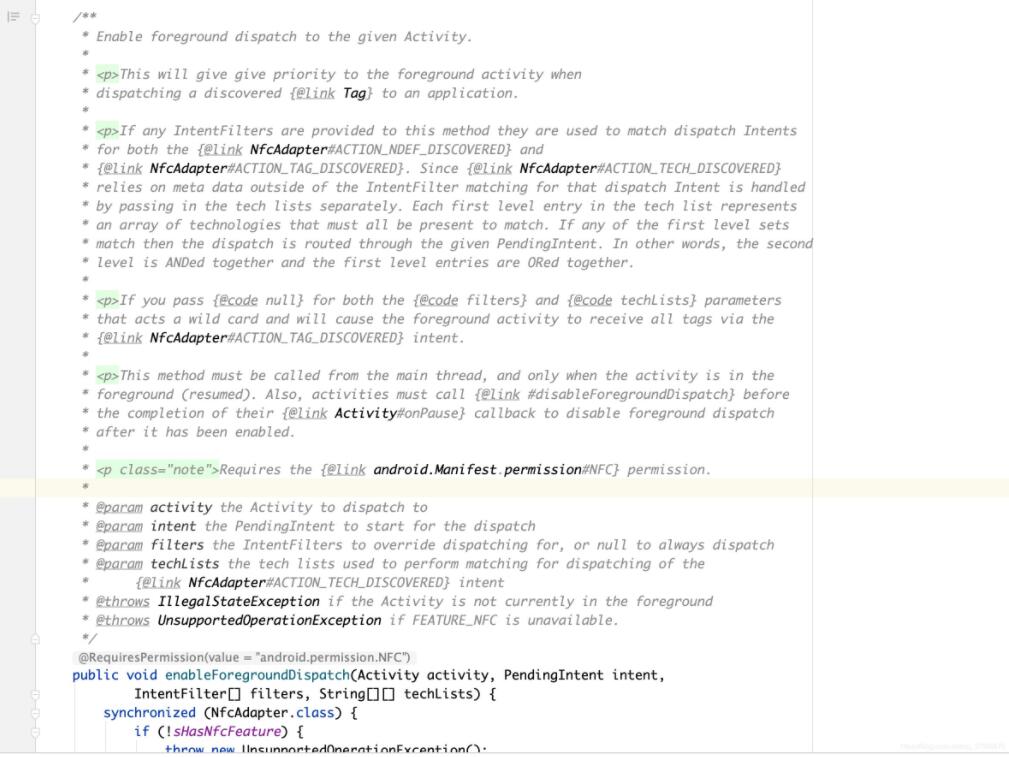
enableForegroundDispatch源碼注釋解析,這里大致翻譯一下:
將發現的tag(可以理解為NFC刷卡事件)優先分配給應用程序的前臺activity;
如果給該方法提供了任何IntentFilters,那么會優先去匹配ACTION_NDEF_DISCOVERED和ACTION_TAG_DISCOVERED。由于ACTION_TECH_DISCOVERED依賴于 IntentFilter 匹配之外的元數據,使用改IntentFilter要通過單獨傳入techLists來處理的。techLists中的每個第一級條目下的配置必須全部匹配才行。如果任何一級下的內容都匹配,則分派將通過給定的 PendingIntent 進行路由。(這三句話我解釋一下:techLists參數是一個二維數組,可以設置很多級,每一級下是第二級,在第二級中放置相關匹配項;看我方法②中對techLists數組的構建方式就能明白)。換句話說,第一級內容是邏輯或關系,第二級內容是邏輯與關系。
如果IntentFilters和techLists都傳了null,那么會默認匹配ACTION_TAG_DISCOVERED
這個方法必須在主線程調用,并且activity必須處于前臺的情況下。同時,在activity調用enableForegroundDispatch方法后,必須在onPause時調用disableForegroundDispatch進行關閉。
Manifest文件中要聲明NFC權限。

關于“Android開發如何實現NFC刷卡讀取”這篇文章就分享到這里了,希望以上內容可以對大家有一定的幫助,使各位可以學到更多知識,如果覺得文章不錯,請把它分享出去讓更多的人看到。
免責聲明:本站發布的內容(圖片、視頻和文字)以原創、轉載和分享為主,文章觀點不代表本網站立場,如果涉及侵權請聯系站長郵箱:is@yisu.com進行舉報,并提供相關證據,一經查實,將立刻刪除涉嫌侵權內容。