溫馨提示×
您好,登錄后才能下訂單哦!
點擊 登錄注冊 即表示同意《億速云用戶服務條款》
您好,登錄后才能下訂單哦!
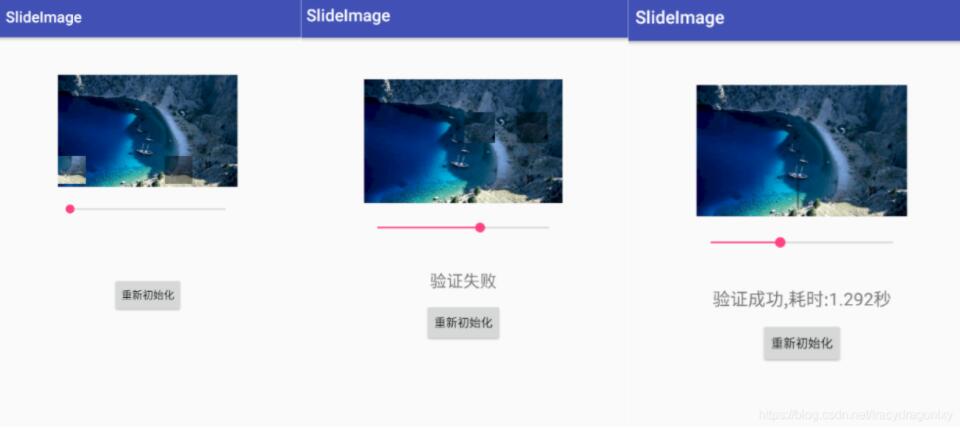
本篇內容介紹了“Android滑動拼圖驗證碼控件的使用方法”的有關知識,在實際案例的操作過程中,不少人都會遇到這樣的困境,接下來就讓小編帶領大家學習一下如何處理這些情況吧!希望大家仔細閱讀,能夠學有所成!
簡介: 很多軟件為了安全防止惡意攻擊,會在登錄/注冊時進行人機驗證,常見的人機驗證方式有:谷歌點擊復選框進行驗證,輸入驗證碼驗證,短信驗證碼,語音驗證,文字按順序選擇在圖片上點擊,滑動拼圖驗證等。

1、滑塊視圖類:SlideImageView.java。實現隨機選取拼圖位置,對拼圖位置進行驗證等功能。
public class SlideImageView extends View {

    Bitmap bitmap;
    Bitmap drawBitmap;
    Bitmap verifyBitmap;
    boolean reset = true;

    // 拼圖的位置
    int x;
    int y;
    // 驗證的地方
    int left, top, right, bottom;
    // 移動x坐標
    int moveX;
    // x坐標最大移動長度
    int moveMax;
    // 正確的拼圖x坐標
    int trueX;

    public SlideImageView(Context context) {
        super(context);
    }

    public SlideImageView(Context context, AttributeSet attrs) {
        super(context, attrs);
    }

    public SlideImageView(Context context, AttributeSet attrs, int defStyleAttr) {
        super(context, attrs, defStyleAttr);
    }

    @Override
    protected void onDraw(Canvas canvas) {
        super.onDraw(canvas);
        if (bitmap == null)
            return;

        if (reset) {
            /*
    * 背景圖
    */
            int width = getWidth();
            int height = getHeight();

            drawBitmap = Bitmap.createScaledBitmap(bitmap, width, height, false);

      /*
       * 驗證的地方
       */
            int length = Math.min(width, height);
            length /= 4;//1/4長度

            // 隨機選取拼圖的位置
            x = new Random().nextInt(width - length * 2) + length;
            y = new Random().nextInt(height - length * 2) + length;

            left = x;
            top = y;
            right = left + length;
            bottom = top + length;

            //驗證的圖片
            verifyBitmap = Bitmap.createBitmap(drawBitmap, x, y, length, length);

            // 驗證圖片的最大移動距離
            moveMax = width - length;
            // 正確的驗證位置x
            trueX = x;

            reset = false;
        }

        Paint paint = new Paint();
        // 畫背景圖
        canvas.drawBitmap(drawBitmap, 0, 0, paint);
        paint.setColor(Color.parseColor("#66000000"));
        canvas.drawRect(left, top, right, bottom, paint);//畫上陰影
        paint.setColor(Color.parseColor("#ffffffff"));
        canvas.drawBitmap(verifyBitmap, moveX, y, paint);//畫驗證圖片

    }

    public void setImageBitmap(Bitmap bitmap) {
        this.bitmap = bitmap;
    }

    public void setMove(double precent) {
        if (precent < 0 || precent > 1)
            return;

        moveX = (int) (moveMax * precent);
        invalidate();
    }

    public boolean isTrue(double range) {
        if (moveX > trueX * (1 - range) && moveX < trueX * (1 + range)) {
            return true;
        } else {
            return false;
        }
    }

    public void setReDraw() {
        reset = true;
        invalidate();
    }
}2、視圖布局文件:activity_main.xml。
<?xml version="1.0" encoding="utf-8"?>
<android.support.constraint.ConstraintLayout
    xmlns:android="http://schemas.android.com/apk/res/android"
    xmlns:app="http://schemas.android.com/apk/res-auto"
    xmlns:tools="http://schemas.android.com/tools"
    android:layout_width="match_parent"
    android:layout_height="match_parent"
    tools:context="com.slideimage.MainActivity">

    <com.slideimage.SlideImageView
        android:id="@+id/slide_image_view"
        android:layout_width="240dp"
        android:layout_height="150dp"
        android:layout_marginTop="50dp"
        app:layout_constraintTop_toTopOf="parent"
        app:layout_constraintLeft_toLeftOf="parent"
        app:layout_constraintRight_toRightOf="parent"/>

    <View
        android:id="@+id/flash_view"
        android:layout_width="wrap_content"
        android:layout_height="wrap_content"
        android:visibility="invisible"
        app:layout_constraintLeft_toLeftOf="@id/slide_image_view"
        app:layout_constraintRight_toRightOf="@id/slide_image_view"
        app:layout_constraintTop_toTopOf="@id/slide_image_view"
        app:layout_constraintBottom_toBottomOf="@id/slide_image_view"
        android:background="@mipmap/drag_flash"/>

    <SeekBar
        android:id="@+id/seekBar1"
        android:layout_width="240dp"
        android:layout_height="wrap_content"
        android:layout_marginTop="220dp"
        app:layout_constraintTop_toTopOf="parent"
        app:layout_constraintLeft_toLeftOf="parent"
        app:layout_constraintRight_toRightOf="parent"/>

    <TextView
        android:id="@+id/show_result"
        android:layout_width="wrap_content"
        android:layout_height="wrap_content"
        android:layout_marginTop="280dp"
        android:textSize="20sp"
        app:layout_constraintLeft_toLeftOf="parent"
        app:layout_constraintRight_toRightOf="parent"
        app:layout_constraintTop_toTopOf="parent"/>

    <Button
        android:id="@+id/button1"
        android:layout_width="wrap_content"
        android:layout_height="wrap_content"
        android:layout_marginTop="320dp"
        android:text="重新初始化"
        app:layout_constraintTop_toTopOf="parent"
        app:layout_constraintLeft_toLeftOf="parent"
        app:layout_constraintRight_toRightOf="parent"/>

</android.support.constraint.ConstraintLayout>
3、在Activity中使用滑塊驗證:MainActivity.java。
public class MainActivity extends AppCompatActivity {

    private SeekBar seekBar;
    private Button button1;
    private SlideImageView slideImageView;
    private TextView resultText;
    private View flashView;

    private static final int flashTime = 800;

    private long timeStart = 0;
    private float timeUsed;

    @SuppressLint("ClickableViewAccessibility")
    @Override
    protected void onCreate(Bundle savedInstanceState) {
        super.onCreate(savedInstanceState);
        setContentView(R.layout.activity_main);

        seekBar = findViewById(R.id.seekBar1);
        button1 = findViewById(R.id.button1);
        slideImageView = findViewById(R.id.slide_image_view);
        flashView = findViewById(R.id.flash_view);
        resultText = findViewById(R.id.show_result);

        slideImageView.setImageBitmap(BitmapFactory.decodeResource(getResources(), R.mipmap.slide_bg));

        seekBar.setMax(10000);
        seekBar.setOnSeekBarChangeListener(new SeekBar.OnSeekBarChangeListener(){

            @Override
            public void onProgressChanged(SeekBar seekBar, int progress,
                                          boolean fromUser) {
                slideImageView.setMove(progress*0.0001);
            }

            @Override
            public void onStartTrackingTouch(SeekBar seekBar) {
                timeStart = System.currentTimeMillis();
            }

            @Override
            public void onStopTrackingTouch(SeekBar seekBar) {
            }

        });

        seekBar.setOnTouchListener(new View.OnTouchListener(){

            @Override
            public boolean onTouch(View v, MotionEvent event) {
                switch(event.getAction()){
                    case MotionEvent.ACTION_UP:
                        timeUsed = (System.currentTimeMillis() - timeStart) / 1000.0f;
                        boolean isTrue = slideImageView.isTrue(0.1);//允許有10%誤差
                        if(isTrue) {
                            flashShowAnime();
                            updateText("驗證成功,耗時:" + timeUsed + "秒");
                        } else {
                            updateText("驗證失敗");
                        }
                        break;
                }
                return false;
            }

        });

        button1.setOnClickListener(new View.OnClickListener() {
            @Override
            public void onClick(View view) {
                reInit();
            }
        });
    }

    private void updateText(final String s) {
        runOnUiThread(new Runnable() {
            @Override
            public void run() {
                resultText.setText(s);
            }
        });
    }

    private void reInit() {
        slideImageView.setReDraw();
        seekBar.setProgress(0);
        resultText.setText("");
        flashView.setVisibility(View.INVISIBLE);
    }

    // 成功高亮動畫
    private void flashShowAnime() {
        TranslateAnimation translateAnimation = new TranslateAnimation(
                Animation.RELATIVE_TO_SELF, 1f,
                Animation.RELATIVE_TO_SELF, -1f,
                Animation.RELATIVE_TO_SELF, 0f,
                Animation.RELATIVE_TO_SELF, 0f);
        translateAnimation.setDuration(flashTime);
        //translateAnimation.setInterpolator(new LinearInterpolator());
        flashView.setVisibility(View.VISIBLE);
        flashView.setAnimation(translateAnimation);
        translateAnimation.setAnimationListener(new Animation.AnimationListener() {
            @Override
            public void onAnimationStart(Animation animation) {

            }

            @Override
            public void onAnimationEnd(Animation animation) {
                flashView.setVisibility(View.INVISIBLE);
            }

            @Override
            public void onAnimationRepeat(Animation animation) {

            }
        });
    }

}
“Android滑動拼圖驗證碼控件的使用方法”的內容就介紹到這里了,感謝大家的閱讀。如果想了解更多行業相關的知識可以關注億速云網站,小編將為大家輸出更多高質量的實用文章!
免責聲明:本站發布的內容(圖片、視頻和文字)以原創、轉載和分享為主,文章觀點不代表本網站立場,如果涉及侵權請聯系站長郵箱:is@yisu.com進行舉報,并提供相關證據,一經查實,將立刻刪除涉嫌侵權內容。