您好,登錄后才能下訂單哦!
您好,登錄后才能下訂單哦!
這期內容當中小編將會給大家帶來有關Android中怎么利用OKhttp3實現登錄注冊功能,文章內容豐富且以專業的角度為大家分析和敘述,閱讀完這篇文章希望大家可以有所收獲。
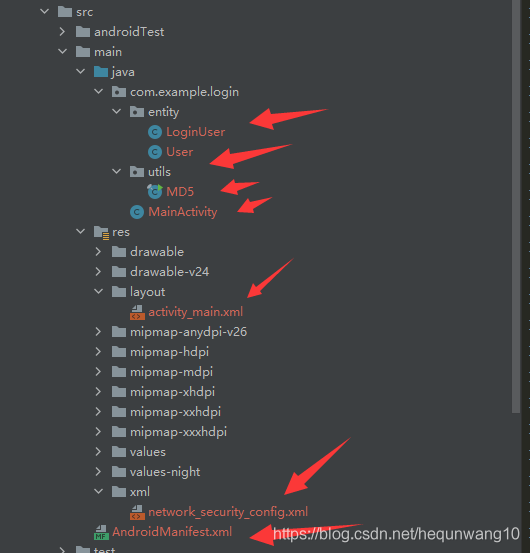
新建一個login的項目,主要的幾個文件在這里

1、gradle引入OKhttp3依賴
implementation 'com.squareup.okhttp3:okhttp:3.14.7'
    implementation 'com.squareup.okio:okio:1.17.5'
2、activity_main.xml布局文件
<?xml version="1.0" encoding="utf-8"?>
<androidx.constraintlayout.widget.ConstraintLayout xmlns:android="http://schemas.android.com/apk/res/android"
    xmlns:app="http://schemas.android.com/apk/res-auto"
    xmlns:tools="http://schemas.android.com/tools"
    android:layout_width="match_parent"
    android:layout_height="match_parent"
    tools:context=".MainActivity">
    <EditText
        android:id="@+id/username"
        android:layout_width="wrap_content"
        android:layout_height="wrap_content"
        android:hint="用戶名"
        android:textSize="34sp"
        app:layout_constraintBottom_toBottomOf="parent"
        app:layout_constraintEnd_toEndOf="parent"
        app:layout_constraintStart_toStartOf="parent"
        app:layout_constraintTop_toTopOf="parent"
        app:layout_constraintVertical_bias="0.051" />
    <EditText
        android:id="@+id/password"
        android:layout_width="wrap_content"
        android:layout_height="wrap_content"
        android:hint="密碼"
        android:textSize="34sp"
        app:layout_constraintBottom_toBottomOf="parent"
        app:layout_constraintEnd_toEndOf="parent"
        app:layout_constraintStart_toStartOf="parent"
        app:layout_constraintTop_toBottomOf="@+id/username"
        app:layout_constraintVertical_bias="0.067" />
    <Button
        android:id="@+id/button"
        android:layout_width="wrap_content"
        android:layout_height="wrap_content"
        android:onClick="register"
        android:text="注冊"
        android:textSize="24sp"
        app:backgroundTint="#E91E63"
        app:layout_constraintBottom_toBottomOf="parent"
        app:layout_constraintEnd_toEndOf="parent"
        app:layout_constraintHorizontal_bias="0.501"
        app:layout_constraintStart_toStartOf="parent"
        app:layout_constraintTop_toBottomOf="@+id/password"
        app:layout_constraintVertical_bias="0.058" />
    <Button
        android:id="@+id/getUser"
        android:layout_width="wrap_content"
        android:layout_height="wrap_content"
        android:onClick="getUser"
        android:text="獲取"
        android:textSize="24sp"
        app:backgroundTint="#E91E63"
        app:layout_constraintBottom_toBottomOf="parent"
        app:layout_constraintEnd_toEndOf="parent"
        app:layout_constraintHorizontal_bias="0.501"
        app:layout_constraintStart_toStartOf="parent"
        app:layout_constraintTop_toBottomOf="@+id/button3"
        app:layout_constraintVertical_bias="0.174" />
    <Button
        android:id="@+id/button3"
        android:layout_width="wrap_content"
        android:layout_height="wrap_content"
        android:text="登錄"
        android:textSize="24sp"
        app:backgroundTint="#E91E63"
        android:onClick="login"
        app:layout_constraintBottom_toBottomOf="parent"
        app:layout_constraintEnd_toEndOf="parent"
        app:layout_constraintHorizontal_bias="0.501"
        app:layout_constraintStart_toStartOf="parent"
        app:layout_constraintTop_toBottomOf="@+id/button"
        app:layout_constraintVertical_bias="0.113" />
</androidx.constraintlayout.widget.ConstraintLayout>
3、AndroidManifest.xml配置文件
這里需要加上網絡請求權限,添加網絡權限的時候注意:在res目錄下新建xml目錄,創建network_security_config.xml文件
<?xml version="1.0" encoding="utf-8"?>
<network-security-config>
    <base-config cleartextTrafficPermitted="true" />
</network-security-config>
并在配置文件中加入這行代碼:
android:networkSecurityConfig="@xml/network_security_config"
完整的AndroidManifest.xml文件如下
<?xml version="1.0" encoding="utf-8"?>
<manifest xmlns:android="http://schemas.android.com/apk/res/android"
    package="com.example.login">

    <uses-permission android:name="android.permission.INTERNET"/>
    <uses-permission android:name="android.permission.WRITE_EXTERNAL_STORAGE" />
    <uses-permission android:name="android.permission.READ_EXTERNAL_STORAGE" />
    <application
        android:allowBackup="true"
        android:icon="@mipmap/ic_launcher"
        android:label="@string/app_name"
        android:roundIcon="@mipmap/ic_launcher_round"
        android:networkSecurityConfig="@xml/network_security_config"
        android:supportsRtl="true"
        android:theme="@style/Theme.Login">
        <activity android:name=".MainActivity">
            <intent-filter>
                <action android:name="android.intent.action.MAIN" />

                <category android:name="android.intent.category.LAUNCHER" />
            </intent-filter>
        </activity>
    </application>

</manifest>
4、創建User實體類
新建entity目錄創建User實體類。注意這里我是根據后端數據庫的字段創建的,在實現登錄注冊的時候只需要id,username,password 幾個基礎的字段就行,這里我比較多,讀者可以自行忽略。
User.java
package com.example.login.entity;
public class User {
    private Integer userId;
    private String userName;
    private String userPassword;
    private String currentVersion;
    private String latestVersion;
    private String updateDescription;
    private String headPortrait;
    private String nickName;
    private String vipTime;
    private String userCategory;
    private String registerDate;

    public User(Integer userId, String userName, String userPassword, String currentVersion, String latestVersion, String updateDescription, String headPortrait, String nickName, String vipTime, String userCategory, String registerDate) {
        this.userId = userId;
        this.userName = userName;
        this.userPassword = userPassword;
        this.currentVersion = currentVersion;
        this.latestVersion = latestVersion;
        this.updateDescription = updateDescription;
        this.headPortrait = headPortrait;
        this.nickName = nickName;
        this.vipTime = vipTime;
        this.userCategory = userCategory;
        this.registerDate = registerDate;
    }

    public User() {
    }

    public Integer getUserId() {
        return userId;
    }

    public void setUserId(Integer userId) {
        this.userId = userId;
    }

    public String getUserName() {
        return userName;
    }

    public void setUserName(String userName) {
        this.userName = userName;
    }

    public String getUserPassword() {
        return userPassword;
    }

    public void setUserPassword(String userPassword) {
        this.userPassword = userPassword;
    }

    public String getCurrentVersion() {
        return currentVersion;
    }

    public void setCurrentVersion(String currentVersion) {
        this.currentVersion = currentVersion;
    }

    public String getLatestVersion() {
        return latestVersion;
    }

    public void setLatestVersion(String latestVersion) {
        this.latestVersion = latestVersion;
    }

    public String getUpdateDescription() {
        return updateDescription;
    }

    public void setUpdateDescription(String updateDescription) {
        this.updateDescription = updateDescription;
    }

    public String getHeadPortrait() {
        return headPortrait;
    }

    public void setHeadPortrait(String headPortrait) {
        this.headPortrait = headPortrait;
    }

    public String getNickName() {
        return nickName;
    }

    public void setNickName(String nickName) {
        this.nickName = nickName;
    }

    public String getVipTime() {
        return vipTime;
    }

    public void setVipTime(String vipTime) {
        this.vipTime = vipTime;
    }

    public String getUserCategory() {
        return userCategory;
    }

    public void setUserCategory(String userCategory) {
        this.userCategory = userCategory;
    }

    public String getRegisterDate() {
        return registerDate;
    }

    public void setRegisterDate(String registerDate) {
        this.registerDate = registerDate;
    }
}
LoginUser.java
public class LoginUser {
    private String userName;
    private String userPassword;

    public LoginUser(String userName, String userPassword) {
        this.userName = userName;
        this.userPassword = userPassword;
    }

    public LoginUser() {
    }

    public String getUserName() {
        return userName;
    }

    public void setUserName(String userName) {
        this.userName = userName;
    }

    public String getUserPassword() {
        return userPassword;
    }

    public void setUserPassword(String userPassword) {
        this.userPassword = userPassword;
    }
}
5、MainActivity.java
package com.example.login;

import androidx.appcompat.app.AppCompatActivity;

import android.os.Bundle;
import android.util.Log;
import android.view.View;
import android.widget.EditText;
import android.widget.TextView;
import android.widget.Toast;

import com.example.login.entity.User;

import org.json.JSONException;
import org.json.JSONObject;

import java.io.IOException;

import okhttp3.Call;
import okhttp3.Callback;
import okhttp3.MediaType;
import okhttp3.OkHttpClient;
import okhttp3.Request;
import okhttp3.RequestBody;
import okhttp3.Response;

public class MainActivity extends AppCompatActivity {
    private EditText username;
    private EditText password;
    private User user;
    @Override
    protected void onCreate(Bundle savedInstanceState) {
        super.onCreate(savedInstanceState);
        setContentView(R.layout.activity_main);
        username = findViewById(R.id.username);
        password = findViewById(R.id.password);

    }

    public void register(View view) {
        user = new User();
        user.setUserName(username.getText().toString());
        user.setUserPassword(password.getText().toString());
        Log.d("whqusername",username.getText().toString());
        Log.d("whqpassword",password.getText().toString());
        new Thread(new Runnable() {
            @Override
            public void run() {
                MediaType JSON = MediaType.parse("application/json;charset=utf-8");
                JSONObject jsonObject = new JSONObject();
                OkHttpClient httpClient = new OkHttpClient();
                try {
                    jsonObject.put("userId",10);
                    jsonObject.put("userName",user.getUserName());
                    jsonObject.put("userPassword",user.getUserPassword());
                    jsonObject.put("currentVersion",null);
                    jsonObject.put("latestVersion",null);
                    jsonObject.put("updateDescription",null);
                    jsonObject.put("headPortrait",null);
                    jsonObject.put("nickName",user.getUserName());
                    jsonObject.put("vipTime",null);
                    jsonObject.put("userCategory",null);
                    jsonObject.put("registerDate",null);
                } catch (JSONException e) {
                    e.printStackTrace();
                }
                RequestBody requestBody = RequestBody.create(JSON, String.valueOf(jsonObject));
                String url = "http://ip:8001/server/user/addUser/";
                Request request = new Request.Builder()
                        .url(url)
                        .post(requestBody)
                        .build();

                Call call = httpClient.newCall(request);
                call.enqueue(new Callback() {
                    @Override
                    public void onFailure(Call call, IOException e) {
                        Log.d("whq","失敗了");
                    }

                    @Override
                    public void onResponse(Call call, Response response) throws IOException {
                        Log.d("whq",response.toString()+"------------------");
                        Log.d("whq",response.body().toString()+"------------------");

                    }
                });

            }
        }).start();
    }

    public void getUser(View view) {
        OkHttpClient httpClient = new OkHttpClient();

        String url = "http://ip:8001/server/user/getAllUserName";
        Request getRequest = new Request.Builder()
                .url(url)
                .get()
                .build();

        Call call = httpClient.newCall(getRequest);

        new Thread(new Runnable() {
            @Override
            public void run() {
                try {
                    //同步請求,要放到子線程執行
                    Response response = call.execute();
                    Log.i("whq+getAllUserName", "okHttpGet run: response:"+ response.body().string());
                } catch (IOException e) {
                    e.printStackTrace();
                }
            }
        }).start();

    }

     public void login(View view) {
        loginUser = new LoginUser();
        loginUser.setUserName(username.getText().toString());
        loginUser.setUserPassword(password.getText().toString());
        new Thread(new Runnable() {
            @Override
            public void run() {
                MediaType JSON = MediaType.parse("application/json;charset=utf-8");
                JSONObject jsonObject = new JSONObject();
                OkHttpClient httpClient = new OkHttpClient();
                try {
                    jsonObject.put("userName",loginUser.getUserName());
                    jsonObject.put("userPassword",MD5.encrypt(loginUser.getUserPassword()));
                } catch (JSONException e) {
                    e.printStackTrace();
                }
                RequestBody requestBody = RequestBody.create(JSON, String.valueOf(jsonObject));
                String url = "http://ip:8001/server/user/login";
                Request request = new Request.Builder()
                        .url(url)
                        .post(requestBody)
                        .build();

                Call call = httpClient.newCall(request);
                call.enqueue(new Callback() {
                    @Override
                    public void onFailure(Call call, IOException e) {
                        Log.d("whq登錄","失敗了");
                    }

                    @Override
                    public void onResponse(Call call, Response response) throws IOException {
                        String MyResult = response.body().string();
                        Log.d("whq登錄",response+"---------response---------");
                        Log.d("whq登錄",response.message()+"---------message---------");
                        Log.d("whq登錄",response.body().toString()+"------------------");
                        Log.d("whq登錄",MyResult+"-----------MyResult-------");
                    }
                });
            }
        }).start();
    }
}
到這里就實現了Android的前端實現。
數據庫就是簡單的一個user表
SET NAMES utf8mb4;
SET FOREIGN_KEY_CHECKS = 0;

-- ----------------------------
-- Table structure for user
-- ----------------------------
DROP TABLE IF EXISTS `user`;
CREATE TABLE `user`  (
  `userId` int(11) NOT NULL AUTO_INCREMENT,
  `userName` varchar(255) CHARACTER SET utf8 COLLATE utf8_general_ci NOT NULL,
  `userPassword` varchar(255) CHARACTER SET utf8 COLLATE utf8_general_ci NULL DEFAULT NULL,
  `currentVersion` varchar(255) CHARACTER SET utf8 COLLATE utf8_general_ci NULL DEFAULT NULL,
  `latestVersion` varchar(255) CHARACTER SET utf8 COLLATE utf8_general_ci NULL DEFAULT NULL,
  `updateDescription` varchar(255) CHARACTER SET utf8 COLLATE utf8_general_ci NULL DEFAULT NULL,
  `headPortrait` mediumblob NULL,
  `nickName` varchar(255) CHARACTER SET utf8 COLLATE utf8_general_ci NULL DEFAULT NULL,
  `vipTime` varchar(255) CHARACTER SET utf8 COLLATE utf8_general_ci NULL DEFAULT NULL,
  `userCategory` varchar(50) CHARACTER SET utf8 COLLATE utf8_general_ci NULL DEFAULT 'normal',
  `registerDate` varchar(50) CHARACTER SET utf8 COLLATE utf8_general_ci NULL DEFAULT NULL,
  PRIMARY KEY (`userId`, `userName`) USING BTREE
) ENGINE = InnoDB AUTO_INCREMENT = 13 CHARACTER SET = utf8 COLLATE = utf8_general_ci ROW_FORMAT = DYNAMIC;

SET FOREIGN_KEY_CHECKS = 1;
后端搭建用到的是SSM框架
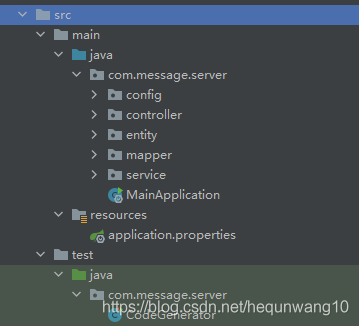
1、新建一個springboot項目,添加依賴
pom.xml文件。這里有mybatis-plus+swagger+velocity,使用了代碼生成器
 <properties>
        <java.version>1.8</java.version>
        <mybatis-plus.version>3.0.5</mybatis-plus.version>
        <swagger.version>2.7.0</swagger.version>
        <jodatime.version>2.10.1</jodatime.version>
        <poi.version>3.17</poi.version>
        <httpclient.version>4.5.1</httpclient.version>
        <gson.version>2.8.2</gson.version>
        <velocity.version>2.0</velocity.version>
    </properties>
        <dependencies>
            <dependency>
                <groupId>org.springframework.boot</groupId>
                <artifactId>spring-boot-starter</artifactId>
            </dependency>
            <dependency>
                <groupId>org.springframework.boot</groupId>
                <artifactId>spring-boot-starter-test</artifactId>
                <scope>test</scope>
            </dependency>

            <!--Spring Cloud-->
            <dependency>
                <groupId>org.springframework.cloud</groupId>
                <artifactId>spring-cloud-dependencies</artifactId>
                <version>Hoxton.RELEASE</version>
                <type>pom</type>
                <scope>import</scope>
            </dependency>
            <!--mybatis-plus 持久層-->
            <dependency>
                <groupId>com.baomidou</groupId>
                <artifactId>mybatis-plus-boot-starter</artifactId>
                <version>${mybatis-plus.version}</version>
            </dependency>

            <!-- velocity 模板引擎, Mybatis Plus 代碼生成器需要 -->
            <dependency>
                <groupId>org.apache.velocity</groupId>
                <artifactId>velocity-engine-core</artifactId>
                <version>${velocity.version}</version>
            </dependency>

            <!--swagger-->
            <dependency>
                <groupId>io.springfox</groupId>
                <artifactId>springfox-swagger2</artifactId>
                <version>${swagger.version}</version>
            </dependency>
            <!--swagger ui-->
            <dependency>
                <groupId>io.springfox</groupId>
                <artifactId>springfox-swagger-ui</artifactId>
                <version>${swagger.version}</version>
            </dependency>
            <!--日期時間工具-->
            <dependency>
                <groupId>joda-time</groupId>
                <artifactId>joda-time</artifactId>
                <version>${jodatime.version}</version>
            </dependency>
            <!--mysql-->
            <dependency>
                <groupId>mysql</groupId>
                <artifactId>mysql-connector-java</artifactId>
            </dependency>
            <!--lombok用來簡化實體類:需要安裝lombok插件-->
            <dependency>
                <groupId>org.projectlombok</groupId>
                <artifactId>lombok</artifactId>
            </dependency>
            <dependency>
                <groupId>org.springframework.boot</groupId>
                <artifactId>spring-boot-starter-web</artifactId>
            </dependency>
        </dependencies>
2、application.properties文件
# 服務端口
server.port=8001
# 服務名
spring.application.name=heartrate

# 環境設置:dev、test、prod
spring.profiles.active=dev

# mysql數據庫連接
spring.datasource.driver-class-name=com.mysql.cj.jdbc.Driver
spring.datasource.url=jdbc:mysql://ip:3310/heartrate?serverTimezone=GMT%2B8&useSSL=false
spring.datasource.username=root
spring.datasource.password=123456


#返回json的全局時間格式
spring.jackson.date-format=yyyy-MM-dd HH:mm:ss
spring.jackson.time-zone=GMT+8

##mybatis日志//要使用logback日志,就需要注釋掉
#mybatis-plus.configuration.log-impl=org.apache.ibatis.logging.stdout.StdOutImpl

#配置mapper xml文件的路徑
mybatis-plus.mapper-locations=classpath:com/atguigu/eduservice/mapper/xml/*.xml
這里的數據庫連接發現我是使用3310端口,因為我的服務器是使用docker創建數據庫的。請自行查看我之前的文章。
3、CodeGenerator.java代碼生成器
import com.baomidou.mybatisplus.annotation.DbType;
import com.baomidou.mybatisplus.annotation.IdType;
import com.baomidou.mybatisplus.generator.AutoGenerator;
import com.baomidou.mybatisplus.generator.config.DataSourceConfig;
import com.baomidou.mybatisplus.generator.config.GlobalConfig;
import com.baomidou.mybatisplus.generator.config.PackageConfig;
import com.baomidou.mybatisplus.generator.config.StrategyConfig;
import com.baomidou.mybatisplus.generator.config.rules.DateType;
import com.baomidou.mybatisplus.generator.config.rules.NamingStrategy;
import org.junit.Test;

/**
 * @author ahuwhq
 * @since 2021/7/27
 */
public class CodeGenerator {

    @Test
    public void run() {

        // 1、創建代碼生成器
        AutoGenerator mpg = new AutoGenerator();

        // 2、全局配置
        GlobalConfig gc = new GlobalConfig();
        String projectPath = System.getProperty("user.dir");
        //這里改成自己的目錄
        gc.setOutputDir("E:\\LaboratoryCode\\service\\server" + "/src/main/java");
        gc.setAuthor("ahuwhq");
        gc.setOpen(false); //生成后是否打開資源管理器
        gc.setFileOverride(false); //重新生成時文件是否覆蓋
        gc.setServiceName("%sService");	//去掉Service接口的首字母I
        gc.setIdType(IdType.ID_WORKER_STR); //主鍵策略
        gc.setDateType(DateType.ONLY_DATE);//定義生成的實體類中日期類型
        gc.setSwagger2(true);//開啟Swagger2模式

        mpg.setGlobalConfig(gc);

        // 3、數據源配置
        DataSourceConfig dsc = new DataSourceConfig();
        //這里的數據庫改為自己的
        dsc.setUrl("jdbc:mysql://ip:3310/heartrate?serverTimezone=GMT%2B8");
        dsc.setDriverName("com.mysql.cj.jdbc.Driver");
        dsc.setUsername("root");
        dsc.setPassword("123456");
        dsc.setDbType(DbType.MYSQL);
        mpg.setDataSource(dsc);

        // 4、包配置
        PackageConfig pc = new PackageConfig();
        pc.setParent("com.message");
        pc.setModuleName("server"); //模塊名

        pc.setController("controller");
        pc.setEntity("entity");
        pc.setService("service");
        pc.setMapper("mapper");
        mpg.setPackageInfo(pc);

        // 5、策略配置
        StrategyConfig strategy = new StrategyConfig();
        //這里是對應的數據庫的表
        strategy.setInclude("user");
        strategy.setNaming(NamingStrategy.underline_to_camel);//數據庫表映射到實體的命名策略
        strategy.setTablePrefix(pc.getModuleName() + "_"); //生成實體時去掉表前綴

        strategy.setColumnNaming(NamingStrategy.underline_to_camel);//數據庫表字段映射到實體的命名策略
        strategy.setEntityLombokModel(true); // lombok 模型 @Accessors(chain = true) setter鏈式操作

        strategy.setRestControllerStyle(true); //restful api風格控制器
        strategy.setControllerMappingHyphenStyle(true); //url中駝峰轉連字符

        mpg.setStrategy(strategy);


        // 6、執行
        mpg.execute();
    }
}
點擊運行就會自動生成文件

4、添加config目錄
這里的config目錄代碼生成器沒有幫我們生成,我們添加這個目錄主要是想使用swagger測試(SwaggerConfig),并且代碼生成器生成文件之后,我們需要配置一下能掃描到mapper文件(ServerConfig)
ServerConfig.java
package com.message.server.config;


import com.baomidou.mybatisplus.core.injector.ISqlInjector;
import com.baomidou.mybatisplus.extension.injector.LogicSqlInjector;
import com.baomidou.mybatisplus.extension.plugins.PaginationInterceptor;
import org.mybatis.spring.annotation.MapperScan;
import org.springframework.context.annotation.Bean;
import org.springframework.context.annotation.Configuration;

@Configuration
@MapperScan("com.message.server.mapper")
public class ServerConfig {

    /**
     * 邏輯刪除插件
     */
    @Bean
    public ISqlInjector sqlInjector() {
        return new LogicSqlInjector();
    }

    /**
     * 分頁插件
     */
    @Bean
    public PaginationInterceptor paginationInterceptor() {
        return new PaginationInterceptor();
    }
}
SwaggerConfig.java
import com.google.common.base.Predicates;
import org.springframework.context.annotation.Bean;
import org.springframework.context.annotation.Configuration;
import springfox.documentation.builders.ApiInfoBuilder;
import springfox.documentation.builders.PathSelectors;
import springfox.documentation.service.ApiInfo;
import springfox.documentation.service.Contact;
import springfox.documentation.spi.DocumentationType;
import springfox.documentation.spring.web.plugins.Docket;
import springfox.documentation.swagger2.annotations.EnableSwagger2;

@Configuration//配置類
@EnableSwagger2//swagger2注解
public class SwaggerConfig {
    @Bean
    public Docket webApiConfig(){
        return new Docket(DocumentationType.SWAGGER_2)
                .groupName("webApi")
                .apiInfo(webApiInfo())
                .select()
//                .paths(Predicates.not(PathSelectors.regex("/admin/.*")))
                .paths(Predicates.not(PathSelectors.regex("/error.*")))
                .build();

    }
    private ApiInfo webApiInfo(){

        return new ApiInfoBuilder()
                .title("網站-課程中心API文檔")
                .description("本文檔描述了課程中心微服務接口定義")
                .version("1.0")
                .contact(new Contact("java", "http://ahuwhq.com", "ahuwhq@163.com"))
                .build();
    }
}
5、Controller層實現 UserController.java
這里我實現了好多種方法,不僅是登錄注冊,但是Android前段我們只用到登錄注冊和獲取全部用戶
import com.message.server.entity.User;
import com.message.server.entity.vo.UserAll;
import com.message.server.service.UserService;
import org.springframework.beans.factory.annotation.Autowired;
import org.springframework.web.bind.annotation.*;

import java.util.List;
/**
 * <p>
 *  前端控制器
 * </p>
 *
 * @author ahuwhq
 * @since 2021-07-27
 */
@RestController
@RequestMapping("/server/user")
public class UserController {
    //訪問地址:http://ip:8001/server/user/findAll    最終部署到服務器時使用這個來訪問
    //訪問地址:http://localhost:8001/server/user/findAll  這是本地測試地址也是Swagger地址
    @Autowired
    private UserService userService;

    /**
     * 查詢所有的用戶
     * @return
     */
    @GetMapping("getAllUsers")
    public List<User> findAllUser(){
        //調用方法查詢
        List<User> list = userService.list(null);
        return list;
    }

    /**
     * 添加用戶,注冊功能
     * @param user
     * @return
     */
    @PostMapping("addUser")
    public Boolean addUser(@RequestBody User user){
        boolean save = userService.save(user);
        return save;

    }

    /**
     * 獲取所有用戶名
     */
    @GetMapping("getAllUserName")
    public List<UserAll> getAllUserName(){
        List<UserAll> userNamelist = userService.getAllUserName();
        return userNamelist;
    }


    /**
     * 根據用戶ID查詢用戶的昵稱
     * @param id
     * @return
     */
    @GetMapping("getUserNickname/{id}")
    public String getUserNickname(@PathVariable Integer id){
        User user = userService.getById(id);
        String nickName = user.getNickName();
        return nickName;
    }

    /**
     *修改密碼
     * @param userName
     * @return
     */
    @PostMapping("changePassword/{userName}/{password}")
    public Boolean changePassword(@PathVariable String userName,
                                  @PathVariable String password){
        Boolean result = userService.changePassword(userName,password);
        return result;
    }


    /**
     * 用戶的登錄功能PostMapping
     * @param loginuser
     * @return
     */
    @PostMapping("login")
    public R login(@RequestBody loginUser loginuser){
        String token = userService.login(loginuser);
        if (token == "wrong Password"){
            return R.error().data("result",token);
        }else{
            return R.ok().data("result",token);
        }
    }
}
這里用到了幾個文件R.java,ResultCode.java,MyException.java
R.java
//統一返回結果

import io.swagger.annotations.ApiModelProperty;
import lombok.Data;

import java.util.HashMap;
import java.util.Map;

@Data
public class R {
    @ApiModelProperty(value = "是否成功")
    private Boolean success;

    @ApiModelProperty(value = "返回碼")
    private Integer code;

    @ApiModelProperty(value = "返回消息")
    private String message;

    @ApiModelProperty(value = "返回數據")
    private Map<String, Object> data = new HashMap<String, Object>();


    //構造方法私有化
    private R(){}


    //鏈式編程
    //成功靜態方法

    public static R ok(){
        R r = new R();
        r.setSuccess(true);
        r.setCode(ResultCode.SUCCESS);
        r.setMessage("成功");
        return r;
    }

    //失敗靜態方法
    public static R error(){
        R r = new R();
        r.setSuccess(false);
        r.setCode(ResultCode.ERROR);
        r.setMessage("失敗");
        return r;
    }

    public R success(Boolean success){
        this.setSuccess(success);
        return this;
    }

    public R message(String message){
        this.setMessage(message);
        return this;
    }

    public R code(Integer code){
        this.setCode(code);
        return this;
    }

    public R data(String key, Object value){
        this.data.put(key, value);
        return this;
    }

    public R data(Map<String, Object> map){
        this.setData(map);
        return this;
    }

}
ResultCode.java
public interface ResultCode {

    public static Integer SUCCESS = 20000;//成功

    public static Integer ERROR = 20001;//失敗
}
MyException.java
import lombok.AllArgsConstructor;
import lombok.Data;
import lombok.NoArgsConstructor;

@Data
@AllArgsConstructor//生成有參構造方法
@NoArgsConstructor//生成無參構造方法
public class MyException extends RuntimeException{


    private Integer code;//狀態碼

    private String msg;//異常信息
}
5、UserService接口
public interface UserService extends IService<User> {

    /**
     * 獲取所有用戶名
     * @return
     */
    List<UserAll> getAllUserName();

    /**
     * 修改密碼
     * @param userName
     * @return
     */
    Boolean changePassword(String userName,String password);

    /**
     * 用戶的登錄功能
     * @param userName
     * @param password
     * @return
     */
    Boolean login(String userName, String password);
}
6、UserServiceImpl.java
public class UserServiceImpl extends ServiceImpl<UserMapper, User> implements UserService {

    @Autowired
    private UserService userService;

    /**
     * 獲取所有用戶名
     */
    @Override
    public List<UserAll> getAllUserName() {

        //創建一個構造器
        QueryWrapper<User> wrapper = new QueryWrapper<>();
        //查詢所有的userName
        wrapper.eq("userName",0);
        //重新封裝一個UserAll的類,專門來查詢所有用戶名
        List<User> users = baseMapper.selectList(wrapper);

        List<UserAll> userAlls = new ArrayList<>();
        for (int i = 0; i < users.size(); i++) {
            User user = users.get(i);
            String userName = user.getUserName();
            UserAll userAll = new UserAll();
            userAll.setUserName(userName);
            userAlls.add(userAll);
        }
        return userAlls ;
    }

    /**
     * 修改密碼
     * @param userName
     * @param password
     * @return
     */
    @Override
    public Boolean changePassword(String userName,String password) {
        QueryWrapper<User> wrapper = new QueryWrapper<>();
        wrapper.eq("userName",userName);
        User user = baseMapper.selectOne(wrapper);
        if (user == null){
            return false;
        }
        user.setUserPassword(password);
        boolean save = userService.update(user,null);
        return save;
    }

    /**
     * 用戶的登錄功能PostMapping
     * @param loginuser
     * @return
     */
    @Override
    public String login(loginUser loginuser) {
        String userName = loginuser.getUserName();
        String userPassword = loginuser.getUserPassword();
        //用戶名和密碼非空判斷
        if(org.springframework.util.StringUtils.isEmpty(userName) || org.springframework.util.StringUtils.isEmpty(userPassword)) {
            return "wrong Password";
        }
        //判斷手機號是否正確
        QueryWrapper<User> wrapper = new QueryWrapper<>();
        wrapper.eq("userName",userName);
        User user = baseMapper.selectOne(wrapper);
        //判斷密碼
        //因為存儲到數據庫密碼肯定加密的
        //把輸入的密碼進行加密,再和數據庫密碼進行比較
        //加密方式 MD5
        if(!userPassword.equals(user.getUserPassword())) {
            return "wrong Password";

        }
        else {
            return "success login";
        }
    }
}
注意:第一個獲取所有用戶名的方法會發現我自己生成一個實體類,原因是我的數據庫表里面有很多字段,但是我在前端展示的時候只能顯示幾個字段,就是起到保護隱私安全的作用。所以我新建了UserAll類。不影響閱讀這些邏輯。
UserAll.java
@Data
public class UserAll {

    private String userName;
}
7、運行springboot
這就是全部代碼,我們運行之后啟動成功。然后打開swagger測試

這里就可以進行接口測試。這里就不進行展示了。
我們使用maven打包。點擊package。就可以生成jar包了。

然后上傳至服務器。

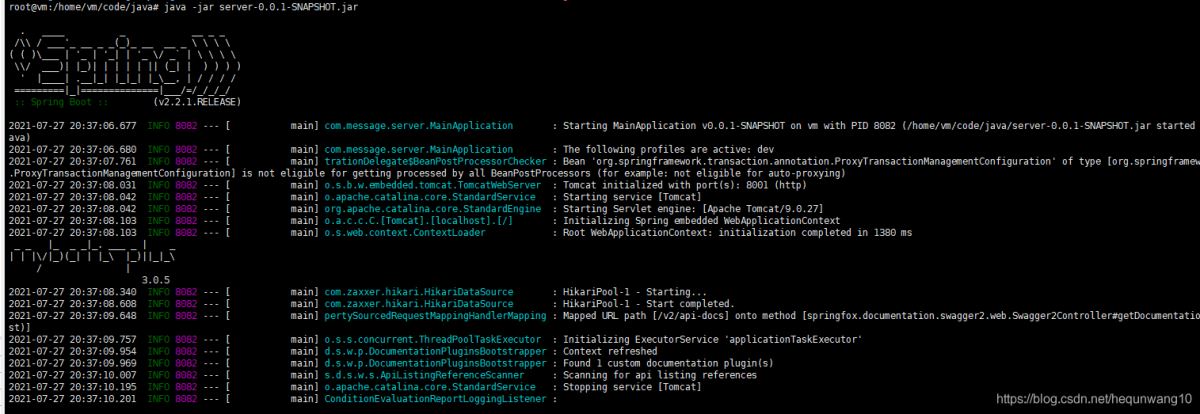
這里我們就使用 java -jar server-0.0.1-SNAPSHOT.jar 命令運行起來就可以了。

這樣就跑起來了。
注意:
這里有一個坑,要看服務器8001的端口有沒有開放,否則是不能通過ip訪問到的。
firewall-cmd --list-port
firewall-cmd --zone=public --add-port=8001/tcp --permanent
firewall-cmd --reload
firewall-cmd --query-port=8001/tcp
firewall-cmd --zone=public --remove-port=8001/tcp --permanent  # 刪除

netstat -anp|grep 8001

然后打開一個接口

打開AS ,運行APP,打印日志

上述就是小編為大家分享的Android中怎么利用OKhttp3實現登錄注冊功能了,如果剛好有類似的疑惑,不妨參照上述分析進行理解。如果想知道更多相關知識,歡迎關注億速云行業資訊頻道。
免責聲明:本站發布的內容(圖片、視頻和文字)以原創、轉載和分享為主,文章觀點不代表本網站立場,如果涉及侵權請聯系站長郵箱:is@yisu.com進行舉報,并提供相關證據,一經查實,將立刻刪除涉嫌侵權內容。