您好,登錄后才能下訂單哦!
您好,登錄后才能下訂單哦!
本篇內容主要講解“SSM登錄注冊功能如何實現”,感興趣的朋友不妨來看看。本文介紹的方法操作簡單快捷,實用性強。下面就讓小編來帶大家學習“SSM登錄注冊功能如何實現”吧!
Myeclipse 2017 CI 1
MySQL 5.7
Tomcat 8.5

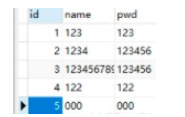
在數據庫中新建user表

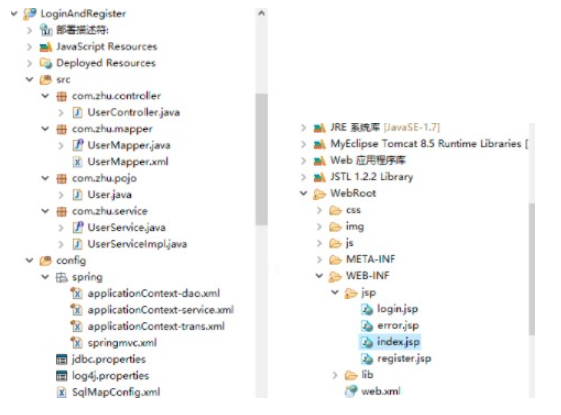
有幾個主要的配置文件,先了解下每個配置文件的作用。
1. web.xml:當服務啟動時首先會去加載web.xml這個資源文件,里面包括了對前端控制器、亂碼問題等配置。
2.applicatonContext.xml : 一般配置數據源,事物,注解等。
在這里我使用的是applicatonContext-*.xml的形式將DAO層、Service層、Transaction層分開配置,這樣便于管理
分別為applicatonContext-dao.xml、applicatonContext-service.xml、applicatonContext-transaction.xml
分開配置時,需要在web.xml中配置上下文位置
3.springmvc.xml: 里面配置的是控制層的 ,如視圖解析器靜態資源, mvc 文件上傳,攔截器等。
4.SqlMapConfig.xml: 該配置文件為MyBatis的配置文件,里面無需配置,一切交給spring管理,但是xml文件基礎配置要有。
持久層相關配置文件 applicationContext-dao.xml
<?xml version="1.0" encoding="UTF-8"?><beans xmlns="http://www.springframework.org/schema/beans"
	xmlns:context="http://www.springframework.org/schema/context" xmlns:p="http://www.springframework.org/schema/p"
	xmlns:aop="http://www.springframework.org/schema/aop" xmlns:tx="http://www.springframework.org/schema/tx"
	xmlns:xsi="http://www.w3.org/2001/XMLSchema-instance"
	xsi:schemaLocation="http://www.springframework.org/schema/beans http://www.springframework.org/schema/beans/spring-beans-4.0.xsd
	http://www.springframework.org/schema/context http://www.springframework.org/schema/context/spring-context-4.0.xsd
	http://www.springframework.org/schema/aop http://www.springframework.org/schema/aop/spring-aop-4.0.xsd http://www.springframework.org/schema/tx http://www.springframework.org/schema/tx/spring-tx-4.0.xsd
	http://www.springframework.org/schema/util http://www.springframework.org/schema/util/spring-util-4.0.xsd">
	<!-- 配置 讀取properties文件 jdbc.properties -->
	<context:property-placeholder location="classpath:jdbc.properties" />
	<!-- 配置 數據源 -->
	<bean id="dataSource" class="com.alibaba.druid.pool.DruidDataSource">
		<property name="driverClassName" value="${jdbc.driver}" />
		<property name="url" value="${jdbc.url}" />
		<property name="username" value="${jdbc.username}" />
		<property name="password" value="${jdbc.password}" />
	</bean>
	<!-- 配置SqlSessionFactory -->
	<bean class="org.mybatis.spring.SqlSessionFactoryBean">
		<!-- 設置MyBatis核心配置文件 -->
		<property name="configLocation" value="classpath:SqlMapConfig.xml" />
		<!-- 設置數據源 -->
		<property name="dataSource" ref="dataSource" />
		<!-- 別名包掃描 -->
		<property name="typeAliasesPackage" value="com.zhu.pojo" />
	</bean>
	<!-- 配置Mapper掃描 -->
	<bean class="org.mybatis.spring.mapper.MapperScannerConfigurer">
		<!-- 設置Mapper掃描包 -->
		<property name="basePackage" value="com.zhu.mapper" />
	</bean></beans>
applicationContext-service.xml
<?xml version="1.0" encoding="UTF-8"?><beans xmlns="http://www.springframework.org/schema/beans"
	xmlns:context="http://www.springframework.org/schema/context" xmlns:p="http://www.springframework.org/schema/p"
	xmlns:aop="http://www.springframework.org/schema/aop" xmlns:tx="http://www.springframework.org/schema/tx"
	xmlns:xsi="http://www.w3.org/2001/XMLSchema-instance"
	xsi:schemaLocation="http://www.springframework.org/schema/beans http://www.springframework.org/schema/beans/spring-beans-4.0.xsd
	http://www.springframework.org/schema/context http://www.springframework.org/schema/context/spring-context-4.0.xsd
	http://www.springframework.org/schema/aop http://www.springframework.org/schema/aop/spring-aop-4.0.xsd http://www.springframework.org/schema/tx http://www.springframework.org/schema/tx/spring-tx-4.0.xsd
	http://www.springframework.org/schema/util http://www.springframework.org/schema/util/spring-util-4.0.xsd">
	<!-- 配置@Service類的包掃描 -->
	<context:component-scan base-package="com.zhu.service"/></beans>
applicationContext-trans.xml
<?xml version="1.0" encoding="UTF-8"?><beans xmlns="http://www.springframework.org/schema/beans"
	xmlns:context="http://www.springframework.org/schema/context" xmlns:p="http://www.springframework.org/schema/p"
	xmlns:aop="http://www.springframework.org/schema/aop" xmlns:tx="http://www.springframework.org/schema/tx"
	xmlns:xsi="http://www.w3.org/2001/XMLSchema-instance"
	xsi:schemaLocation="http://www.springframework.org/schema/beans http://www.springframework.org/schema/beans/spring-beans-4.0.xsd
	http://www.springframework.org/schema/context http://www.springframework.org/schema/context/spring-context-4.0.xsd
	http://www.springframework.org/schema/aop http://www.springframework.org/schema/aop/spring-aop-4.0.xsd http://www.springframework.org/schema/tx http://www.springframework.org/schema/tx/spring-tx-4.0.xsd
	http://www.springframework.org/schema/util http://www.springframework.org/schema/util/spring-util-4.0.xsd">
	<!-- 事務管理器 -->
	<bean id="transactionManager"	class="org.springframework.jdbc.datasource.DataSourceTransactionManager">
		<!-- 數據源 -->
		<property name="dataSource" ref="dataSource" />
	</bean>
	<!-- 通知 -->
	<tx:advice id="txAdvice" transaction-manager="transactionManager">
		<tx:attributes>
			<!-- 傳播行為 -->
			<tx:method name="save*" propagation="REQUIRED" />
			<tx:method name="insert*" propagation="REQUIRED" />
			<tx:method name="add*" propagation="REQUIRED" />
			<tx:method name="create*" propagation="REQUIRED" />
			<tx:method name="delete*" propagation="REQUIRED" />
			<tx:method name="update*" propagation="REQUIRED" />
			<tx:method name="find*" propagation="SUPPORTS" read-only="true" />
			<tx:method name="select*" propagation="SUPPORTS" read-only="true" />
			<tx:method name="get*" propagation="SUPPORTS" read-only="true" />
			<tx:method name="query*" propagation="SUPPORTS" read-only="true" />
		</tx:attributes>
	</tx:advice>
	<!-- 切面 -->
	<aop:config>
		<aop:advisor advice-ref="txAdvice"
			pointcut="execution(* com.zhu.service.*.*(..))" />
	</aop:config></beans>
springmvc.xml
<?xml version="1.0" encoding="UTF-8"?><beans xmlns="http://www.springframework.org/schema/beans"
	xmlns:xsi="http://www.w3.org/2001/XMLSchema-instance" xmlns:p="http://www.springframework.org/schema/p"
	xmlns:context="http://www.springframework.org/schema/context"
	xmlns:mvc="http://www.springframework.org/schema/mvc"
	xsi:schemaLocation="http://www.springframework.org/schema/beans http://www.springframework.org/schema/beans/spring-beans-4.0.xsd
        http://www.springframework.org/schema/mvc http://www.springframework.org/schema/mvc/spring-mvc-4.0.xsd
        http://www.springframework.org/schema/context http://www.springframework.org/schema/context/spring-context-4.0.xsd">
	<!-- 配置Controller掃描 -->
	<context:component-scan base-package="com.zhu.controller" />
	<!-- 配置注解驅動 -->
	<mvc:annotation-driven />
	<!-- 配置視圖解析器 -->
	<bean	class="org.springframework.web.servlet.view.InternalResourceViewResolver">
		<!-- 前綴 -->
		<property name="prefix" value="/WEB-INF/jsp/" />
		<!-- 后綴 -->
		<property name="suffix" value=".jsp" />
	</bean></beans>
SqlMapConfig.xml這個無需設置,但是必須要有
<?xml version="1.0" encoding="UTF-8" ?><!DOCTYPE configuration PUBLIC "-//mybatis.org//DTD Config 3.0//EN"
"http://mybatis.org/dtd/mybatis-3-config.dtd"><configuration> </configuration>
配置文件寫好了,接下來就開始寫代碼
先從Mapper開始寫:
1.先寫一個接口UserMapper.java
package com.zhu.mapper;
import com.zhu.pojo.User;
public interface UserMapper {	//登錄驗證
	User logincheck(User user);	//注冊
    void register(User user);
}
2.在寫一個UserMapper.xml與之相關聯
<?xml version="1.0" encoding="UTF-8" ?><!DOCTYPE mapper
PUBLIC "-//mybatis.org//DTD Mapper 3.0//EN"
"http://mybatis.org/dtd/mybatis-3-mapper.dtd"><mapper namespace="com.zhu.mapper.UserMapper">
    <select id="logincheck" parameterType="com.zhu.pojo.User" resultType="com.zhu.pojo.User">
        select *
        from user        <where>
			<if test="name != null and name != ''">
				and `name` = #{name}			</if>
			<if test="pwd != null and pwd != ''">
				AND `pwd` = #{pwd}			</if>
		</where>
    </select>
    <insert id="register" parameterType="com.zhu.pojo.User">
       insert into
       user(name,pwd)
       value(#{name},#{pwd})    </insert></mapper>
3.接下來就是Service層了,先寫一個接口:UserService.java,內容與UserMapper.java一樣
4.然后寫一個類實現UserService.java,代碼比較簡單,不做過多解釋,大家不要忘了要給給它標記@Service
package com.zhu.service;import org.springframework.beans.factory.annotation.Autowired;import org.springframework.stereotype.Service;
import com.zhu.mapper.UserMapper;import com.zhu.pojo.User;@Servicepublic class UserServiceImpl implements UserService {   //屬性注入
   @Autowired
   private UserMapper usermapper;
	@Override
	public User logincheck(User user) {
		User u = usermapper.logincheck(user);		return u;
	}
	@Override
	public void register(User user) {
		usermapper.register(user);
	}
}
5.最后就是Controller層了,Controller層的代碼主要是調用Service層實現的方法,實現一些操作,并與前端進行交互。
UserController.java
package com.zhu.controller;
import org.springframework.beans.factory.annotation.Autowired;import org.springframework.stereotype.Controller;import org.springframework.ui.Model;import org.springframework.web.bind.annotation.RequestMapping;import org.springframework.web.bind.annotation.RequestParam;import com.zhu.pojo.User;import com.zhu.service.UserService;
@Controllerpublic class UserController {	@Autowired
     private UserService userService;	//轉向登錄頁面
	@RequestMapping("tologin")	public String tologin(){		return "login";
	}	//登錄驗證
	@RequestMapping("login")	public String  login(@RequestParam("username") String username,
			@RequestParam("password") String password,Model model){
		User user = new User();
		user.setName(username);
		user.setPwd(password);		if(userService.logincheck(user) != null){
			model.addAttribute("username",username);			return "index";
		}	    else{
	    	model.addAttribute("error","賬號或密碼錯誤");	    	return "login";
	    }
		}	//轉向注冊頁面
	@RequestMapping("toregister")	public String toregister(){		return "register";
	}	//注冊
	@RequestMapping("register")	public String  register(@RequestParam("username") String username,
			@RequestParam("password") String password){
		User user = new User();
		user.setName(username);
		user.setPwd(password);
		userService.register(user);
		return "login";
     }
}
到此,相信大家對“SSM登錄注冊功能如何實現”有了更深的了解,不妨來實際操作一番吧!這里是億速云網站,更多相關內容可以進入相關頻道進行查詢,關注我們,繼續學習!
免責聲明:本站發布的內容(圖片、視頻和文字)以原創、轉載和分享為主,文章觀點不代表本網站立場,如果涉及侵權請聯系站長郵箱:is@yisu.com進行舉報,并提供相關證據,一經查實,將立刻刪除涉嫌侵權內容。