您好,登錄后才能下訂單哦!
您好,登錄后才能下訂單哦!
這篇文章將為大家詳細講解有關Angular中NgRx/Store框架怎么用,小編覺得挺實用的,因此分享給大家做個參考,希望大家閱讀完這篇文章后可以有所收獲。
ngrx/store 是基于RxJS的狀態管理庫,其靈感來源于Redux。在NgRx中,狀態是由一個包含action和reducer的函數的映射組成的。Reducer函數經由action的分發以及當前或初始的狀態而被調用,最后由reducer返回一個不可變的狀態。
在前端大型復雜Angular/AngularJS項目的狀態管理一直是個讓人頭疼的問題。在AngularJS(1.x版本)中,狀態管理通常由服務,事件,$rootScope混合處理。在Angular中(2+版本),組件通信讓狀態管理變得清晰一些,但還是有點復雜,根據數據流向不同會用到很多方法。
視圖層通過dispatch發起一個行為(action)、Reducer接收action,根據action.type類型來判斷執行、改變狀態、返回一個新的狀態給store、由store更新state。
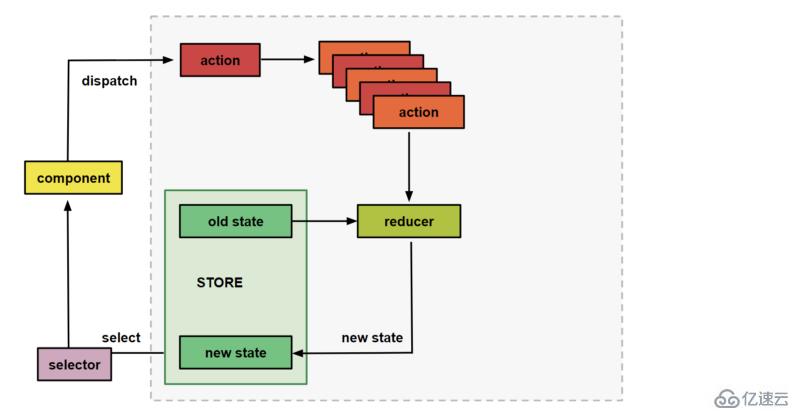
State(狀態) 是狀態(state)存儲器
Action(行為) 描述狀態的變化
Reducer(歸約器/歸約函數) 根據先前狀態以及當前行為來計算出新的狀態,里面的方法為純函數
狀態用State的可觀察對象,Action的觀察者——Store來訪問
Actions是信息的載體,它發送數據到reducer,然后reducer更新store。Actions是store能接受數據的唯一方式。
在ngrx/store里,Action的接口是這樣的:
// actions包括行為類型和對應的數據載體
export interface Action {
  type: string;
  payload?: any;
}type描述期待的狀態變化類型。比如,添加待辦 ADD_TODO,增加 DECREMENT 等。payload是發送到待更新store中的數據。store派發action 的代碼類似如下:
// 派發action,從而更新store
store.dispatch({
  type: 'ADD_TODO',
  payload: 'Buy milk'
});Reducers規定了行為對應的具體狀態變化。是純函數,通過接收前一個狀態和派發行為返回新對象作為下一個狀態的方式來改變狀態,新對象通常用Object.assign和擴展語法來實現。
// reducer定義了action被派發時state的具體改變方式
export const todoReducer = (state = [], action) => {
  switch(action.type) {
    case 'ADD_TODO':
      return [...state, action.payload];
    default:
      return state;
  }
}
開發時特別要注意函數的純性。因為純函數:
不會改變它作用域外的狀態
輸出只決定于輸入
相同輸入,總是得到相同輸出
store中儲存了應用中所有的不可變狀態。ngrx/store中的store是RxJS狀態的可觀察對象,以及行為的觀察者。
可以利用Store來派發行為。也可以用Store的select()方法獲取可觀察對象,然后訂閱觀察,在狀態變化之后做出反應。
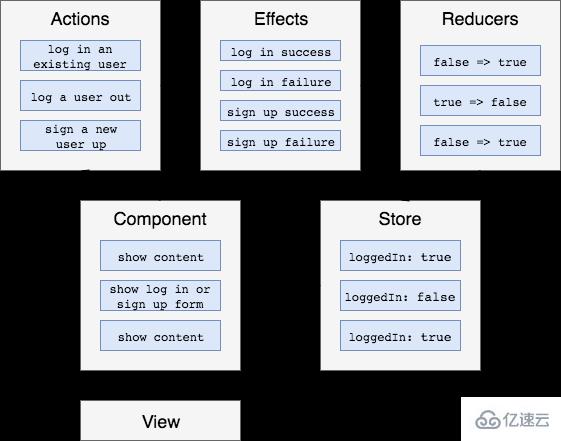
上面我們描述的是基本流程。在實際開發過程中,會涉及API請求、瀏覽器存儲等異步操作,就需要effects和services,effects由action觸發,進行一些列邏輯后發出一個或者多個需要添加到隊列的action,再由reducers處理。
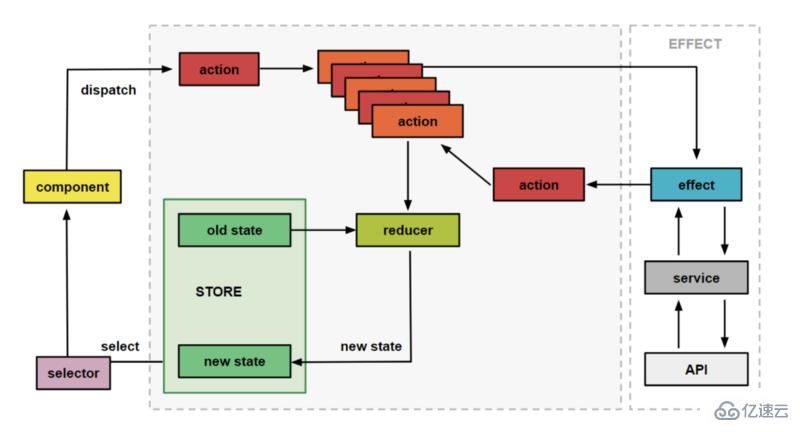
使用ngrx/store框架開發應用,始終只維護一個狀態,并減少對API的調用。
簡單介紹一個管理系統的登錄模塊。
1、增加組件:LoginComponent,主要就是布局,代碼為組件邏輯
2、定義用戶:User Model
export class User {
    id: number;
    username: string;
    password: string;
    email: string;
    avatar: string;

    clear(): void {
        this.id = undefined;
        this.username = "";
        this.password = "";
        this.email = "";
        this.avatar = "./assets/default.jpg";
    }
}3、添加表單:在組件LoginComponent增加Form表單
按照上述的4個原則定義相應的Actions
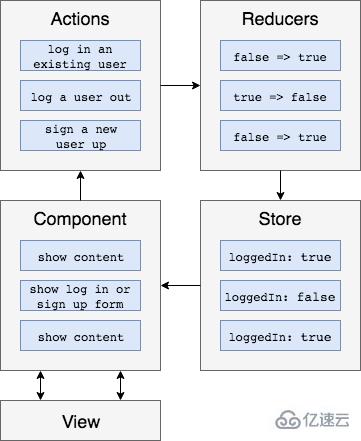
reducers定義狀態
在文件auth.reducers.ts中創建狀態,并初始化
export interface AuthState {
    isAuthenticated: boolean;
    user: User | null;
    errorMessage: string | null;
}

export const initialAuthState: AuthState = {
    isAuthenticated: false,
    user: null,
    errorMessage: null
};actions定義行為
export enum AuthActionTypes {
    Login = "[Auth] Login",
    LoginSuccess = "[Auth] Login Success",
    LoginFailure = "[Auth] Login Failure"
}

export class Login implements Action {
    readonly type = AuthActionTypes.Login;
    constructor(public payload: any) {}
}service實現數據交互(服務器)
@Injectable()
export class AuthService {
    private BASE_URL = "api/user";

    constructor(private http: HttpClient) {}

    getToken(): string {
        return localStorage.getItem("token");
    }

    login(email: string, pwd: string): Observable<any> {
        const url = `${this.BASE_URL}/login`;
        return this.http.post<User>(url, { email, pwd });
    }
}
effects偵聽從Store調度的動作,執行某些邏輯,然后分派新動作
一般情況下只在這里調用API
通過返回一個action給reducer進行操作來改變store的狀態
effects總是返回一個或多個action(除非@Effect with {dispatch: false}))
@Effect()
Login: Observable<any> = this.actions.pipe(
    ofType(AuthActionTypes.Login),   //執行Login響應
    map((action: Login) => action.payload),
    switchMap(payload => {
        return this.authService.login(payload.email, payload.password).pipe(
            map(user => {
                return new LoginSuccess({ uid: user.id, email: payload.email });
            }),
            catchError(error => {
                return of(new LoginFailure(error));
            })
        );
    })
);

//失敗的效果
@Effect({ dispatch: false })
LoginFailure: Observable<any> = this.actions.pipe(ofType(AuthActionTypes.LoginFailure));

//成功的效果
@Effect({ dispatch: false })
LoginSuccess: Observable<any> = this.actions.pipe(
    ofType(AuthActionTypes.LoginSuccess),
    tap(user => {
        localStorage.setItem("uid", user.payload.id);
        this.router.navigateByUrl("/sample");
    })
);
關于“Angular中NgRx/Store框架怎么用”這篇文章就分享到這里了,希望以上內容可以對大家有一定的幫助,使各位可以學到更多知識,如果覺得文章不錯,請把它分享出去讓更多的人看到。
免責聲明:本站發布的內容(圖片、視頻和文字)以原創、轉載和分享為主,文章觀點不代表本網站立場,如果涉及侵權請聯系站長郵箱:is@yisu.com進行舉報,并提供相關證據,一經查實,將立刻刪除涉嫌侵權內容。