您好,登錄后才能下訂單哦!
您好,登錄后才能下訂單哦!
這篇文章主要講解了“如何用C#開發微信公眾平臺”,文中的講解內容簡單清晰,易于學習與理解,下面請大家跟著小編的思路慢慢深入,一起來研究和學習“如何用C#開發微信公眾平臺”吧!
服務號和訂閱號
服務號是公司申請的微信公共賬號,訂閱號是個人申請的,我個人也申請了一個,不過沒怎么用。
服務號
1個月(30天)內僅可以發送1條群發消息。
發給訂閱用戶(粉絲)的消息,會顯示在對方的聊天列表中。
在發送消息給用戶時,用戶將收到即時的消息提醒。
服務號會在訂閱用戶(粉絲)的通訊錄中。
可申請自定義菜單。
訂閱號
每天(24小時內)可以發送1條群發消息。
發給訂閱用戶(粉絲)的消息,將會顯示在對方的訂閱號文件夾中。
在發送消息給訂閱用戶(粉絲)時,訂閱用戶不會收到即時消息提醒。
在訂閱用戶(粉絲)的通訊錄中,訂閱號將被放入訂閱號文件夾中。
訂閱號不支持申請自定義菜單。
URL配置
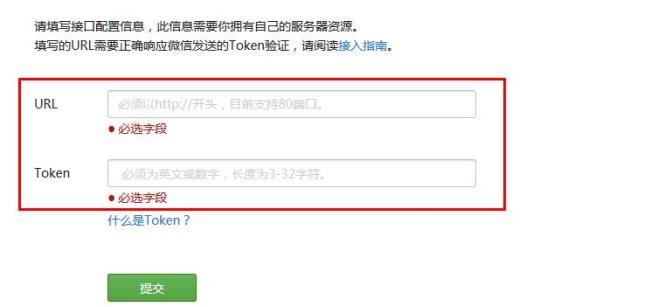
啟用開發模式需要先成為開發者,而且編輯模式和開發模式只能選擇一個,進入微信公眾平臺-開發模式,如下:

需要填寫url和token,當時本人填寫這個的時候花了好久,我本以為填寫個服務器的url就可以了(80端口),但是不行,主要是沒有仔細的閱讀提示信息,所以總是提示


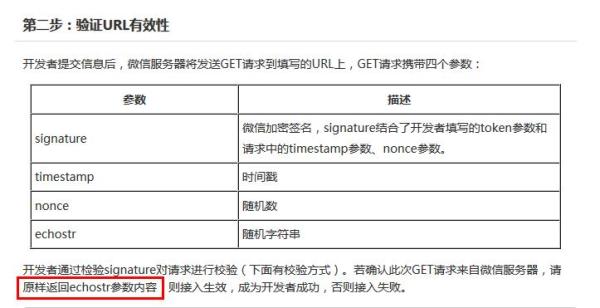
從上面可以看出,點擊提交后微信會向我們填寫的服務器發送幾個參數,然后需要原樣返回出來,所以在提交url的時候,先在服務器創建接口測試返回echostr參數內容。代碼:
//成為開發者url測試,返回echoStr public void InterfaceTest() { string token = "填寫的token"; if (string.IsNullOrEmpty(token)) { return; } string echoString = HttpContext.Current.Request.QueryString["echoStr"]; string signature = HttpContext.Current.Request.QueryString["signature"]; string timestamp = HttpContext.Current.Request.QueryString["timestamp"]; string nonce = HttpContext.Current.Request.QueryString["nonce"]; if (!string.IsNullOrEmpty(echoString)) { HttpContext.Current.Response.Write(echoString); HttpContext.Current.Response.End(); } }在一般處理程序ashx的ProcessRequest的方法內調用上面的方法,url填寫的就是這個ashx的服務器地址,token是一個服務器標示,可以隨便輸入,代碼中的token要和申請填寫的一致,成為開發者才能做開發。
創建菜單
我們添加一些微信服務號,聊天窗口下面有些菜單,這個可以在編輯模式簡單配置,也可以在開發模式代碼配置。微信公眾平臺開發者文檔:http://mp.weixin.qq.com/wiki/index.php?title=自定義菜單創建接口,可以看到創建菜單的一些要點,下面的使用網頁調試工具調試該接口,只是調試接口是否可用,并不是直接創建菜單的,菜單分為兩種:
click: 用戶點擊click類型按鈕后,微信服務器會通過消息接口推送消息類型為event 的結構給開發者(參考消息接口指南),并且帶上按鈕中開發者填寫的key值,開發者可以通過自定義的key值與用戶進行交互。
view: 用戶點擊view類型按鈕后,微信客戶端將會打開開發者在按鈕中填寫的url值 (即網頁鏈接),達到打開網頁的目的,建議與網頁授權獲取用戶基本信息接口結合,獲得用戶的登入個人信息。
click菜單需要填一個key,這個是在我們菜單點擊事件的時候會用到,view只是一個菜單超鏈接。菜單數據是json格式,官網是php示例,其實C#實現起來也很簡單,就是post發送一個json數據,示例代碼:
public partial class createMenu : System.Web.UI.Page { protected void Page_Load(object sender, EventArgs e) { FileStream fs1 = new FileStream(Server.MapPath(".")+"\\menu.txt", FileMode.Open); StreamReader sr = new StreamReader(fs1, Encoding.GetEncoding("GBK")); string menu = sr.ReadToEnd(); sr.Close(); fs1.Close(); GetPage("https://api.weixin.qq.com/cgi-bin/menu/create?access_token=access_token", menu); } public string GetPage(string posturl, string postData) { Stream outstream = null; Stream instream = null; StreamReader sr = null; HttpWebResponse response = null; HttpWebRequest request = null; Encoding encoding = Encoding.UTF8; byte[] data = encoding.GetBytes(postData); // 準備請求... try { // 設置參數 request = WebRequest.Create(posturl) as HttpWebRequest; CookieContainer cookieContainer = new CookieContainer(); request.CookieContainer = cookieContainer; request.AllowAutoRedirect = true; request.Method = "POST"; request.ContentType = "application/x-www-form-urlencoded"; request.ContentLength = data.Length; outstream = request.GetRequestStream(); outstream.Write(data, 0, data.Length); outstream.Close(); //發送請求并獲取相應回應數據 response = request.GetResponse() as HttpWebResponse; //直到request.GetResponse()程序才開始向目標網頁發送Post請求 instream = response.GetResponseStream(); sr = new StreamReader(instream, encoding); //返回結果網頁(html)代碼 string content = sr.ReadToEnd(); string err = string.Empty; Response.Write(content); return content; } catch (Exception ex) { string err = ex.Message; return string.Empty; } } }menu.text里面的內容就是json示例菜單,大家可以從示例復制下來,按照你的需要修改一些就行了。
關于access_token,其實就是一個請求標示,獲取方式:https://api.weixin.qq.com/cgi-bin/token?grant_type=client_credential&appid=appid&secret=secret;appid和secret是開發者標示,在你的信息里面可以看到,通過這個鏈接返回一個json數據,就可以得到access_token值。
需要注意的是:access_token有一定的時效性,失效的話就需要重新獲取下,這個在本機就可以創建,不需要上傳到服務器,創建菜單正確,返回{"errcode":0,"errmsg":"ok"}提示信息。這邊就不截圖了,大家試下就可以看到效果,一般創建菜單是一到兩分鐘生效,實在不行就重新關注下。
查詢、刪除菜單
查詢和刪除菜單也很簡單,只不過是get請求,不需要傳數據,看下示例代碼:
public partial class selectMenu : System.Web.UI.Page { protected void Page_Load(object sender, EventArgs e) { GetPage("https://api.weixin.qq.com/cgi-bin/menu/get?access_token=access_token"); //GetPage("https://api.weixin.qq.com/cgi-bin/menu/delete?access_token=access_token"); } public string GetPage(string posturl) { Stream instream = null; StreamReader sr = null; HttpWebResponse response = null; HttpWebRequest request = null; Encoding encoding = Encoding.UTF8; // 準備請求... try { // 設置參數 request = WebRequest.Create(posturl) as HttpWebRequest; CookieContainer cookieContainer = new CookieContainer(); request.CookieContainer = cookieContainer; request.AllowAutoRedirect = true; request.Method = "GET"; request.ContentType = "application/x-www-form-urlencoded"; //發送請求并獲取相應回應數據 response = request.GetResponse() as HttpWebResponse; //直到request.GetResponse()程序才開始向目標網頁發送Post請求 instream = response.GetResponseStream(); sr = new StreamReader(instream, encoding); //返回結果網頁(html)代碼 string content = sr.ReadToEnd(); string err = string.Empty; Response.Write(content); return content; } catch (Exception ex) { string err = ex.Message; return string.Empty; } } }access_token獲取方式上面已經講過了,查詢菜單返回的是json數據,其實就是我們創建菜單的menu.txt里面的內容。
刪除成功返回信息提示:{"errcode":0,"errmsg":"ok"},這個也只要在本地運行就可以了。
接受消息
微信公眾平臺開發者文檔:http://mp.weixin.qq.com/wiki/index.php?title=接收普通消息,我們使用微信就是要對用戶發送的信息進行處理,這邊以接受普通消息為例,語音、圖片消息等,舉一反三可得。
從文檔上可以看出接受消息獲得的是一個xml格式文件,當時有點犯傻的是,我要在哪邊進行接受消息啊?還郁悶了半天,其實就是你一開始填寫的url,是不是很汗顏啊,哈哈。
<xml> <ToUserName><![CDATA[toUser]]></ToUserName> <FromUserName><![CDATA[fromUser]]></FromUserName> <CreateTime>1348831860</CreateTime> <MsgType><![CDATA[text]]></MsgType> <Content><![CDATA[this is a test]]></Content> <MsgId>1234567890123456</MsgId> </xml>
我們在ashx添加下面代碼:
public void ProcessRequest(HttpContext param_context) { string postString = string.Empty; if (HttpContext.Current.Request.HttpMethod.ToUpper() == "POST") { using (Stream stream = HttpContext.Current.Request.InputStream) { Byte[] postBytes = new Byte[stream.Length]; stream.Read(postBytes, 0, (Int32)stream.Length); postString = Encoding.UTF8.GetString(postBytes); Handle(postString); } } } /// <summary> /// 處理信息并應答 /// </summary> private void Handle(string postStr) { messageHelp help = new messageHelp(); string responseContent = help.ReturnMessage(postStr); HttpContext.Current.Response.ContentEncoding = Encoding.UTF8; HttpContext.Current.Response.Write(responseContent); }messageHelp是消息處理幫助類,這邊提供下部分代碼,完整的可以下載來,獲取的postString是xml,格式如上,我們這邊只需要轉換成XmlDocument進行解析就行了:
//接受文本消息 public string TextHandle(XmlDocument xmldoc) { string responseContent = ""; XmlNode ToUserName = xmldoc.SelectSingleNode("/xml/ToUserName"); XmlNode FromUserName = xmldoc.SelectSingleNode("/xml/FromUserName"); XmlNode Content = xmldoc.SelectSingleNode("/xml/Content"); if (Content != null) { responseContent = string.Format(ReplyType.Message_Text, FromUserName.InnerText, ToUserName.InnerText, DateTime.Now.Ticks, "歡迎使用微信公共賬號,您輸入的內容為:" + Content.InnerText+"\r\n<a href=\"http://www.cnblogs.com\">點擊進入</a>"); } return responseContent; } /// <summary> /// 普通文本消息 /// </summary> public static string Message_Text { get { return @"<xml> <ToUserName><![CDATA[{0}]]></ToUserName> <FromUserName><![CDATA[{1}]]></FromUserName> <CreateTime>{2}</CreateTime> <MsgType><![CDATA[text]]></MsgType> <Content><![CDATA[{3}]]></Content> </xml>"; } }上面的代碼就是接受消息,并做一些處理操作,返回消息。
發送消息(圖文、菜單事件響應)
這邊發送消息我分為三種:普通消息、圖文消息和菜單事件響應。普通消息其實上面說接受消息的時候講到了,完整的代碼下邊下載來看。
我們先看下圖文消息和菜單事件響應,微信公眾平臺開發者文檔:http://mp.weixin.qq.com/wiki/index.php?title=回復圖文消息#.E5.9B.9E.E5.A4.8D.E5.9B.BE.E6.96.87.E6.B6.88.E6.81.AF,xml格式為:
<xml> <ToUserName><![CDATA[toUser]]></ToUserName> <FromUserName><![CDATA[fromUser]]></FromUserName> <CreateTime>12345678</CreateTime> <MsgType><![CDATA[news]]></MsgType> <ArticleCount>2</ArticleCount> <Articles> <item> <Title><![CDATA[title1]]></Title> <Description><![CDATA[description1]]></Description> <PicUrl><![CDATA[picurl]]></PicUrl> <Url><![CDATA[url]]></Url> </item> <item> <Title><![CDATA[title]]></Title> <Description><![CDATA[description]]></Description> <PicUrl><![CDATA[picurl]]></PicUrl> <Url><![CDATA[url]]></Url> </item> </Articles> </xml>
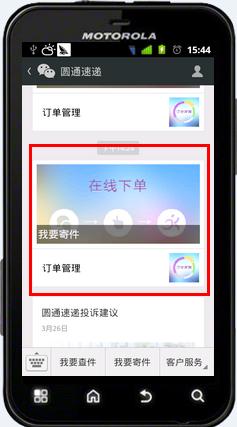
圖文消息分為兩種,我們先看下效果,找的圓通速遞的微信服務號做示例:


剛開始做的時候,我以為這兩種應該不是用的同一個接口,但是在文檔中找了半天也沒有找到除這個之外的,就試了下兩個圖文消息,發現就是這個接口發送的,如果多個的話,item中的Description會失效,只會顯示Title,大家試下就知道了,示例代碼:
//事件 public string EventHandle(XmlDocument xmldoc) { string responseContent = ""; XmlNode Event = xmldoc.SelectSingleNode("/xml/Event"); XmlNode EventKey = xmldoc.SelectSingleNode("/xml/EventKey"); XmlNode ToUserName = xmldoc.SelectSingleNode("/xml/ToUserName"); XmlNode FromUserName = xmldoc.SelectSingleNode("/xml/FromUserName"); if (Event!=null) { //菜單單擊事件 if (Event.InnerText.Equals("CLICK")) { if (EventKey.InnerText.Equals("click_one"))//click_one { responseContent = string.Format(ReplyType.Message_Text, FromUserName.InnerText, ToUserName.InnerText, DateTime.Now.Ticks, "你點擊的是click_one"); } else if (EventKey.InnerText.Equals("click_two"))//click_two { responseContent = string.Format(ReplyType.Message_News_Main, FromUserName.InnerText, ToUserName.InnerText, DateTime.Now.Ticks, "2", string.Format(ReplyType.Message_News_Item,"我要寄件","", "http://www.soso.com/orderPlace.jpg", "http://www.soso.com/")+ string.Format(ReplyType.Message_News_Item, "訂單管理", "", "http://www.soso.com/orderManage.jpg", "http://www.soso.com/")); } else if (EventKey.InnerText.Equals("click_three"))//click_three { responseContent = string.Format(ReplyType.Message_News_Main, FromUserName.InnerText, ToUserName.InnerText, DateTime.Now.Ticks, "1", string.Format(ReplyType.Message_News_Item, "標題", "摘要", "http://www.soso.com/jieshao.jpg", "http://www.soso.com/")); } } } return responseContent; } /// <summary> /// 圖文消息主體 /// </summary> public static string Message_News_Main { get { return @"<xml> <ToUserName><![CDATA[{0}]]></ToUserName> <FromUserName><![CDATA[{1}]]></FromUserName> <CreateTime>{2}</CreateTime> <MsgType><![CDATA[news]]></MsgType> <ArticleCount>{3}</ArticleCount> <Articles> {4} </Articles> </xml> "; } } /// <summary> /// 圖文消息項 /// </summary> public static string Message_News_Item { get { return @"<item> <Title><![CDATA[{0}]]></Title> <Description><![CDATA[{1}]]></Description> <PicUrl><![CDATA[{2}]]></PicUrl> <Url><![CDATA[{3}]]></Url> </item>"; } }需要注意的是:XmlNode Event = xmldoc.SelectSingleNode("/xml/Event")表示獲取的是事件類型,XmlNode EventKey = xmldoc.SelectSingleNode("/xml/EventKey")表示事件標示,就是我們創建菜單添加click的key,通過key我們就可以判斷出是點的哪個菜單。
還有一點是回復超鏈接,有時候在服務號會發送一些鏈接,我們打開直接就會鏈接到相關網址,只需要在回復內容中添加:<a href="http://www.baidu.com">點擊進入</a>,就可以了。
感謝各位的閱讀,以上就是“如何用C#開發微信公眾平臺”的內容了,經過本文的學習后,相信大家對如何用C#開發微信公眾平臺這一問題有了更深刻的體會,具體使用情況還需要大家實踐驗證。這里是億速云,小編將為大家推送更多相關知識點的文章,歡迎關注!
免責聲明:本站發布的內容(圖片、視頻和文字)以原創、轉載和分享為主,文章觀點不代表本網站立場,如果涉及侵權請聯系站長郵箱:is@yisu.com進行舉報,并提供相關證據,一經查實,將立刻刪除涉嫌侵權內容。