溫馨提示×
您好,登錄后才能下訂單哦!
點擊 登錄注冊 即表示同意《億速云用戶服務條款》
您好,登錄后才能下訂單哦!
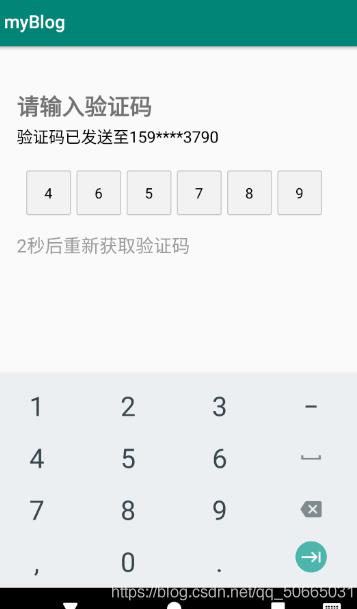
這篇文章主要介紹了Android實現驗證碼登錄的方法,具有一定借鑒價值,感興趣的朋友可以參考下,希望大家閱讀完這篇文章之后大有收獲,下面讓小編帶著大家一起了解一下。

1.導包
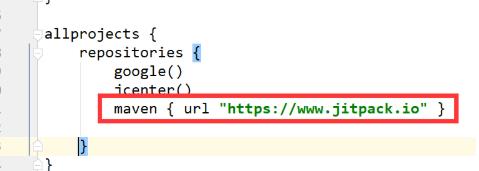
1.1在項目的gradle中導入
maven { url "https://www.jitpack.io" }

1.2在model的gradle的dependencies導入
//XUI項目
implementation 'com.github.xuexiangjys:XUI:1.1.6'

implementation 'androidx.appcompat:appcompat:1.1.0'
implementation 'androidx.recyclerview:recyclerview:1.1.0'
implementation 'com.google.android.material:material:1.1.0'
implementation 'com.github.bumptech.glide:glide:4.11.0'


1.3點擊右上角的sync now
2.新建xml文件
phone_code.xml
<?xml version="1.0" encoding="utf-8"?>
<LinearLayout xmlns:android="http://schemas.android.com/apk/res/android"
 android:layout_width="match_parent"
 android:layout_height="match_parent"
 android:orientation="vertical"
 xmlns:app="http://schemas.android.com/apk/res-auto">


 <TextView
 android:layout_width="wrap_content"
 android:layout_height="wrap_content"
 android:layout_marginLeft="30dp"
 android:layout_marginTop="50dp"
 android:textSize="25dp"
 android:textStyle="bold"
 android:text="請輸入驗證碼"
 />
 <TextView
 android:id="@+id/phone_number_str"
 android:layout_width="wrap_content"
 android:layout_height="wrap_content"
 android:textSize="18dp"
 android:textColor="#000000"
 android:layout_marginLeft="30dp"
 android:layout_marginTop="5dp"
 />

 <com.xuexiang.xui.widget.edittext.verify.VerifyCodeEditText
 android:id="@+id/phone_code_input"
 android:layout_width="match_parent"
 android:layout_height="wrap_content"
 android:layout_marginLeft="10dp"
 android:layout_marginTop="26dp"
 android:layout_marginRight="10dp"
 app:vcet_is_pwd="false"
 app:vcet_number="6"
 app:vcet_pwd_radius="10dp"
 app:vcet_text_color="#000000"
 app:vcet_width="50dp" />

 <TextView
 android:id="@+id/re_get_code"
 android:layout_width="wrap_content"
 android:layout_height="wrap_content"
 android:layout_marginTop="20dp"
 android:layout_marginLeft="30dp"
 android:textColor="#60000000"
 android:textSize="20dp"
 />

 <TextView
 android:id="@+id/get_code"
 android:layout_width="wrap_content"
 android:layout_height="wrap_content"
 android:layout_marginTop="20dp"
 android:layout_marginLeft="30dp"
 android:textColor="#60000000"
 android:textSize="15dp"
 />

</LinearLayout>
3.修改Activity
MainActivity.java
import androidx.appcompat.app.AppCompatActivity;

import android.os.Bundle;
import android.content.Intent;
import android.view.View;
import android.widget.TextView;

import androidx.annotation.Nullable;


import java.lang.reflect.Field;
import java.util.Timer;
import java.util.TimerTask;

public class MainActivity extends AppCompatActivity implements View.OnClickListener {
 TextView phoneNumberStr;
 TextView codeCountDown;
 TextView reGetCode;
 private int recLen = 10;

 Timer timer = new Timer();
 @Override
 protected void onCreate(@Nullable Bundle savedInstanceState) {
 super.onCreate(savedInstanceState);
 setContentView(R.layout.phone_code);
 init();//初始化組件
 String phone = new String("15968373790");

 if (phone.length() < 11)
  phoneNumberStr.setText("驗證碼已發送至"+phone);
 else
  phoneNumberStr.setText("驗證碼已發送至"+phone.substring(0,3)+"****"+phone.substring(7));
 timer.schedule(task, 1000, 1000); // 啟動一個1000毫秒(1秒)的定時任務

 }

 TimerTask task = new TimerTask() {
 @Override
 public void run() {

  runOnUiThread(new Runnable() {
  @Override
  public void run() {
   codeCountDown.setVisibility(View.VISIBLE);
   recLen--;
   codeCountDown.setText(recLen+"秒后重新獲取驗證碼");//動態調整秒數下降
   if(recLen <= 0){
   timer.cancel();
   codeCountDown.setVisibility(View.GONE);
   reGetCode.setText("重新獲得驗證碼");//倒計時結束,修改為重新獲得驗證碼

   reGetCode.setVisibility(View.VISIBLE);//修改控件的可見性
   reGetCode.setOnClickListener(new View.OnClickListener() {
    @Override
    public void onClick(View v) {
    reGetCode.setVisibility(View.GONE);
    recLen = 10;
    codeCountDown.setVisibility(View.VISIBLE);
    codeCountDown.setText(recLen+"秒后重新獲取驗證碼");
    timer = new Timer();
    //task一般情況下使用過一次后無法再使用,但可以借助反射使得task重新工作,修改state屬性即可,state為1時表示已經使用過無法再次使用,為0表示可以使用
    Field field;
    try {
     field = TimerTask.class.getDeclaredField("state");
     field.setAccessible(true);
     field.set(task, 0);
    } catch (NoSuchFieldException e) {
     e.printStackTrace();
    } catch (Exception e) {
     e.printStackTrace();
    }
    timer.schedule(task, 1000, 1000);
    }
   });
   }
  }
  });
 }
 };


 private void init() {

 phoneNumberStr = findViewById(R.id.phone_number_str);
 codeCountDown = findViewById(R.id.re_get_code);
 reGetCode = findViewById(R.id.re_get_code);
 reGetCode.setOnClickListener(this);
 reGetCode.setVisibility(View.GONE);
 }


 @Override
 public void onClick(View v) {
 Intent intent;//設置單擊事件使得倒計時可以繼續
 switch (v.getId()){
  case R.id.get_code:
  reGetCode.setVisibility(View.GONE);
  timer.schedule(task, 1000, 1000); // timeTask
  break;
 }
 }
}
感謝你能夠認真閱讀完這篇文章,希望小編分享的“Android實現驗證碼登錄的方法”這篇文章對大家有幫助,同時也希望大家多多支持億速云,關注億速云行業資訊頻道,更多相關知識等著你來學習!
免責聲明:本站發布的內容(圖片、視頻和文字)以原創、轉載和分享為主,文章觀點不代表本網站立場,如果涉及侵權請聯系站長郵箱:is@yisu.com進行舉報,并提供相關證據,一經查實,將立刻刪除涉嫌侵權內容。