您好,登錄后才能下訂單哦!
您好,登錄后才能下訂單哦!
這篇文章主要講解了Spring Security實現短信驗證碼登錄功能的方法,內容清晰明了,對此有興趣的小伙伴可以學習一下,相信大家閱讀完之后會有幫助。
之前文章都是基于用戶名密碼登錄,第六章圖形驗證碼登錄其實還是用戶名密碼登錄,只不過多了一層圖形驗證碼校驗而已;Spring Security默認提供的認證流程就是用戶名密碼登錄,整個流程都已經固定了,雖然提供了一些接口擴展,但是有些時候我們就需要有自己特殊的身份認證邏輯,比如用短信驗證碼登錄,它和用戶名密碼登錄的邏輯是不一樣的,這時候就需要重新寫一套身份認證邏輯。
開發短信驗證碼接口
獲取驗證碼
短信驗證碼的發送獲取邏輯和圖片驗證碼類似,這里直接貼出代碼。
@GetMapping("/code/sms")
	public void createSmsCode(HttpServletRequest request, HttpServletResponse response) throws Exception {
		// 創建驗證碼
		ValidateCode smsCode = createCodeSmsCode(request);
		// 將驗證碼放到session中
		sessionStrategy.setAttribute(new ServletWebRequest(request), SMS_CODE_SESSION_KEY, smsCode);
		String mobile = ServletRequestUtils.getRequiredStringParameter(request, "mobile");
		// 發送驗證碼
		smsCodeSender.send(mobile, smsCode.getCode());
	}
前端代碼
<tr> <td>手機號:</td> <td><input type="text" name="mobile" value="13012345678"></td> </tr> <tr> <td>短信驗證碼:</td> <td> <input type="text" name="smsCode"> <a href="/code/sms?mobile=13012345678" rel="external nofollow" >發送驗證碼</a> </td> </tr>
短信驗證碼流程原理
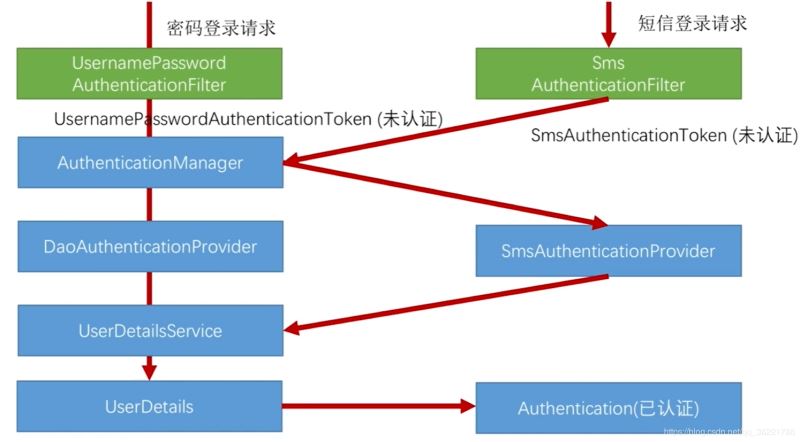
短信驗證碼登錄和用戶名密碼登錄對比

步驟流程
SmsAuthenticationFilter過濾器處理,這個過濾器拿到請求以后會在登錄請求中拿到手機號,然后封裝成自定義的一個SmsAuthenticationToken(未認證)。AuthenticationManager整個系統只有一個,它會檢索系統中所有的AuthenticationProvider,這時候我們要提供自己的SmsAuthenticationProvider,用它來校驗自己寫的SmsAuthenticationToken的手機號信息。UserDetailsService,把手機號傳給它讓它去讀用戶信息,去判斷是否能登錄,登錄成功的話再把SmsAuthenticationToken標記為已認證。在SmsAuthenticationFilter過濾器之前加一個過濾器來驗證短信驗證碼。代碼實現
SmsCodeAuthenticationToken
public class SmsCodeAuthenticationToken extends AbstractAuthenticationToken {
private static final long serialVersionUID = SpringSecurityCoreVersion.SERIAL_VERSION_UID;
private final Object principal;
/**
* 進入SmsAuthenticationFilter時,構建一個未認證的Token
*
* @param mobile
*/
public SmsCodeAuthenticationToken(String mobile) {
super(null);
this.principal = mobile;
setAuthenticated(false);
}
/**
* 認證成功以后構建為已認證的Token
*
* @param principal
* @param authorities
*/
public SmsCodeAuthenticationToken(Object principal,
Collection<? extends GrantedAuthority> authorities) {
super(authorities);
this.principal = principal;
super.setAuthenticated(true);
}
@Override
public Object getCredentials() {
return null;
}
@Override
public Object getPrincipal() {
return this.principal;
}
@Override
public void setAuthenticated(boolean isAuthenticated) throws IllegalArgumentException {
if (isAuthenticated) {
throw new IllegalArgumentException(
"Cannot set this token to trusted - use constructor which takes a GrantedAuthority list instead");
}
super.setAuthenticated(false);
}
@Override
public void eraseCredentials() {
super.eraseCredentials();
}
}SmsCodeAuthenticationFilter
public class SmsCodeAuthenticationFilter extends AbstractAuthenticationProcessingFilter {
	private String mobileParameter = "mobile";
	private boolean postOnly = true;
 /**
 * 表示要處理的請求路徑
 */
	public SmsCodeAuthenticationFilter() {
 super(new AntPathRequestMatcher("/authentication/mobile", "POST"));
	}
 @Override
	public Authentication attemptAuthentication(HttpServletRequest request, HttpServletResponse response)
			throws AuthenticationException {
		if (postOnly && !request.getMethod().equals("POST")) {
			throw new AuthenticationServiceException("Authentication method not supported: " + request.getMethod());
		}
		String mobile = obtainMobile(request);
		if (mobile == null) {
			mobile = "";
		}
		mobile = mobile.trim();
		SmsCodeAuthenticationToken authRequest = new SmsCodeAuthenticationToken(mobile);
		// 把請求信息設到Token中
		setDetails(request, authRequest);
		return this.getAuthenticationManager().authenticate(authRequest);
	}
	/**
	 * 獲取手機號
	 */
	protected String obtainMobile(HttpServletRequest request) {
		return request.getParameter(mobileParameter);
	}
	protected void setDetails(HttpServletRequest request, SmsCodeAuthenticationToken authRequest) {
		authRequest.setDetails(authenticationDetailsSource.buildDetails(request));
	}
	public void setMobileParameter(String usernameParameter) {
		Assert.hasText(usernameParameter, "Username parameter must not be empty or null");
		this.mobileParameter = usernameParameter;
	}
	public void setPostOnly(boolean postOnly) {
		this.postOnly = postOnly;
	}
	public final String getMobileParameter() {
		return mobileParameter;
	}
}
SmsAuthenticationProvider
public class SmsCodeAuthenticationProvider implements AuthenticationProvider {
private UserDetailsService userDetailsService;
/**
* 進行身份認證的邏輯
*
* @param authentication
* @return
* @throws AuthenticationException
*/
@Override
public Authentication authenticate(Authentication authentication) throws AuthenticationException {
SmsCodeAuthenticationToken authenticationToken = (SmsCodeAuthenticationToken) authentication;
UserDetails user = userDetailsService.loadUserByUsername((String) authenticationToken.getPrincipal());
if (user == null) {
throw new InternalAuthenticationServiceException("無法獲取用戶信息");
}
SmsCodeAuthenticationToken authenticationResult = new SmsCodeAuthenticationToken(user, user.getAuthorities());
authenticationResult.setDetails(authenticationToken.getDetails());
return authenticationResult;
}
/**
* 表示支持校驗的Token,這里是SmsCodeAuthenticationToken
*
* @param authentication
* @return
*/
@Override
public boolean supports(Class<?> authentication) {
return SmsCodeAuthenticationToken.class.isAssignableFrom(authentication);
}
public UserDetailsService getUserDetailsService() {
return userDetailsService;
}
public void setUserDetailsService(UserDetailsService userDetailsService) {
this.userDetailsService = userDetailsService;
}
}ValidateCodeFilter
@Component("validateCodeFilter")
public class ValidateCodeFilter extends OncePerRequestFilter implements InitializingBean {
	/**
	 * 驗證碼校驗失敗處理器
	 */
	@Autowired
	private AuthenticationFailureHandler authenticationFailureHandler;
	/**
	 * 系統配置信息
	 */
	@Autowired
	private SecurityProperties securityProperties;
	/**
	 * 系統中的校驗碼處理器
	 */
	@Autowired
	private ValidateCodeProcessorHolder validateCodeProcessorHolder;
	/**
	 * 存放所有需要校驗驗證碼的url
	 */
	private Map<String, ValidateCodeType> urlMap = new HashMap<>();
	/**
	 * 驗證請求url與配置的url是否匹配的工具類
	 */
	private AntPathMatcher pathMatcher = new AntPathMatcher();
	/**
	 * 初始化要攔截的url配置信息
	 */
	@Override
	public void afterPropertiesSet() throws ServletException {
		super.afterPropertiesSet();
		urlMap.put("/authentication/mobile", ValidateCodeType.SMS);
		addUrlToMap(securityProperties.getCode().getSms().getUrl(), ValidateCodeType.SMS);
	}
	/**
	 * 講系統中配置的需要校驗驗證碼的URL根據校驗的類型放入map
	 *
	 * @param urlString
	 * @param type
	 */
	protected void addUrlToMap(String urlString, ValidateCodeType type) {
		if (StringUtils.isNotBlank(urlString)) {
			String[] urls = StringUtils.splitByWholeSeparatorPreserveAllTokens(urlString, ",");
			for (String url : urls) {
				urlMap.put(url, type);
			}
		}
	}
	/**
	 * 驗證短信驗證碼
	 *
	 * @param request
	 * @param response
	 * @param chain
	 * @throws ServletException
	 * @throws IOException
	 */
	@Override
	protected void doFilterInternal(HttpServletRequest request, HttpServletResponse response, FilterChain chain)
			throws ServletException, IOException {
		ValidateCodeType type = getValidateCodeType(request);
		if (type != null) {
			logger.info("校驗請求(" + request.getRequestURI() + ")中的驗證碼,驗證碼類型" + type);
			try {
				// 進行驗證碼的校驗
				validateCodeProcessorHolder.findValidateCodeProcessor(type)
						.validate(new ServletWebRequest(request, response));
				logger.info("驗證碼校驗通過");
			} catch (ValidateCodeException exception) {
				// 如果校驗拋出異常,則交給我們之前文章定義的異常處理器進行處理
				authenticationFailureHandler.onAuthenticationFailure(request, response, exception);
				return;
			}
		}
		// 繼續調用后邊的過濾器
		chain.doFilter(request, response);
	}
	/**
	 * 獲取校驗碼的類型,如果當前請求不需要校驗,則返回null
	 *
	 * @param request
	 * @return
	 */
	private ValidateCodeType getValidateCodeType(HttpServletRequest request) {
		ValidateCodeType result = null;
		if (!StringUtils.equalsIgnoreCase(request.getMethod(), "GET")) {
			Set<String> urls = urlMap.keySet();
			for (String url : urls) {
				if (pathMatcher.match(url, request.getRequestURI())) {
					result = urlMap.get(url);
				}
			}
		}
		return result;
	}
}
添加配置
SmsCodeAuthenticationSecurityConfig
作用:配置SmsCodeAuthenticationFilter,后面需要把這些配置加到主配置類BrowserSecurityConfig
@Component
public class SmsCodeAuthenticationSecurityConfig extends SecurityConfigurerAdapter<DefaultSecurityFilterChain, HttpSecurity> {

	@Autowired
	private AuthenticationSuccessHandler meicloudAuthenticationSuccessHandler;

	@Autowired
	private AuthenticationFailureHandler meicloudAuthenticationFailureHandler;

	@Autowired
	private UserDetailsService userDetailsService;

	@Autowired
	private PersistentTokenRepository persistentTokenRepository;

	@Override
	public void configure(HttpSecurity http) throws Exception {

		SmsCodeAuthenticationFilter smsCodeAuthenticationFilter = new SmsCodeAuthenticationFilter();
		// 設置AuthenticationManager
		smsCodeAuthenticationFilter.setAuthenticationManager(http.getSharedObject(AuthenticationManager.class));
		// 設置登錄成功處理器
		smsCodeAuthenticationFilter.setAuthenticationSuccessHandler(meicloudAuthenticationSuccessHandler);
		// 設置登錄失敗處理器
		smsCodeAuthenticationFilter.setAuthenticationFailureHandler(meicloudAuthenticationFailureHandler);
		String key = UUID.randomUUID().toString();
		smsCodeAuthenticationFilter.setRememberMeServices(new PersistentTokenBasedRememberMeServices(key, userDetailsService, persistentTokenRepository));

		SmsCodeAuthenticationProvider smsCodeAuthenticationProvider = new SmsCodeAuthenticationProvider();
		smsCodeAuthenticationProvider.setUserDetailsService(userDetailsService);
		// 將自己寫的Provider加到Provider集合里去
		http.authenticationProvider(smsCodeAuthenticationProvider)
			.addFilterAfter(smsCodeAuthenticationFilter, UsernamePasswordAuthenticationFilter.class);
	}
}
BrowserSecurityConfig
作用:主配置類;添加短信驗證碼配置類、添加SmsCodeAuthenticationSecurityConfig配置
@Configuration
public class BrowserSecurityConfig extends WebSecurityConfigurerAdapter {
	@Bean
	public PasswordEncoder passwordEncoder() {
		return new BCryptPasswordEncoder();
	}
	@Autowired
	private SecurityProperties securityProperties;
	@Autowired
	private DataSource dataSource;
	@Autowired
	private UserDetailsService userDetailsService;
	@Autowired
	private AuthenticationSuccessHandler meicloudAuthenticationSuccessHandler;
	@Autowired
	private AuthenticationFailureHandler meicloudAuthenticationFailureHandler;
	@Autowired
	private SmsCodeAuthenticationSecurityConfig smsCodeAuthenticationSecurityConfig;

	@Override
	protected void configure(HttpSecurity http) throws Exception {
		// 驗證碼校驗過濾器
		ValidateCodeFilter validateCodeFilter = new ValidateCodeFilter();
		// 將驗證碼校驗過濾器加到 UsernamePasswordAuthenticationFilter 過濾器之前
		http.addFilterBefore(validateCodeFilter, UsernamePasswordAuthenticationFilter.class)
				.formLogin()
				// 當用戶登錄認證時默認跳轉的頁面
				.loginPage("/authentication/require")
				// 以下這行 UsernamePasswordAuthenticationFilter 會知道要處理表單的 /authentication/form 請求,而不是默認的 /login
				.loginProcessingUrl("/authentication/form")
				.successHandler(meicloudAuthenticationSuccessHandler)
				.failureHandler(meicloudAuthenticationFailureHandler)
				// 配置記住我功能
				.and()
				.rememberMe()
				// 配置TokenRepository
				.tokenRepository(persistentTokenRepository())
				// 配置Token過期時間
				.tokenValiditySeconds(3600)
				// 最終拿到用戶名之后,使用UserDetailsService去做登錄
				.userDetailsService(userDetailsService)
				.and()
				.authorizeRequests()
				// 排除對 "/authentication/require" 和 "/meicloud-signIn.html" 的身份驗證
				.antMatchers("/authentication/require", securityProperties.getBrowser().getSignInPage(), "/code/*").permitAll()
				// 表示所有請求都需要身份驗證
				.anyRequest()
				.authenticated()
				.and()
				.csrf().disable()// 暫時把跨站請求偽造的功能關閉掉
				// 相當于把smsCodeAuthenticationSecurityConfig里的配置加到上面這些配置的后面
				.apply(smsCodeAuthenticationSecurityConfig);
	}
	/**
	 * 記住我功能的Token存取器配置
	 *
	 * @return
	 */
	@Bean
	public PersistentTokenRepository persistentTokenRepository() {
		JdbcTokenRepositoryImpl tokenRepository = new JdbcTokenRepositoryImpl();
		tokenRepository.setDataSource(dataSource);
		// 啟動的時候自動創建表,建表語句 JdbcTokenRepositoryImpl 已經都寫好了
		tokenRepository.setCreateTableOnStartup(true);
		return tokenRepository;
	}
}
看完上述內容,是不是對Spring Security實現短信驗證碼登錄功能的方法有進一步的了解,如果還想學習更多內容,歡迎關注億速云行業資訊頻道。
免責聲明:本站發布的內容(圖片、視頻和文字)以原創、轉載和分享為主,文章觀點不代表本網站立場,如果涉及侵權請聯系站長郵箱:is@yisu.com進行舉報,并提供相關證據,一經查實,將立刻刪除涉嫌侵權內容。