您好,登錄后才能下訂單哦!
您好,登錄后才能下訂單哦!
這篇文章將為大家詳細講解有關一文讀懂Android的進程,文章內容質量較高,因此小編分享給大家做個參考,希望大家閱讀完這篇文章后對相關知識有一定的了解。
多進程
如果需要的時候,app可以創建多進程。
在進程里面
各類組件元素的清單文件條目 、 、 和
— 均支持 android:process 屬性,此屬性可以指定該組件應在哪個進程運行。
默認進程就是主進程。其他進程一般來說都是子進程。
2個activity在不同的進程里面,可以刷新UI嗎?
<activity android:name=".androidsample.ActivityProgressB"
      android:process=":progressb"/>
測試結果:ActivityProgressB可以正常顯示。這個其實很好理解,如果你打開系統相機頁面,那個activity肯定與你的app不再一個進程,但是他可以很順利的打開,所以可以支持。
保活
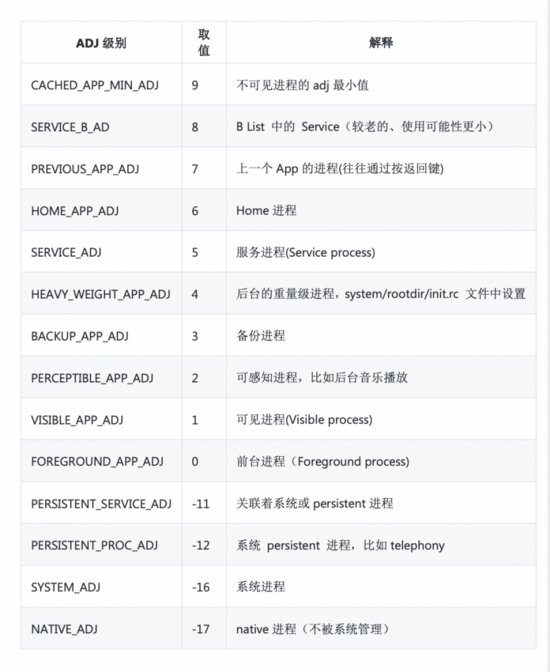
OOM_ADJ

這個就是oom 回kill進程的優先級。
進程kill的方式
| 場景 | 接口 | 范圍 |
|---|---|---|
| LowMemoryKiller | LowMemoryKiller | 從進程的優先級依次kill,釋放內存 |
| 三方kill(無root) | killbackgroundprogersss | kill oom_adj>4 |
| 三方kill(有root) | forcestop or kill | 理論上所有,一般是非系統和可見進程 |
| 廠商kill功能 | force stop or kill | 理論上所有,包括native |
進程保活的目的,就是提供進程的優先級,降低進程被kill的概率。
保活的套路
開啟1個像素的activity
2020-08-14 14:29:48.630 1164-8504/system_process W/ActivityTaskManager: Background activity start [callingPackage: com.demanmath.androidms; callingUid: 10398; isCallingUidForeground: false; isCallingUidPersistentSystemProcess: false; realCallingUid: 10398; isRealCallingUidForeground: false; isRealCallingUidPersistentSystemProcess: false; originatingPendingIntent: null; isBgStartWhitelisted: false; intent: Intent { flg=0x10000000 cmp=com.demanmath.androidms/.androidsample.LiveActivity }; callerApp: ProcessRecord{a168b71 2429:com.demanmath.androidms/u0a398}]
在android Q以后,不允許后臺進程啟動后臺頁面了。也就是想啟動一個前臺頁面
使用前臺服務
package com.demanmath.androidms.androidsample
import android.annotation.TargetApi
import android.app.Notification
import android.app.NotificationChannel
import android.app.NotificationManager
import android.app.Service
import android.content.Context
import android.content.Intent
import android.os.Build
import android.os.Handler
import android.os.IBinder
import androidx.core.app.NotificationCompat
import com.demanmath.androidms.AppLog
import com.demanmath.androidms.R
/**
* @author DemanMath
* @date 2020/8/14
*
*/
class KeepLiveService:Service() {
val NOTIFICATION_ID = 0x11
val NOTIFICATION_CHANNEL_ID = "demanmathId"
val channelName = "My Background Service"
companion object {
const val NOTIFICATION_ID = 0x11
}
override fun onBind(intent: Intent?): IBinder? {
return null
}
override fun onCreate() {
super.onCreate()
if (Build.VERSION.SDK_INT < Build.VERSION_CODES.O) {
startForeground(NOTIFICATION_ID, Notification())
} else {
startMyOwnForeground()
startService(Intent(this, InnerService::class.java))
}
}
@TargetApi(value = Build.VERSION_CODES.O)
private fun startMyOwnForeground() {
AppLog.d()
val chan = NotificationChannel(
NOTIFICATION_CHANNEL_ID,
channelName,
NotificationManager.IMPORTANCE_NONE
)
chan.lockscreenVisibility = Notification.VISIBILITY_PRIVATE
val manager =
(getSystemService(Context.NOTIFICATION_SERVICE) as NotificationManager)
manager.createNotificationChannel(chan)
val notificationBuilder =
NotificationCompat.Builder(this, NOTIFICATION_CHANNEL_ID)
val notification = notificationBuilder.setOngoing(true)
.setSmallIcon(R.drawable.ic_launcher_background)
.setContentTitle("App is running in background")
.setPriority(NotificationManager.IMPORTANCE_MIN)
.setCategory(Notification.CATEGORY_SERVICE)
.build()
startForeground(NOTIFICATION_ID, notification)
}
class InnerService : Service() {
override fun onBind(intent: Intent): IBinder? {
return null
}
override fun onCreate() {
super.onCreate()
//使用channeId & channelName
//發送與KeepLiveService中ID相同的Notification,然后將其取消并取消自己的前臺顯示
// val builder: Notification.Builder = Notification.Builder(this)
// builder.setSmallIcon(R.mipmap.ic_launcher)
// startForeground(NOTIFICATION_ID, builder.build())
Handler().postDelayed(Runnable {
stopForeground(true)
val manager =
getSystemService(Context.NOTIFICATION_SERVICE) as NotificationManager
manager.cancel(NOTIFICATION_ID)
stopSelf()
}, 100)
}
}
}但是androidQ開始以后,禁止后臺進程開啟前臺進程,這個也是android為了省電考慮的。
多進程相互喚醒
這個就是每個app,其多個進程,如果比kill掉了,可以通過另一個喚起。從上面的前臺service的功效有些類似。
同樣的問題,android Q以后無效。
JobSchedule
package com.demanmath.androidms.jobservice

import android.app.job.JobParameters
import android.app.job.JobService
import android.content.Intent
import android.os.Handler
import android.os.Message
import android.widget.Toast
import com.demanmath.androidms.AppLog

/**
 *  @author   DemanMath
 *  @date    2020/8/20
 *
 */
class JobDemoService:JobService() {

  override fun onCreate() {
    super.onCreate()
    AppLog.i()
  }

  override fun onStartCommand(intent: Intent?, flags: Int, startId: Int): Int {
    AppLog.i()
    return super.onStartCommand(intent, flags, startId)
  }

  private var mHandler = object:Handler(){
    override fun handleMessage(msg: Message) {
      AppLog.i()
      Toast.makeText(
        applicationContext,
        "JobService task running", Toast.LENGTH_SHORT
      ).show()
      //請注意,我們手動調用了jobFinished方法。
      //當onStartJob返回true的時候,我們必須手動調用jobFinished方法
      //否則該應用中的其他job將不會被執行
      jobFinished(msg.obj as JobParameters, false)
    }
  }
  override fun onStartJob(params: JobParameters?): Boolean {
    AppLog.i()
    mHandler.sendMessage(Message.obtain(mHandler,1,params))
    return true
  }

  override fun onStopJob(params: JobParameters?): Boolean {
    AppLog.i()
    mHandler.removeMessages(1)
    return false
  }

}
package com.demanmath.androidms.jobservice
import android.app.job.JobInfo
import android.app.job.JobScheduler
import android.content.ComponentName
import android.content.Context
import com.demanmath.androidms.AppLog
/**
* @author DemanMath
* @date 2020/8/20
*
*/
class JobHelper(var context: Context) {
lateinit var jobScheduler:JobScheduler
fun startJob(){
AppLog.i()
jobScheduler = context.getSystemService(Context.JOB_SCHEDULER_SERVICE) as JobScheduler
var builder = JobInfo.Builder(1, ComponentName(context.packageName,JobDemoService::class.java.name))
// builder.setBackoffCriteria(1000L,JobInfo.BACKOFF_POLICY_LINEAR)
var boolean = jobScheduler.schedule(builder.build())
AppLog.i(boolean.toString())
}
}關于一文讀懂Android的進程就分享到這里了,希望以上內容可以對大家有一定的幫助,可以學到更多知識。如果覺得文章不錯,可以把它分享出去讓更多的人看到。
免責聲明:本站發布的內容(圖片、視頻和文字)以原創、轉載和分享為主,文章觀點不代表本網站立場,如果涉及侵權請聯系站長郵箱:is@yisu.com進行舉報,并提供相關證據,一經查實,將立刻刪除涉嫌侵權內容。