您好,登錄后才能下訂單哦!
您好,登錄后才能下訂單哦!
這篇文章給大家介紹MYSQL架構中如何主從MHA,內容非常詳細,感興趣的小伙伴們可以參考借鑒,希望對大家能有所幫助。
MHA – GTID模式
MasterHigh Availability Manager and Toolsfor MySQL.是采用PERL語音編寫的一個腳本管理工具,該工具適用于MySQL Replication環境,目的是在與維持master主庫的高可用性。
MHA是自動的master故障轉移和slave提升的軟件包,基于標準的MySQL復制(異步、半同步)
MHA Manager管理節點可以單獨部署在一個獨立服務器上管理多個master-slave集群,也可以部署在一臺slave上。MHA Manager探測集群中的node節點
MHA有兩個組成部分。
MHA Manager (管理節點)
MHA node (數據節點)
下載地址:
https://github.com/yoshinorim/mha4mysql-manager/releases
https://github.com/yoshinorim/mha4mysql-node/releases
MHA Manager管理節點可以單獨部署在一臺服務器上管理多個master-slave集群,也可以部署在一臺slave上,MHA Manager探測集群中的node節點,當發現master出現故障時,它可以自動將具有最新數據的slave提升為新master,然后將所有其他slave導向新的master上。
整個故障轉移過程對應用程序是透明的,MHA node數據節點可以運行在每臺Mysql服務器上,
MHA的目的是維持MYSQL Replication 中master庫的高可用性,其最大特點是可以修復多個slave之間的差異日志,最終使所有slave保持數據一致,然后從中選擇出一個充當新的master,并將其他slave指向它。當master出現故障時,可以通過對比slave之間I/O thread讀取主庫binlog的position號,選取最接近的slave作為備選主庫,其他的從庫可以通過與備選主庫對比生成差異的中繼日志,在備選主庫上應用從原來master保存的binlog,同時將備選主庫提升為master,最后在其他slave上應用相應的差異中繼日志并從新master開始復制。
環境配置
\ | 主服務器1 | 從服務器1 | 從服務器2 |
OS | Centos el7.x86_64 | Centos el7.x86_64 | Centos el7.x86_64 |
IP | 192.168.31.79 | 192.168.31.188 | 192.168.31.90 |
HOSTNAME | mysql | Mysql2 | Mysql3 |
Mysql-version | 5.7.23 | 5.7.23 | 5.7.23 |
數據庫 | TEST | ||
備注1 | vip 192.168.31.100 | ||
備注2 | 管理節點 | ||
備注3 | 候選節點 | ||
備注4 | 單網卡 名:enp0s3 | 單網卡 名:enp0s3 | 單網卡 名:enp0s3 |
三個節點安裝mysql
同時,在主節點創建數據庫TEST及TEST數據庫下建立若干表,用于測試目的。
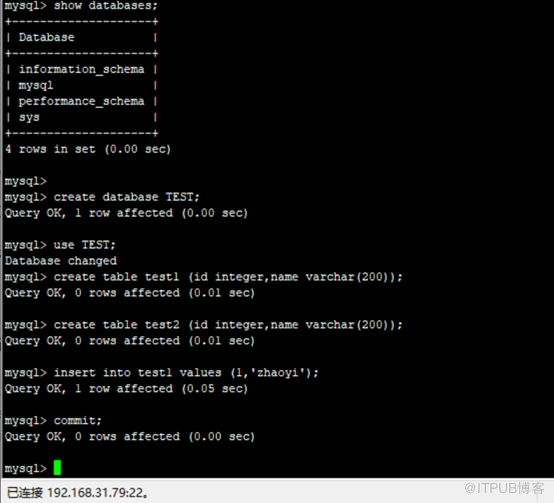
三個節點均運行
建立復制賬號
mysql> create user 'rep1'@'192.168.31.%' identified by 'Oracle123';
mysql> grant replication slave on *.* to 'rep1'@'192.168.31.%';
mysql> flush privileges;
建立管理賬號
mysql> create user 'dba'@'192.168.31.%' identified by 'Oracle123';
mysql> grant all privileges on *.* to 'dba'@'192.168.31.%';
mysql> flush privileges;
主服務器1
[root@mysql ~]# vi /etc/my.cnf
添加內容如下
gtid_mode=on
enforce_gtid_consistency=on
log_bin=on
binlog_format=row
server-id=79
log-bin = master-log
relay-log = relay-log
skip_name_resolve
從服務器1
[root@mysql2 ~]# vi /etc/my.cnf
gtid_mode=on
enforce_gtid_consistency=on
log_slave_updates=1
server-id=188
relay-log = relay-log
log-bin = master-log
skip_name_resolve
relay_log_purge = 0
## read_only = ON 該從庫會被選為候選主庫,故取消read_only
從服務器2
[root@mysql3 ~]# vi /etc/my.cnf
gtid_mode=on
enforce_gtid_consistency=on
log_slave_updates=1
server-id=90
relay-log = relay-log
log-bin = master-log
skip_name_resolve
relay_log_purge = 0
read_only = ON
主服務器1
備份TEST數據庫
[root@mysql ~]# mysqldump --single-transaction -uroot -pOracle123 TEST > TEST_20200316.sql
從服務器1
[root@mysql2 ~]# scp root@192.168.31.79:/root/TEST_20200316.sql .
mysql> create database TEST;
[root@mysql2 ~]# mysql -uroot -pOracle123 TEST < TEST_20200316.sql
從服務器2
[root@mysql3 ~]# scp root@192.168.31.79:/root/TEST_20200316.sql .
mysql> create database TEST;
[root@mysql3 ~]# mysql -uroot -pOracle123 TEST < TEST_20200316.sql
三個節點都重啟
[root@mysql ~]# service mysql stop
[root@mysql ~]# service mysql start
從服務器兩個節點都執行
[root@mysql2 bin]# mysql -uroot -p
mysql> change master to master_host='192.168.31.79',master_user='rep1',master_password='Oracle123',master_port=3306,master_auto_position=1;
mysql> start slave;
mysql> show slave status\G

注:如果以上執行change master有報錯,Last_IO_Error: Got fatal error 1236 from master when reading data from binary log: 'The slave is connecting using CHANGE MASTER TO MASTER_AUTO_POSITION = 1, but the master has purged binary logs containing GTIDs that the slave requires.'
解決方式如下:
mysql> change master to master_auto_position=0;
mysql> start slave;
注:如果執行以上出現報錯,
Last_Error: Error 'Table 'test4' already exists' on query. Default database: 'TEST'. Query: 'create table test4 (id integer,name varchar(200))'
解決方式如下:
主庫:mysql> SHOW MASTER STATUS\g --獲取File Position
從庫執行
mysql> change master to master_host='192.168.31.79',master_user='rep1', master_password='Oracle123',master_port=3306,master_log_file='master-log.000001',master_log_pos=154;
主服務器1
[root@mysql ~]# mysql -uroot -p
mysql> show master status;

主服務器1
mysql> use TEST;
mysql> insert into test2 values (1,'test1');
mysql> commit;
從服務器1
mysql> use TEST;
mysql> select * from test2;
從服務器2
mysql> use TEST;
mysql> select * from test2;
三個節點均執行(包含管理節點)
[root@mysql ~]# cd .ssh/
[root@mysql .ssh]# ssh-keygen -t dsa -P '' -f id_dsa
[root@mysql .ssh]# cat id_dsa.pub >> authorized_keys
主服務器接收秘鑰
主服務器操作
[root@mysql .ssh]# scp 192.168.31.188:/root/.ssh/id_dsa.pub ./id_dsa.pub_188
[root@mysql .ssh]# scp 192.168.31.90:/root/.ssh/id_dsa.pub ./id_dsa.pub_90
[root@mysql .ssh]# cat id_dsa.pub_188 >> authorized_keys
[root@mysql .ssh]# cat id_dsa.pub_90 >> authorized_keys
[root@mysql .ssh]# scp authorized_keys 192.168.31.188:/root/.ssh/
[root@mysql .ssh]# scp authorized_keys 192.168.31.90:/root/.ssh/
三個節點配置host
三個節點均執行
[root@mysql ~]# vi /etc/hosts
添加內如如下:
192.168.31.79 mysql
192.168.31.188 mysql2
192.168.31.90 mysql3
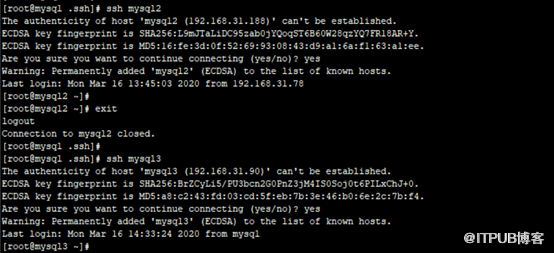
驗證
三個節點均互相測試,不需要輸入密碼即成功
[root@mysql .ssh]# ssh mysql2
[root@mysql .ssh]# ssh mysql3
NODE節點安裝
[root@mysql soft]# yum install -y perl-CPAN
[root@mysql soft]# yum install -y mha4mysql-node-0.58-0.el7.centos.noarch.rpm
管理節點安裝(即從服務器1)
如果缺少包,可以下載之后在安裝
https://centos.pkgs.org/
[root@mysql2 ~]# yum install perl-Config-Tiny perl-Email-Date-Format perl-File-Remove perl-Log-Dispatch perl-Mail-Sender perl-Mail-Sendmail perl-MIME-Lite perl-MIME-Types perl-Module-Install perl-Module-ScanDeps perl-Parallel-ForkManager perl-YAML -y
[root@mysql2 soft]# yum install mha4mysql-manager-0.58-0.el7.centos.noarch.rpm
每一個節點
[root@mysql ~]# cd /usr/local/
[root@mysql local]# mkdir mha
管理節點(從服務器1)
[root@mysql2 soft]# mkdir /usr/local/mha
[root@mysql2 mha]# vi mha.conf
添加內容如下:
[server default]
user = dba
password = Oracle123
ssh_user = root
repl_user = rep1
repl_password = Oracle123
ping_interval = 1
ping_type = SELECT
manager_workdir=/usr/local/mha
manager_log=/usr/local/mha/manager.log
remote_workdir=/usr/local/mha
master_ip_failover_script="/usr/local/mha/master_ip_failover"
master_ip_online_change_script="/usr/local/mha/master_ip_online_change"
shutdown_script=""
report_script=""
#check_repl_delay=0
[server1]
hostname=mysql
port=3306
master_binlog_dir="/u01/data"
candidate_master=1 ##優先選擇該節點為候選節點
[server2]
hostname=mysql2
port=3306
master_binlog_dir="/u01/data"
candidate_master=1
[server3]
hostname=mysql3
port=3306
master_binlog_dir="/u01/data"
no_master =1 ##不選擇該節點為候選節點
[root@mysql2 mha]# vi master_ip_failover
添加內容如下
#!/usr/bin/env perl
use strict;
use warnings FATAL => 'all';
use Getopt::Long;
my (
$command, $ssh_user, $orig_master_host, $orig_master_ip,
$orig_master_port, $new_master_host, $new_master_ip, $new_master_port
);
my $vip = '192.168.31.100/32'; # Virtual IP,該ip具體參考步驟12添加IP,顯示出的結果
my $key = "0";
my $int = "enp0s3";
##my $ssh_start_vip = "/sbin/ifconfig $int:$key $vip"; --本環境為centos7,故注釋該指令
##my $ssh_stop_vip = "/sbin/ifconfig $int:$key down"; --本環境為centos7,該指令無效
my $ssh_start_vip = "/sbin/ip addr add $vip dev $int";
my $ssh_stop_vip = "/sbin/ip addr del $vip dev $int";
my $arp_effect = "/sbin/arping -Uq -s192.168.31.100 -I $int 192.168.31.255 -c 3"; # Virtual IP and gatway
#my $test = "echo successfull >/tmp/test.txt";
$ssh_user = "root";
GetOptions(
'command=s' => \$command,
'ssh_user=s' => \$ssh_user,
'orig_master_host=s' => \$orig_master_host,
'orig_master_ip=s' => \$orig_master_ip,
'orig_master_port=i' => \$orig_master_port,
'new_master_host=s' => \$new_master_host,
'new_master_ip=s' => \$new_master_ip,
'new_master_port=i' => \$new_master_port,
);
exit &main();
sub main {
print "\n\nIN SCRIPT TEST====$ssh_stop_vip==$ssh_start_vip===\n\n";
if ( $command eq "stop" || $command eq "stopssh" ) {
# $orig_master_host, $orig_master_ip, $orig_master_port are passed.
# If you manage master ip address at global catalog database,
# invalidate orig_master_ip here.
my $exit_code = 1;
eval {
print "Disabling the VIP on old master: $orig_master_host \n";
&stop_vip();
$exit_code = 0;
};
if ($@) {
warn "Got Error: $@\n";
exit $exit_code;
}
exit $exit_code;
}
elsif ( $command eq "start" ) {
# all arguments are passed.
# If you manage master ip address at global catalog database,
# activate new_master_ip here.
# You can also grant write access (create user, set read_only=0, etc) here.
my $exit_code = 10;
eval {
print "Enabling the VIP - $vip on the new master - $new_master_host \n";
&start_vip();
$exit_code = 0;
};
if ($@) {
warn $@;
exit $exit_code;
}
exit $exit_code;
}
elsif ( $command eq "status" ) {
print "Checking the Status of the script.. OK \n";
#`ssh $ssh_user\@cluster1 \" $ssh_start_vip \"`;
&status();
exit 0;
}
else {
&usage();
exit 1;
}
}
# A simple system call that enable the VIP on the new master
sub start_vip() {
`ssh $ssh_user\@$new_master_host \" $ssh_start_vip \"`;
`ssh $ssh_user\@$new_master_host \" $arp_effect \"`;
# `ssh $ssh_user\@$new_master_host \" $test \"`;
}
# A simple system call that disable the VIP on the old_master
sub stop_vip() {
`ssh $ssh_user\@$orig_master_host \" $ssh_stop_vip \"`;
}
sub status() {
print `ssh $ssh_user\@$orig_master_host \" ip add show $int \"`;
}
sub usage {
"Usage: master_ip_failover --command=start|stop|stopssh|status --orig_master_host=host --orig_maste
r_ip=ip --orig_master_port=port --new_master_host=host --new_master_ip=ip --new_master_port=port\n";
}
[root@mysql2 mha]# vi master_ip_online_change
添加內容如下:
#!/usr/bin/env perl
use strict;
use warnings FATAL => 'all';
use Getopt::Long;
use MHA::DBHelper;
use MHA::NodeUtil;
use Time::HiRes qw( sleep gettimeofday tv_interval );
use Data::Dumper;
my $_tstart;
my $_running_interval = 0.1;
my $vip = "192.168.31.100/32";
my $if = "enp0s3";
my (
$command, $orig_master_is_new_slave, $orig_master_host,
$orig_master_ip, $orig_master_port, $orig_master_user,
$orig_master_password, $orig_master_ssh_user, $new_master_host,
$new_master_ip, $new_master_port, $new_master_user,
$new_master_password, $new_master_ssh_user,
);
GetOptions(
'command=s' => \$command,
'orig_master_is_new_slave' => \$orig_master_is_new_slave,
'orig_master_host=s' => \$orig_master_host,
'orig_master_ip=s' => \$orig_master_ip,
'orig_master_port=i' => \$orig_master_port,
'orig_master_user=s' => \$orig_master_user,
'orig_master_password=s' => \$orig_master_password,
'orig_master_ssh_user=s' => \$orig_master_ssh_user,
'new_master_host=s' => \$new_master_host,
'new_master_ip=s' => \$new_master_ip,
'new_master_port=i' => \$new_master_port,
'new_master_user=s' => \$new_master_user,
'new_master_password=s' => \$new_master_password,
'new_master_ssh_user=s' => \$new_master_ssh_user,
);
exit &main();
sub drop_vip {
my $output = `ssh -o ConnectTimeout=15 -o ConnectionAttempts=3 $orig_master_host /sbin/ip addr del $vip/32 dev $if`;
}
sub add_vip {
my $output = `ssh -o ConnectTimeout=15 -o ConnectionAttempts=3 $new_master_host /sbin/ip addr add $vip/32 dev $if`;
}
sub current_time_us {
my ( $sec, $microsec ) = gettimeofday();
my $curdate = localtime($sec);
return $curdate . " " . sprintf( "%06d", $microsec );
}
sub sleep_until {
my $elapsed = tv_interval($_tstart);
if ( $_running_interval > $elapsed ) {
sleep( $_running_interval - $elapsed );
}
}
sub get_threads_util {
my $dbh = shift;
my $my_connection_id = shift;
my $running_time_threshold = shift;
my $type = shift;
$running_time_threshold = 0 unless ($running_time_threshold);
$type = 0 unless ($type);
my @threads;
my $sth = $dbh->prepare("SHOW PROCESSLIST");
$sth->execute();
while ( my $ref = $sth->fetchrow_hashref() ) {
my $id = $ref->{Id};
my $user = $ref->{User};
my $host = $ref->{Host};
my $command = $ref->{Command};
my $state = $ref->{State};
my $query_time = $ref->{Time};
my $info = $ref->{Info};
$info =~ s/^\s*(.*?)\s*$/$1/ if defined($info);
next if ( $my_connection_id == $id );
next if ( defined($query_time) && $query_time < $running_time_threshold );
next if ( defined($command) && $command eq "Binlog Dump" );
next if ( defined($user) && $user eq "system user" );
next
if ( defined($command)
&& $command eq "Sleep"
&& defined($query_time)
&& $query_time >= 1 );
if ( $type >= 1 ) {
next if ( defined($command) && $command eq "Sleep" );
next if ( defined($command) && $command eq "Connect" );
}
if ( $type >= 2 ) {
next if ( defined($info) && $info =~ m/^select/i );
next if ( defined($info) && $info =~ m/^show/i );
}
push @threads, $ref;
}
return @threads;
}
sub main {
if ( $command eq "stop" ) {
## Gracefully killing connections on the current master
# 1. Set read_only= 1 on the new master
# 2. DROP USER so that no app user can establish new connections
# 3. Set read_only= 1 on the current master
# 4. Kill current queries
# * Any database access failure will result in script die.
my $exit_code = 1;
eval {
## Setting read_only=1 on the new master (to avoid accident)
my $new_master_handler = new MHA::DBHelper();
# args: hostname, port, user, password, raise_error(die_on_error)_ or_not
$new_master_handler->connect( $new_master_ip, $new_master_port,
$new_master_user, $new_master_password, 1 );
print current_time_us() . " Set read_only on the new master.. ";
$new_master_handler->enable_read_only();
if ( $new_master_handler->is_read_only() ) {
print "ok.\n";
}
else {
die "Failed!\n";
}
$new_master_handler->disconnect();
# Connecting to the orig master, die if any database error happens
my $orig_master_handler = new MHA::DBHelper();
$orig_master_handler->connect( $orig_master_ip, $orig_master_port,
$orig_master_user, $orig_master_password, 1 );
## Drop application user so that nobody can connect. Disabling per-session binlog beforehand
$orig_master_handler->disable_log_bin_local();
# print current_time_us() . " Drpping app user on the orig master..\n";
print current_time_us() . " drop vip $vip..\n";
#drop_app_user($orig_master_handler);
&drop_vip();
## Waiting for N * 100 milliseconds so that current connections can exit
my $time_until_read_only = 15;
$_tstart = [gettimeofday];
my @threads = get_threads_util( $orig_master_handler->{dbh},
$orig_master_handler->{connection_id} );
while ( $time_until_read_only > 0 && $#threads >= 0 ) {
if ( $time_until_read_only % 5 == 0 ) {
printf
"%s Waiting all running %d threads are disconnected.. (max %d milliseconds)\n",
current_time_us(), $#threads + 1, $time_until_read_only * 100;
if ( $#threads < 5 ) {
print Data::Dumper->new( [$_] )->Indent(0)->Terse(1)->Dump . "\n"
foreach (@threads);
}
}
sleep_until();
$_tstart = [gettimeofday];
$time_until_read_only--;
@threads = get_threads_util( $orig_master_handler->{dbh},
$orig_master_handler->{connection_id} );
}
## Setting read_only=1 on the current master so that nobody(except SUPER) can write
print current_time_us() . " Set read_only=1 on the orig master.. ";
$orig_master_handler->enable_read_only();
if ( $orig_master_handler->is_read_only() ) {
print "ok.\n";
}
else {
die "Failed!\n";
}
## Waiting for M * 100 milliseconds so that current update queries can complete
my $time_until_kill_threads = 5;
@threads = get_threads_util( $orig_master_handler->{dbh},
$orig_master_handler->{connection_id} );
while ( $time_until_kill_threads > 0 && $#threads >= 0 ) {
if ( $time_until_kill_threads % 5 == 0 ) {
printf
"%s Waiting all running %d queries are disconnected.. (max %d milliseconds)\n",
current_time_us(), $#threads + 1, $time_until_kill_threads * 100;
if ( $#threads < 5 ) {
print Data::Dumper->new( [$_] )->Indent(0)->Terse(1)->Dump . "\n"
foreach (@threads);
}
}
sleep_until();
$_tstart = [gettimeofday];
$time_until_kill_threads--;
@threads = get_threads_util( $orig_master_handler->{dbh},
$orig_master_handler->{connection_id} );
}
## Terminating all threads
print current_time_us() . " Killing all application threads..\n";
$orig_master_handler->kill_threads(@threads) if ( $#threads >= 0 );
print current_time_us() . " done.\n";
$orig_master_handler->enable_log_bin_local();
$orig_master_handler->disconnect();
## After finishing the script, MHA executes FLUSH TABLES WITH READ LOCK
$exit_code = 0;
};
if ($@) {
warn "Got Error: $@\n";
exit $exit_code;
}
exit $exit_code;
}
elsif ( $command eq "start" ) {
## Activating master ip on the new master
# 1. Create app user with write privileges
# 2. Moving backup script if needed
# 3. Register new master's ip to the catalog database
# We don't return error even though activating updatable accounts/ip failed so that we don't interrupt slaves' recovery.
# If exit code is 0 or 10, MHA does not abort
my $exit_code = 10;
eval {
my $new_master_handler = new MHA::DBHelper();
# args: hostname, port, user, password, raise_error_or_not
$new_master_handler->connect( $new_master_ip, $new_master_port,
$new_master_user, $new_master_password, 1 );
## Set read_only=0 on the new master
$new_master_handler->disable_log_bin_local();
print current_time_us() . " Set read_only=0 on the new master.\n";
$new_master_handler->disable_read_only();
## Creating an app user on the new master
#print current_time_us() . " Creating app user on the new master..\n";
print current_time_us() . "Add vip $vip on $if..\n";
# create_app_user($new_master_handler);
&add_vip();
$new_master_handler->enable_log_bin_local();
$new_master_handler->disconnect();
## Update master ip on the catalog database, etc
$exit_code = 0;
};
if ($@) {
warn "Got Error: $@\n";
exit $exit_code;
}
exit $exit_code;
}
elsif ( $command eq "status" ) {
# do nothing
exit 0;
}
else {
&usage();
exit 1;
}
}
sub usage {
"Usage: master_ip_online_change --command=start|stop|status --orig_master_host=host --orig_master_ip=ip --orig_master_port=port --new_master_host=host --new_master_ip=ip --new_master_port=port\n";
die;
}
管理節點
[root@mysql2 mha]# which masterha_check_ssh
[root@mysql2 mha]# chmod +x master_ip_online_change
[root@mysql2 mha]# chmod +x master_ip_failover
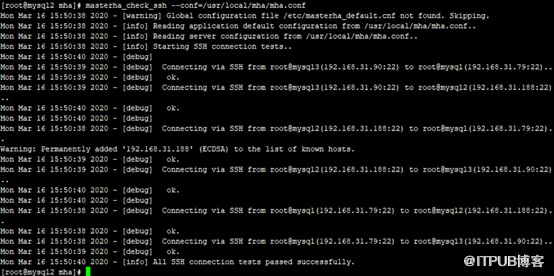
[root@mysql2 mha]# masterha_check_ssh --conf=/usr/local/mha/mha.conf
[root@mysql2 mha]# masterha_check_repl --conf=/usr/local/mha/mha.conf

主服務器1
[root@mysql ~]# ip addr add 192.168.31.100 dev enp0s3
[root@mysql ~]# ip addr show
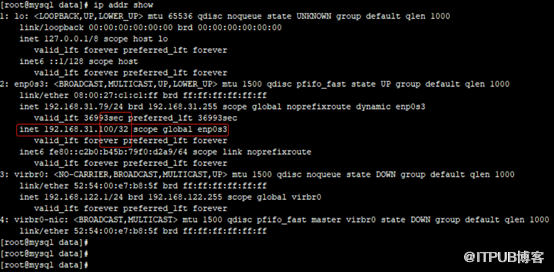
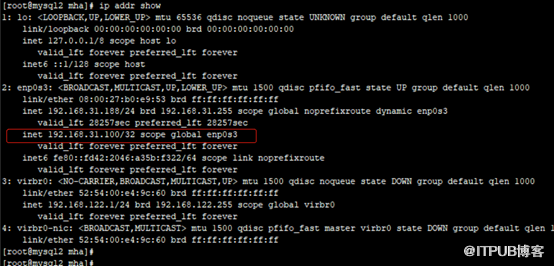
注意是 100/32
管理節點(即從服務器1)
[root@mysql2 mha]# nohup masterha_manager --conf=/usr/local/mha/mha.conf > /tmp/mha_manager.log < /dev/null 2>&1 &
管理節點(即從服務器1)
[root@mysql2 mha]# masterha_check_status --conf=/usr/local/mha/mha.conf

主服務器1
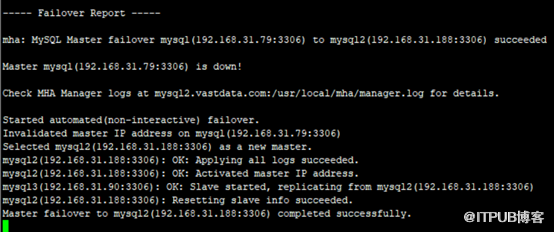
[root@mysql ~]# service mysql stop
注:
每次出發MHA切換,需要在管理節點刪除mha.failover.complete文件,不然下次切換會報錯。
從服務器1(候選節點)
檢查
[root@mysql2 mha]# tail -100f manager.log
[root@mysql2 mha]# ip addr show
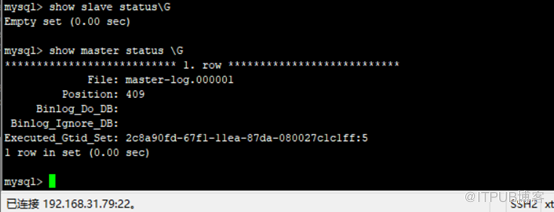
mysql> show slave status\G
mysql> show master status\G
從服務器2

將原主庫恢復,成為現集群環境的備庫
現主庫操作
mysql> show master status;

原主庫操作
[root@mysql data]# service mysql start
[root@mysql data]# mysql -uroot -p
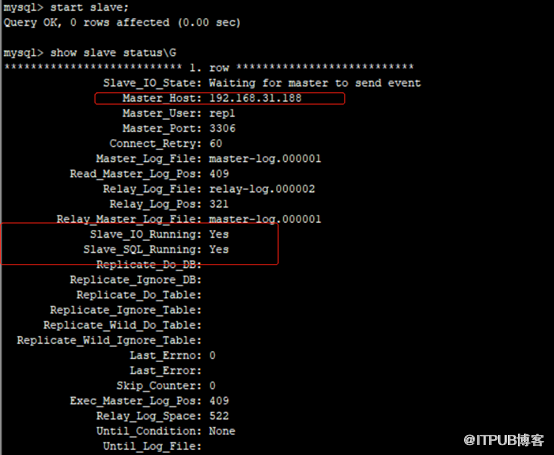
mysql> change master to master_host='192.168.31.188',master_user='rep1', master_password='Oracle123',master_port=3306,master_log_file='master-log.000001',master_log_pos=409;
mysql> start slave;
mysql> show slave status\G
關于MYSQL架構中如何主從MHA就分享到這里了,希望以上內容可以對大家有一定的幫助,可以學到更多知識。如果覺得文章不錯,可以把它分享出去讓更多的人看到。
免責聲明:本站發布的內容(圖片、視頻和文字)以原創、轉載和分享為主,文章觀點不代表本網站立場,如果涉及侵權請聯系站長郵箱:is@yisu.com進行舉報,并提供相關證據,一經查實,將立刻刪除涉嫌侵權內容。