您好,登錄后才能下訂單哦!
您好,登錄后才能下訂單哦!
先寫在前面,這說的Settings加載選項是指Settings這個應用顯示在主界面的選項,這個修改需要對系統源碼進行修改。
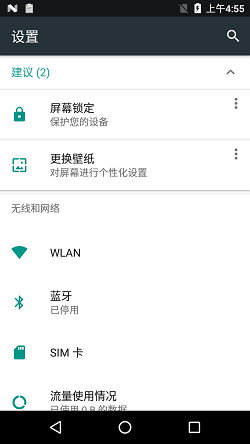
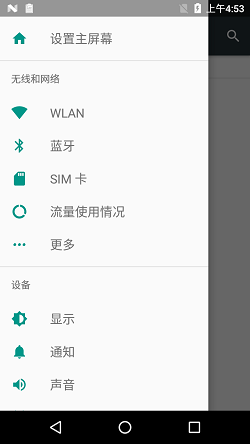
Android 7.0 Settings頂部多了一個建議選項,多了個側邊欄,操作更加便捷了。


原生7.0主界面 原生7.0側邊欄
Android 6.0
之前做Android 6.0開發的,都會了解到6.0的Settings加載選項是通過加載dashboard_categories.xml,獲取需要顯示的選項,并且在SettingsActivity中也進行判斷是否要顯示,所以在6.0上添加一個選項是比較簡單的,直接在dashboard_categories.xml添加icon、title、summary,也可以添加目標fragment和Intent,這樣就可以順利跳轉到對應的界面了。但是在7.0上,google對Settings進行了重構。
Android 7.0
7.0的Settings的選項不再從dashboard_categories.xml中加載選項列表,而是通過在Androidmanifest.xml中,配置intent-filter的Action,在通過PackageManager進行指定的Action進行搜索,那么就可以獲取到需要顯示的選項列表了,并且也需要在代碼中進行判斷,判斷哪些功能需要顯示與否。
TileUtils.Java中通過幾個Action進行獲取系統中對應的activity,如Settings中的幾個
private static final String SETTINGS_ACTION ="com.android.settings.action.SETTINGS";

private static final String OPERATOR_SETTINGS ="com.android.settings.OPERATOR_APPLICATION_SETTING";

private static final String OPERATOR_DEFAULT_CATEGORY ="com.android.settings.category.wireless";

private static final String MANUFACTURER_SETTINGS ="com.android.settings.MANUFACTURER_APPLICATION_SETTING";

private static final String MANUFACTURER_DEFAULT_CATEGORY ="com.android.settings.category.device";
通過PackageManager進行搜索,獲取到這一系列的activity信息,
PackageManager pm = context.getPackageManager();
List<ResolveInfo> results = pm.queryIntentActivitiesAsUser(intent,PackageManager.GET_META_DATA, user.getIdentifier());
并且在AndroidManifest.xml通過meta-data配置了icon、title、summary,那這就有Settings中顯示的圖標、標題和說明。還有在Settings中顯示的分類、目標Fragment。
Settings 的AndroidManifest.xml 下面那代碼是Settings->about phone的Activity配置。
<activity android:name="Settings$DeviceInfoSettingsActivity"
        android:theme="@style/Theme.SubSettingsDialogWhenLarge"
        android:label="@string/device_info_settings"
        android:icon="@drawable/ic_settings_about"
        android:taskAffinity="com.android.settings"
        android:parentActivityName="Settings">

      <intent-filter android:priority="1">
        <action android:name="android.settings.DEVICE_INFO_SETTINGS" />
        <category android:name="android.intent.category.DEFAULT" />
      </intent-filter>
      <intent-filter>
        <action android:name="android.intent.action.MAIN" />
        <category android:name="android.intent.category.DEFAULT" />
        <category android:name="android.intent.category.VOICE_LAUNCH" />
      </intent-filter>
      <intent-filter android:priority="-1">
        <action android:name="com.android.settings.action.SETTINGS" />
      </intent-filter>

      <meta-data android:name="com.android.settings.category"
        android:value="com.android.settings.category.system" />
      <meta-data android:name="com.android.settings.title"
        android:resource="@string/about_settings" />
      <meta-data android:name="com.android.settings.FRAGMENT_CLASS"
        android:value="com.android.settings.DeviceInfoSettings" />

      <meta-data android:name="com.android.settings.PRIMARY_PROFILE_CONTROLLED"
        android:value="true" />
    </activity>
Settings顯示各選項的思路比較簡單,所以直接在Settings里面添加功能選項還是比較簡單的。
添加第三方apk到Settings選項中
如果需要Settings中添加打包好的apk,需要三個步驟。
1. 添加action。
可以被PackageManager搜索到的activity,搜索到后添加到Settings的選項列表中
1、添加顯示的選項信息。
在該apk的AndroidManifest.xml對應的啟動activity中添加以下meta-data。最好是有該apk提供公司的技術支持,不然有混淆的代碼就比較難進行更改、回編譯了。
  /**
   * The key used to get the category from metadata of activities of action
   * {@link #EXTRA_SETTINGS_ACTION}
   * The value must be one of:
   * <li>com.android.settings.category.wireless</li>
   * <li>com.android.settings.category.device</li>
   * <li>com.android.settings.category.personal</li>
   * <li>com.android.settings.category.system</li>
   */
  private static final String EXTRA_CATEGORY_KEY = "com.android.settings.category";

  /**
   * Name of the meta-data item that should be set in the AndroidManifest.xml
   * to specify the icon that should be displayed for the preference.
   */
  public static final String META_DATA_PREFERENCE_ICON = "com.android.settings.icon";

  /**
   * Name of the meta-data item that should be set in the AndroidManifest.xml
   * to specify the title that should be displayed for the preference.
   */
  public static final String META_DATA_PREFERENCE_TITLE = "com.android.settings.title";

  /**
   * Name of the meta-data item that should be set in the AndroidManifest.xml
   * to specify the summary text that should be displayed for the preference.
   */
  public static final String META_DATA_PREFERENCE_SUMMARY = "com.android.settings.summary";
在TileUtils.java的白名單中添加對應的包名。
這個也是Android考慮到的一些安全上的問題,沒有添加到白名單上面的包名,就不會顯示出來。
  /// Extra package white list for add item to Settings @{
  private static final String[] EXTRA_PACKAGE_WHITE_LIST = {};
  /// @}
最后就是全編,刷機驗證了。
相比android6.0,在7.0上添加功能選項顯得更簡單了,只需要寫好了功能,在Settings的AndroidManifest.xml中添加必要的參數,或者是在獨立的apk中AndroidManifest.xml中配置必要的參數,再在TileUtils.java中添加包名就好了。需要修改的地方更少了,并且Google將很方方法放到了com.android.settinglibs里,精簡了一部分代碼。
以上就是本文的全部內容,希望對大家的學習有所幫助,也希望大家多多支持億速云。
免責聲明:本站發布的內容(圖片、視頻和文字)以原創、轉載和分享為主,文章觀點不代表本網站立場,如果涉及侵權請聯系站長郵箱:is@yisu.com進行舉報,并提供相關證據,一經查實,將立刻刪除涉嫌侵權內容。