您好,登錄后才能下訂單哦!
您好,登錄后才能下訂單哦!
這期內容當中小編將會給大家帶來有關使用Spring Security怎么JSON進行配置并登錄,文章內容豐富且以專業的角度為大家分析和敘述,閱讀完這篇文章希望大家可以有所收獲。
準備工作
基本的spring security配置就不說了,網上一堆例子,只要弄到普通的表單登錄和自定義UserDetailsService就可以。因為需要重寫Filter,所以需要對spring security的工作流程有一定的了解,這里簡單說一下spring security的原理。

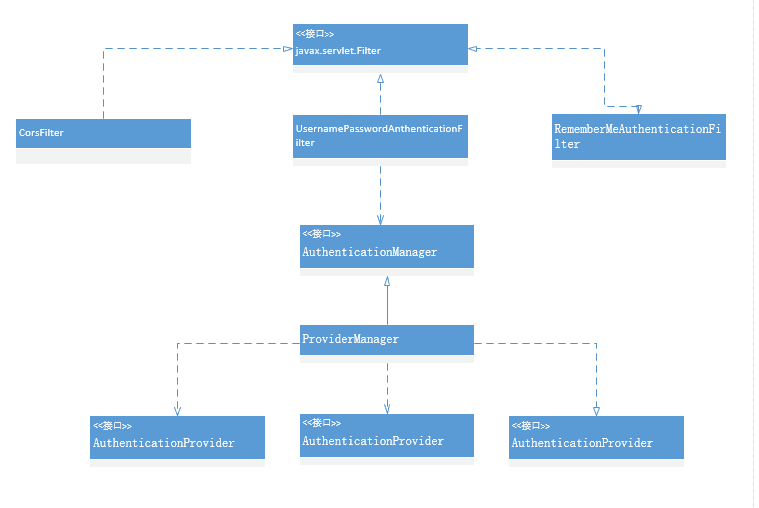
spring security 是基于javax.servlet.Filter的,因此才能在spring mvc(DispatcherServlet基于Servlet)前起作用。
UsernamePasswordAuthenticationFilter:實現Filter接口,負責攔截登錄處理的url,帳號和密碼會在這里獲取,然后封裝成Authentication交給AuthenticationManager進行認證工作
Authentication:貫穿整個認證過程,封裝了認證的用戶名,密碼和權限角色等信息,接口有一個boolean isAuthenticated()方法來決定該Authentication認證成功沒;
AuthenticationManager:認證管理器,但本身并不做認證工作,只是做個管理者的角色。例如默認實現ProviderManager會持有一個AuthenticationProvider數組,把認證工作交給這些AuthenticationProvider,直到有一個AuthenticationProvider完成了認證工作。
AuthenticationProvider:認證提供者,默認實現,也是最常使用的是DaoAuthenticationProvider。我們在配置時一般重寫一個UserDetailsService來從數據庫獲取正確的用戶名密碼,其實就是配置了DaoAuthenticationProvider的UserDetailsService屬性,DaoAuthenticationProvider會做帳號和密碼的比對,如果正常就返回給AuthenticationManager一個驗證成功的Authentication
看UsernamePasswordAuthenticationFilter源碼里的obtainUsername和obtainPassword方法只是簡單地調用request.getParameter方法,因此如果用json發送用戶名和密碼會導致DaoAuthenticationProvider檢查密碼時為空,拋出BadCredentialsException。
/**
   * Enables subclasses to override the composition of the password, such as by
   * including additional values and a separator.
   * <p>
   * This might be used for example if a postcode/zipcode was required in addition to
   * the password. A delimiter such as a pipe (|) should be used to separate the
   * password and extended value(s). The <code>AuthenticationDao</code> will need to
   * generate the expected password in a corresponding manner.
   * </p>
   *
   * @param request so that request attributes can be retrieved
   *
   * @return the password that will be presented in the <code>Authentication</code>
   * request token to the <code>AuthenticationManager</code>
   */
  protected String obtainPassword(HttpServletRequest request) {
    return request.getParameter(passwordParameter);
  }

  /**
   * Enables subclasses to override the composition of the username, such as by
   * including additional values and a separator.
   *
   * @param request so that request attributes can be retrieved
   *
   * @return the username that will be presented in the <code>Authentication</code>
   * request token to the <code>AuthenticationManager</code>
   */
  protected String obtainUsername(HttpServletRequest request) {
    return request.getParameter(usernameParameter);
  }
重寫UsernamePasswordAnthenticationFilter
上面UsernamePasswordAnthenticationFilter的obtainUsername和obtainPassword方法的注釋已經說了,可以讓子類來自定義用戶名和密碼的獲取工作。但是我們不打算重寫這兩個方法,而是重寫它們的調用者attemptAuthentication方法,因為json反序列化畢竟有一定消耗,不會反序列化兩次,只需要在重寫的attemptAuthentication方法中檢查是否json登錄,然后直接反序列化返回Authentication對象即可。這樣我們沒有破壞原有的獲取流程,還是可以重用父類原有的attemptAuthentication方法來處理表單登錄。
/**
 * AuthenticationFilter that supports rest login(json login) and form login.
 * @author chenhuanming
 */
public class CustomAuthenticationFilter extends UsernamePasswordAuthenticationFilter {

  @Override
  public Authentication attemptAuthentication(HttpServletRequest request, HttpServletResponse response) throws AuthenticationException {

    //attempt Authentication when Content-Type is json
    if(request.getContentType().equals(MediaType.APPLICATION_JSON_UTF8_VALUE)
        ||request.getContentType().equals(MediaType.APPLICATION_JSON_VALUE)){

      //use jackson to deserialize json
      ObjectMapper mapper = new ObjectMapper();
      UsernamePasswordAuthenticationToken authRequest = null;
      try (InputStream is = request.getInputStream()){
        AuthenticationBean authenticationBean = mapper.readValue(is,AuthenticationBean.class);
        authRequest = new UsernamePasswordAuthenticationToken(
            authenticationBean.getUsername(), authenticationBean.getPassword());
      }catch (IOException e) {
        e.printStackTrace();
        new UsernamePasswordAuthenticationToken(
            "", "");
      }finally {
        setDetails(request, authRequest);
        return this.getAuthenticationManager().authenticate(authRequest);
      }
    }

    //transmit it to UsernamePasswordAuthenticationFilter
    else {
      return super.attemptAuthentication(request, response);
    }
  }
}
封裝的AuthenticationBean類,用了lombok簡化代碼(lombok幫我們寫getter和setter方法而已)
@Getter
@Setter
public class AuthenticationBean {
  private String username;
  private String password;
}
WebSecurityConfigurerAdapter配置
重寫Filter不是問題,主要是怎么把這個Filter加到spring security的眾多filter里面。
@Override
protected void configure(HttpSecurity http) throws Exception {
  http
      .cors().and()
      .antMatcher("/**").authorizeRequests()
      .antMatchers("/", "/login**").permitAll()
      .anyRequest().authenticated()
      //這里必須要寫formLogin(),不然原有的UsernamePasswordAuthenticationFilter不會出現,也就無法配置我們重新的UsernamePasswordAuthenticationFilter
      .and().formLogin().loginPage("/")
      .and().csrf().disable();

  //用重寫的Filter替換掉原有的UsernamePasswordAuthenticationFilter
  http.addFilterAt(customAuthenticationFilter(),
  UsernamePasswordAuthenticationFilter.class);
}

//注冊自定義的UsernamePasswordAuthenticationFilter
@Bean
CustomAuthenticationFilter customAuthenticationFilter() throws Exception {
  CustomAuthenticationFilter filter = new CustomAuthenticationFilter();
  filter.setAuthenticationSuccessHandler(new SuccessHandler());
  filter.setAuthenticationFailureHandler(new FailureHandler());
  filter.setFilterProcessesUrl("/login/self");

  //這句很關鍵,重用WebSecurityConfigurerAdapter配置的AuthenticationManager,不然要自己組裝AuthenticationManager
  filter.setAuthenticationManager(authenticationManagerBean());
  return filter;
}
題外話,如果搭自己的oauth3的server,需要讓spring security oauth3共享同一個AuthenticationManager(源碼的解釋是這樣寫可以暴露出這個AuthenticationManager,也就是注冊到spring ioc)
@Override
@Bean // share AuthenticationManager for web and oauth
public AuthenticationManager authenticationManagerBean() throws Exception {
  return super.authenticationManagerBean();
}
上述就是小編為大家分享的使用Spring Security怎么JSON進行配置并登錄了,如果剛好有類似的疑惑,不妨參照上述分析進行理解。如果想知道更多相關知識,歡迎關注億速云行業資訊頻道。
免責聲明:本站發布的內容(圖片、視頻和文字)以原創、轉載和分享為主,文章觀點不代表本網站立場,如果涉及侵權請聯系站長郵箱:is@yisu.com進行舉報,并提供相關證據,一經查實,將立刻刪除涉嫌侵權內容。