您好,登錄后才能下訂單哦!
您好,登錄后才能下訂單哦!
怎么在Android應用中實現一個抽屜效果?很多新手對此不是很清楚,為了幫助大家解決這個難題,下面小編將為大家詳細講解,有這方面需求的人可以來學習下,希望你能有所收獲。
實現原理
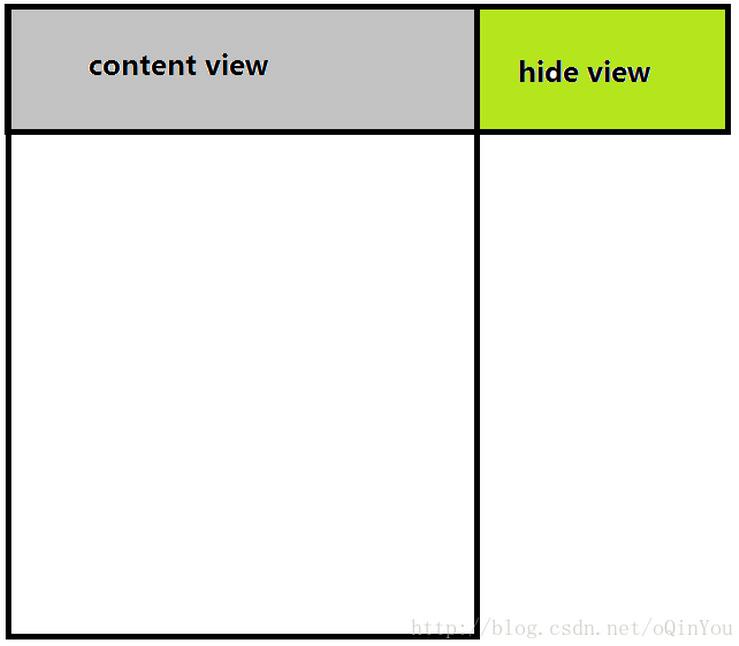
其實單就一個SwipeLayout的實現原理來講的話,還是很簡單的,實際上單個SwipeLayout隱藏抽屜狀態時,應該是這樣的:

也就是說,最初的隱藏狀態,實際上是將hide view區域layout到conten view的右邊,達到隱藏效果,而后顯示則是根據拖拽的x值變化來動態的layout 2個view,從而達到一個滑動抽屜效果。
當然,直接重寫view的onTouchEvent來動態的layout 2個view是可以實現我們需要的效果的,但是有更好的方法來實現,就是同過ViewDragHelper。
ViewDragHelper是google官方提供的一個專門用于手勢分析處理的類,關于ViewDragHelper的基本使用,網上有一大堆的資源。具體的ViewDragHelper介紹以及基本使用方法,本文就不重復造輪子了,此處推薦鴻洋大神的一篇微博:Android ViewDragHelper完全解析 自定義ViewGroup神器。
具體實現
下面我們開始具體的實現。
布局比較簡單,這里就不貼代碼了,最后會貼上本demo的完整代碼地址。
首先我們實現一個繼承FrameLayout的自定義SwipeLauout,重寫onFinishInflate方法:
這里我們只允許SwipeLayout設置2個子View,ContentLayout是繼承LinearLayout的自定義layout,后面會講到這個,此處先略過;
 @Override
 protected void onFinishInflate() {
  super.onFinishInflate();
  if (getChildCount() != 2) {
   throw new IllegalStateException("Must 2 views in SwipeLayout");
  }
  contentView = getChildAt(0);
  hideView = getChildAt(1);
  if (contentView instanceof ContentLayout)
   ((ContentLayout) contentView).setSwipeLayout(this);
  else {
   throw new IllegalStateException("content view must be an instanceof FrontLayout");
  }
 }
接著重寫onSizeChanged,onLayout,onInterceptTouchEvent方法:
 @Override
 protected void onSizeChanged(int w, int h, int oldw, int oldh) {
  super.onSizeChanged(w, h, oldw, oldh);
  hideViewHeight = hideView.getMeasuredHeight();
  hideViewWidth = hideView.getMeasuredWidth();
  contentWidth = contentView.getMeasuredWidth();
 }

 @Override
 protected void onLayout(boolean changed, int left, int top, int right,
       int bottom) {
  // super.onLayout(changed, left, top, right, bottom);
  contentView.layout(0, 0, contentWidth, hideViewHeight);
  hideView.layout(contentView.getRight(), 0, contentView.getRight()
    + hideViewWidth, hideViewHeight);
 }

 @Override
 public boolean onInterceptTouchEvent(MotionEvent ev) {
  boolean result = viewDragHelper.shouldInterceptTouchEvent(ev);
  //  Log.e("SwipeLayout", "-----onInterceptTouchEvent-----");
  return result;
 }
然后是比較關鍵的,重寫onTouchEvent方法以及ViewDragHelper.Callback回調,我們定了一個enum來判斷SwipeLayout的三種狀態。在onViewPositionChanged中,有2種方法實現content view和hide view的伴隨移動,一種是直接offset view的橫向變化量,還有一種就是直接通過layout的方式,兩種方式都可以。
 public enum SwipeState {
  Open, Swiping, Close;
 }
 @Override
 public boolean onTouchEvent(MotionEvent event) {
  //  Log.e("SwipeLayout", "-----onTouchEvent-----");
  switch (event.getAction()) {
   case MotionEvent.ACTION_DOWN:
    downX = event.getX();
    downY = event.getY();
    break;
   case MotionEvent.ACTION_MOVE:
    // 1.獲取x和y方向移動的距離
    float moveX = event.getX();
    float moveY = event.getY();
    float delatX = moveX - downX;// x方向移動的距離
    float delatY = moveY - downY;// y方向移動的距離

    if (Math.abs(delatX) > Math.abs(delatY)) {
     // 表示移動是偏向于水平方向,那么應該SwipeLayout應該處理,請求listview不要攔截
     this.requestDisallowInterceptTouchEvent(true);
    }

    // 更新downX,downY
    downX = moveX;
    downY = moveY;
    break;
   case MotionEvent.ACTION_UP:

    break;
  }
  viewDragHelper.processTouchEvent(event);
  return true;
 }

 private ViewDragHelper.Callback callback = new ViewDragHelper.Callback() {
  @Override
  public boolean tryCaptureView(View child, int pointerId) {
   return child == contentView || child == hideView;
  }

  @Override
  public int getViewHorizontalDragRange(View child) {
   return hideViewWidth;
  }

  @Override
  public int clampViewPositionHorizontal(View child, int left, int dx) {
   if (child == contentView) {
    if (left > 0)
     left = 0;
    if (left < -hideViewWidth)
     left = -hideViewWidth;
   } else if (child == hideView) {
    if (left > contentWidth)
     left = contentWidth;
    if (left < (contentWidth - hideViewWidth))
     left = contentWidth - hideViewWidth;
   }
   return left;
  }

  @Override
  public void onViewPositionChanged(View changedView, int left, int top,
           int dx, int dy) {
   super.onViewPositionChanged(changedView, left, top, dx, dy);
   if (changedView == contentView) {
    // 如果手指滑動deleteView,那么也要講橫向變化量dx設置給contentView
    hideView.offsetLeftAndRight(dx);
   } else if (changedView == hideView) {
    // 如果手指滑動contentView,那么也要講橫向變化量dx設置給deleteView
    contentView.offsetLeftAndRight(dx);
   }

   //   if (changedView == contentView) {
   //    // 手動移動deleteView
   //    hideView.layout(hideView.getLeft() + dx,
   //      hideView.getTop() + dy, hideView.getRight() + dx,
   //      hideView.getBottom() + dy);
   //   } else if (hideView == changedView) {
   //    // 手動移動contentView
   //    contentView.layout(contentView.getLeft() + dx,
   //      contentView.getTop() + dy, contentView.getRight() + dx,
   //      contentView.getBottom() + dy);
   //   }
   //實時更新當前狀態
   updateSwipeStates();
   invalidate();
  }

  @Override
  public void onViewReleased(View releasedChild, float xvel, float yvel) {
   super.onViewReleased(releasedChild, xvel, yvel);
   //根據用戶滑動速度處理開關
   //xvel: x方向滑動速度
   //yvel: y方向滑動速度
   //   Log.e("tag", "currentState = " + currentState);
   //   Log.e("tag", "xvel = " + xvel);
   if (xvel < -200 && currentState != SwipeState.Open) {
    open();
    return;
   } else if (xvel > 200 && currentState != SwipeState.Close) {
    close();
    return;
   }

   if (contentView.getLeft() < -hideViewWidth / 2) {
    // 打開
    open();
   } else {
    // 關閉
    close();
   }
  }
 };
open(),close()實現
 public void open() {
  open(true);
 }

 public void close() {
  close(true);
 }

 /**
  * 打開的方法
  *
  * @param isSmooth 是否通過緩沖動畫的形式設定view的位置
  */
 public void open(boolean isSmooth) {
  if (isSmooth) {
   viewDragHelper.smoothSlideViewTo(contentView, -hideViewWidth,
     contentView.getTop());
   ViewCompat.postInvalidateOnAnimation(SwipeLayout.this);
  } else {
   contentView.offsetLeftAndRight(-hideViewWidth);//直接偏移View的位置
   hideView.offsetLeftAndRight(-hideViewWidth);//直接偏移View的位置
   //   contentView.layout(-hideViewWidth, 0, contentWidth - hideViewWidth, hideViewHeight);//直接通過坐標擺放
   //   hideView.layout(contentView.getRight(), 0, hideViewWidth, hideViewHeight);//直接通過坐標擺放
   invalidate();
  }
 }

 /**
  * 關閉的方法
  *
  * @param isSmooth true:通過緩沖動畫的形式設定view的位置
  *     false:直接設定view的位置
  */
 public void close(boolean isSmooth) {
  if (isSmooth) {
   viewDragHelper.smoothSlideViewTo(contentView, 0, contentView.getTop());
   ViewCompat.postInvalidateOnAnimation(SwipeLayout.this);
  } else {
   contentView.offsetLeftAndRight(hideViewWidth);
   hideView.offsetLeftAndRight(hideViewWidth);
   invalidate();
   //contentView.layout(0, 0, contentWidth, hideViewHeight);//直接通過坐標擺放
   //hideView.layout(contentView.getRight(), 0, hideViewWidth, hideViewHeight);//直接通過坐標擺放
  }
 }
此上基本實現了單個SwipeLayout的抽屜滑動效果,但是將此SwipeLayout作為一個item布局設置給一個listView的時候,還需要做許多的判斷。
由于listView的重用機制,我們這里并未針對listview做任何處理,所以一旦有一個item的SwipeLayout的狀態是打開狀態,不可避免的其它也必然有幾個是打開狀態,所以我們這里需要根據檢測listView的滑動,當listView滑動時,關閉SwipeLayout。既然需要在外部控制SwipeLayout的開關,我們先定義一個SwipeLayoutManager用于管理SwipeLayout的控制。
public class SwipeLayoutManager {
 //記錄打開的SwipeLayout集合
 private HashSet<SwipeLayout> mUnClosedSwipeLayouts = new HashSet<SwipeLayout>();

 private SwipeLayoutManager() {
 }

 private static SwipeLayoutManager mInstance = new SwipeLayoutManager();

 public static SwipeLayoutManager getInstance() {
  return mInstance;
 }

 /**
  * 將一個沒有關閉的SwipeLayout加入集合
  * @param layout
  */
 public void add(SwipeLayout layout) {
  mUnClosedSwipeLayouts.add(layout);
 }

 /**
  * 將一個沒有關閉的SwipeLayout移出集合
  * @param layout
  */
 public void remove(SwipeLayout layout){
  mUnClosedSwipeLayouts.remove(layout);
 }

 /**
  * 關閉已經打開的SwipeLayout
  */
 public void closeUnCloseSwipeLayout() {
  if(mUnClosedSwipeLayouts.size() == 0){
   return;
  }

  for(SwipeLayout l : mUnClosedSwipeLayouts){
   l.close(true);
  }
  mUnClosedSwipeLayouts.clear();
 }

 /**
  * 關閉已經打開的SwipeLayout
  */
 public void closeUnCloseSwipeLayout(boolean isSmooth) {
  if(mUnClosedSwipeLayouts.size() == 0){
   return;
  }

  for(SwipeLayout l : mUnClosedSwipeLayouts){
   l.close(isSmooth);
  }
  mUnClosedSwipeLayouts.clear();
 }
}
這樣就可以監聽listView的滑動,然后在listView滑動的時候,關閉所有的抽屜View。
 listView.setOnScrollListener(new OnScrollListener() {
   @Override
   public void onScrollStateChanged(AbsListView view, int scrollState) {
    swipeLayoutManager.closeUnCloseSwipeLayout();
   }

   @Override
   public void onScroll(AbsListView view, int firstVisibleItem, int visibleItemCount, int totalItemCount) {
   }
  });
考慮到大多數時候,在我們打開抽屜View和關閉抽屜View的時候,外部需要知道SwipeLayout的狀態值,所以我們需要在SwipeLayout中增加幾個接口,告訴外部當前SwipeLayout的狀態值:
SwipeLayout.java
----------------
 private void updateSwipeStates() {
  SwipeState lastSwipeState = currentState;
  SwipeState swipeState = getCurrentState();

  if (listener == null) {
   try {
    throw new Exception("please setOnSwipeStateChangeListener first!");
   } catch (Exception e) {
    e.printStackTrace();
   }
   return;
  }

  if (swipeState != currentState) {
   currentState = swipeState;
   if (currentState == SwipeState.Open) {
    listener.onOpen(this);
    // 當前的Swipelayout已經打開,需要讓Manager記錄
    swipeLayoutManager.add(this);
   } else if (currentState == SwipeState.Close) {
    listener.onClose(this);
    // 說明當前的SwipeLayout已經關閉,需要讓Manager移除
    swipeLayoutManager.remove(this);
   } else if (currentState == SwipeState.Swiping) {
    if (lastSwipeState == SwipeState.Open) {
     listener.onStartClose(this);
    } else if (lastSwipeState == SwipeState.Close) {
     listener.onStartOpen(this);
     //hideView準備顯示之前,先將之前打開的的SwipeLayout全部關閉
     swipeLayoutManager.closeUnCloseSwipeLayout();
     swipeLayoutManager.add(this);
    }
   }
  } else {
   currentState = swipeState;
  }
 }

 /**
  * 獲取當前控件狀態
  *
  * @return
  */
 public SwipeState getCurrentState() {
  int left = contentView.getLeft();
  //  Log.e("tag", "contentView.getLeft() = " + left);
  //  Log.e("tag", "hideViewWidth = " + hideViewWidth);
  if (left == 0) {
   return SwipeState.Close;
  }

  if (left == -hideViewWidth) {
   return SwipeState.Open;
  }
  return SwipeState.Swiping;
 }
 private OnSwipeStateChangeListener listener;

 public void setOnSwipeStateChangeListener(
   OnSwipeStateChangeListener listener) {
  this.listener = listener;
 }

 public View getContentView() {
  return contentView;
 }

 public interface OnSwipeStateChangeListener {
  void onOpen(SwipeLayout swipeLayout);

  void onClose(SwipeLayout swipeLayout);

  void onStartOpen(SwipeLayout swipeLayout);

  void onStartClose(SwipeLayout swipeLayout);
 }
然后接下來是寫一個為listView設置的SwipeAdapter
SwipeAdapter.java
------------
public class SwipeAdapter extends BaseAdapter implements OnSwipeStateChangeListener {
 private Context mContext;
 private List<String> list;
 private MyClickListener myClickListener;
 private SwipeLayoutManager swipeLayoutManager;

 public SwipeAdapter(Context mContext) {
  super();
  this.mContext = mContext;
  init();
 }

 private void init() {
  myClickListener = new MyClickListener();
  swipeLayoutManager = SwipeLayoutManager.getInstance();
 }

 public void setList(List<String> list){
  this.list = list;
  notifyDataSetChanged();
 }

 @Override
 public int getCount() {
  return list.size();
 }

 @Override
 public Object getItem(int position) {
  return list.get(position);
 }

 @Override
 public long getItemId(int position) {
  return position;
 }

 @Override
 public View getView(final int position, View convertView, ViewGroup parent) {
  if (convertView == null) {
   convertView = UIUtils.inflate(R.layout.list_item_swipe);
  }
  ViewHolder holder = ViewHolder.getHolder(convertView);

  holder.tv_content.setText(list.get(position));
  holder.tv_overhead.setOnClickListener(myClickListener);
  holder.tv_overhead.setTag(position);
  holder.tv_delete.setOnClickListener(myClickListener);
  holder.tv_delete.setTag(position);
  holder.sv_layout.setOnSwipeStateChangeListener(this);
  holder.sv_layout.setTag(position);

  holder.sv_layout.getContentView().setOnClickListener(new View.OnClickListener() {
   @Override
   public void onClick(View v) {
    ToastUtils.showToast("item click : " + position);
    swipeLayoutManager.closeUnCloseSwipeLayout();
   }
  });

  return convertView;
 }

 static class ViewHolder {
  TextView tv_content, tv_overhead, tv_delete;
  SwipeLayout sv_layout;

  public ViewHolder(View convertView) {
   tv_content = (TextView) convertView.findViewById(R.id.tv_content);
   tv_overhead = (TextView) convertView.findViewById(R.id.tv_overhead);
   tv_delete = (TextView) convertView.findViewById(R.id.tv_delete);
   sv_layout = (SwipeLayout) convertView.findViewById(R.id.sv_layout);
  }

  public static ViewHolder getHolder(View convertView) {
   ViewHolder holder = (ViewHolder) convertView.getTag();
   if (holder == null) {
    holder = new ViewHolder(convertView);
    convertView.setTag(holder);
   }
   return holder;
  }
 }

 class MyClickListener implements View.OnClickListener {
  @Override
  public void onClick(View v) {
   Integer position = (Integer) v.getTag();
   switch (v.getId()) {
    case R.id.tv_overhead:
     //ToastUtils.showToast("position : " + position + " overhead is clicked.");
     }
     break;
    case R.id.tv_delete:
     //ToastUtils.showToast("position : " + position + " delete is clicked.");
     }
     break;
    default:
     break;
   }
  }
 }

 @Override
 public void onOpen(SwipeLayout swipeLayout) {
  //ToastUtils.showToast(swipeLayout.getTag() + "onOpen.");
 }

 @Override
 public void onClose(SwipeLayout swipeLayout) {
  //ToastUtils.showToast(swipeLayout.getTag() + "onClose.");
 }

 @Override
 public void onStartOpen(SwipeLayout swipeLayout) {
  //   ToastUtils.showToast("onStartOpen.");
 }

 @Override
 public void onStartClose(SwipeLayout swipeLayout) {
  //   ToastUtils.showToast("onStartClose.");
 }
}
此時已經基本實現了我們需要的大部分功能了,但是當我們滑動的時候,又發現新的問題,我們的SwipeLayout和listview滑動判斷有問題。由于前面我們僅僅是將touch攔截事件簡簡單單的丟給了viewDragHelper.shouldInterceptTouchEvent(ev)來處理,導致SwipeLayout和listview攔截touch事件時的處理存在一定的問題,這里我們要提到一個知識點:Android view事件的傳遞。
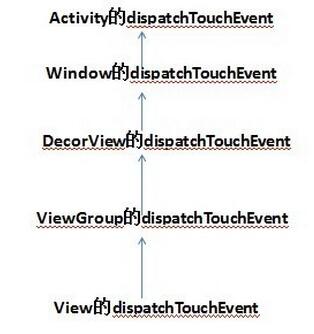
(1)首先由Activity分發,分發給根View,也就是DecorView(DecorView為整個Window界面的最頂層View)
(2)然后由根View分發到子的View
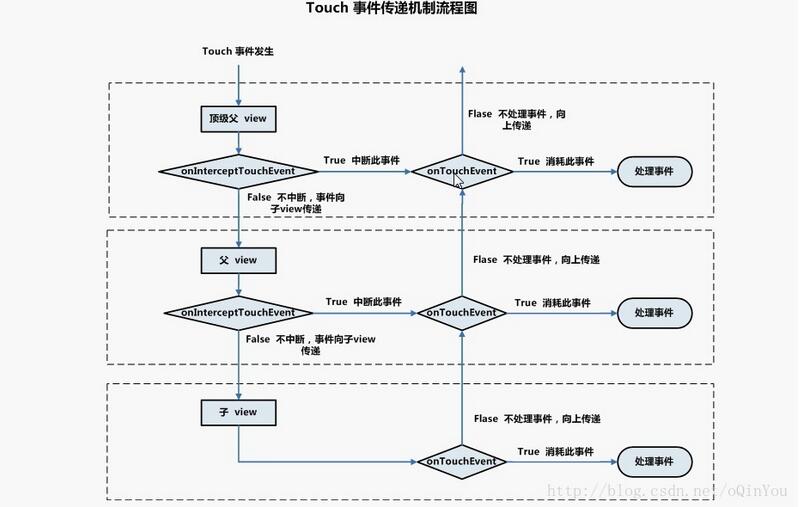
view事件攔截如下圖所示:

view事件的消費如下圖所示:

注:以上2張圖借鑒網上總結的比較經典的圖
所以這里我們就要談到一開始出現的ContentLayout,主要重寫了onInterceptTouchEvent和onTouchEvent。
public class ContentLayout extends LinearLayout {
 SwipeLayoutInterface mISwipeLayout;

 public ContentLayout(Context context) {
  super(context);
 }

 public ContentLayout(Context context, AttributeSet attrs) {
  super(context, attrs);
 }

 public ContentLayout(Context context, AttributeSet attrs, int defStyleAttr) {
  super(context, attrs, defStyleAttr);
 }

 public void setSwipeLayout(SwipeLayoutInterface iSwipeLayout) {
  this.mISwipeLayout = iSwipeLayout;
 }

 @Override
 public boolean onInterceptTouchEvent(MotionEvent ev) {
//  Log.e("ContentLayout", "-----onInterceptTouchEvent-----");
  if (mISwipeLayout.getCurrentState() == SwipeState.Close) {
   return super.onInterceptTouchEvent(ev);
  } else {
   return true;
  }
 }

 @Override
 public boolean onTouchEvent(MotionEvent ev) {
//  Log.e("ContentLayout", "-----onTouchEvent-----");
  if (mISwipeLayout.getCurrentState() == SwipeState.Close) {
   return super.onTouchEvent(ev);
  } else {
   if (ev.getActionMasked() == MotionEvent.ACTION_UP) {
    mISwipeLayout.close();
   }
   return true;
  }
 }
}
另外由于在ContentLayout中需要拿到父View SwipeLayout的開關狀態以及控制SwipeLayout的關閉,因此在再寫一個接口,用于ContentLayout獲取SwipeLayout的開關狀態以及更新SwipeLayout。
public interface SwipeLayoutInterface {

 SwipeState getCurrentState();

 void open();

 void close();
}
然后接著的是完善SwipeLayout的onInterceptTouchEvent,我們在這里增加一個GestureDetectorCompat處理手勢識別:
 private void init(Context context) {
  viewDragHelper = ViewDragHelper.create(this, callback);
  mGestureDetector = new GestureDetectorCompat(context, mOnGestureListener);
  swipeLayoutManager = SwipeLayoutManager.getInstance();
 }

 private SimpleOnGestureListener mOnGestureListener = new SimpleOnGestureListener() {
  @Override
  public boolean onScroll(MotionEvent e1, MotionEvent e2, float distanceX, float distanceY) {
   // 當橫向移動距離大于等于縱向時,返回true
   return Math.abs(distanceX) >= Math.abs(distanceY);
  }
 };
  @Override
 public boolean onInterceptTouchEvent(MotionEvent ev) {
  boolean result = viewDragHelper.shouldInterceptTouchEvent(ev) & mGestureDetector.onTouchEvent(ev);
  //  Log.e("SwipeLayout", "-----onInterceptTouchEvent-----");
  return result;
 }
如此下來,整個View不管是上下拖動,還是SwipeLayout的開關滑動,都已經實現完成了。最后增加對應overhead,delete以及item的點擊事件,此處完善SwipeAdapter的代碼之后如下。
 class MyClickListener implements View.OnClickListener {
  @Override
  public void onClick(View v) {
   Integer position = (Integer) v.getTag();
   switch (v.getId()) {
    case R.id.tv_overhead:
     //ToastUtils.showToast("position : " + position + " overhead is clicked.");
     swipeLayoutManager.closeUnCloseSwipeLayout(false);
     if(onSwipeControlListener != null){
      onSwipeControlListener.onOverhead(position, list.get(position));
     }
     break;
    case R.id.tv_delete:
     //ToastUtils.showToast("position : " + position + " delete is clicked.");
     swipeLayoutManager.closeUnCloseSwipeLayout(false);
     if(onSwipeControlListener != null){
      onSwipeControlListener.onDelete(position, list.get(position));
     }
     break;
    default:
     break;
   }
  }
 }

 private OnSwipeControlListener onSwipeControlListener;

 public void setOnSwipeControlListener(OnSwipeControlListener onSwipeControlListener){
  this.onSwipeControlListener = onSwipeControlListener;
 }

 /**
  * overhead 和 delete點擊事件接口
  */
 public interface OnSwipeControlListener{
  void onOverhead(int position, String itemTitle);

  void onDelete(int position, String itemTitle);
 }
最后貼上MainActivity代碼,此處通過OnSwipeControlListener接口回調實現item的刪除和置頂:
public class MainActivity extends Activity implements OnSwipeControlListener {
 private ListView listView;
 private List<String> list = new ArrayList<String>();
 private SwipeLayoutManager swipeLayoutManager;
 private SwipeAdapter swipeAdapter;

 protected void onCreate(Bundle savedInstanceState) {
  super.onCreate(savedInstanceState);
  setContentView(R.layout.activity_main);

  initData();
  initView();
 }

 private void initData() {
  for (int i = 0; i < 50; i++) {
   list.add("content - " + i);
  }
 }

 private void initView() {
  swipeLayoutManager = SwipeLayoutManager.getInstance();
  swipeAdapter = new SwipeAdapter(this);
  swipeAdapter.setList(list);

  listView = (ListView) findViewById(R.id.list_view);

  listView.setAdapter(swipeAdapter);
  listView.setOnScrollListener(new OnScrollListener() {
   @Override
   public void onScrollStateChanged(AbsListView view, int scrollState) {
    swipeLayoutManager.closeUnCloseSwipeLayout();
   }

   @Override
   public void onScroll(AbsListView view, int firstVisibleItem, int visibleItemCount, int totalItemCount) {
   }
  });

  swipeAdapter.setOnSwipeControlListener(this);
 }

 @Override
 public void onOverhead(int position, String itemTitle) {
  setItemOverhead(position, itemTitle);
 }

 @Override
 public void onDelete(int position, String itemTitle) {
  removeItem(position, itemTitle);
 }

 /**
  * 設置item置頂
  *
  * @param position
  * @param itemTitle
  */
 private void setItemOverhead(int position, String itemTitle) {
  // ToastUtils.showToast("position : " + position + " overhead.");
  ToastUtils.showToast("overhead ---" + itemTitle + "--- success.");
  String newTitle = itemTitle;
  list.remove(position);//刪除要置頂的item
  list.add(0, newTitle);//根據adapter傳來的Title數據在list 0位置插入title字符串,達到置頂效果
  swipeAdapter.setList(list);//重新給Adapter設置list數據并更新
  UIUtils.runOnUIThread(new Runnable() {
   @Override
   public void run() {
    listView.setSelection(0);//listview選中第0項item
   }
  });
 }

 /**
  * 刪除item
  *
  * @param position
  * @param itemTitle
  */

 private void removeItem(int position, String itemTitle) {
  //  ToastUtils.showToast("position : " + position + " delete.");
  ToastUtils.showToast("delete ---" + itemTitle + "--- success.");
  list.remove(position);
  swipeAdapter.setList(list);//重新給Adapter設置list數據并更新
 }
}
至此整個demo基本完成,本次完成的功能基本能夠直接放到項目中使用。其實最麻煩的地方就在于view的touch事件攔截和處理,不過將本demo的log打開看一下對比之后,也就能夠理解整個傳遞過程了。
看完上述內容是否對您有幫助呢?如果還想對相關知識有進一步的了解或閱讀更多相關文章,請關注億速云行業資訊頻道,感謝您對億速云的支持。
免責聲明:本站發布的內容(圖片、視頻和文字)以原創、轉載和分享為主,文章觀點不代表本網站立場,如果涉及侵權請聯系站長郵箱:is@yisu.com進行舉報,并提供相關證據,一經查實,將立刻刪除涉嫌侵權內容。