溫馨提示×
您好,登錄后才能下訂單哦!
點擊 登錄注冊 即表示同意《億速云用戶服務條款》
您好,登錄后才能下訂單哦!
本文實例為大家分享了Android實現底部導航欄功能的具體代碼,供大家參考,具體內容如下
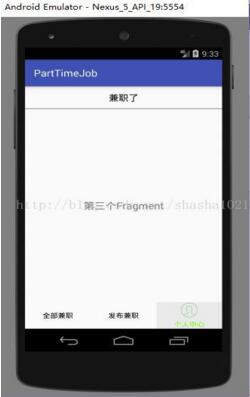
實驗效果:

(1)在drawable文件夾下新建tab_menu_bg.xml文件,具體代碼如下:
<?xml version="1.0" encoding="utf-8"?>
<selector xmlns:android="http://schemas.android.com/apk/res/android">
  <item android:state_selected="true">
    <shape>
      <solid android:color="@color/bg_gray"/>
    </shape>
  </item>
</selector>
(2)在drawable文件夾下新建tab_menu_text.xml文件,具體代碼如下:
<?xml version="1.0" encoding="utf-8"?>
<selector xmlns:android="http://schemas.android.com/apk/res/android">
  <item android:color="@color/text_green" android:state_selected="true"/>
  <item android:color="@color/text_black" />
</selector>
(3)在drawable文件夾下新建tab_menu_personal.xml文件,具體代碼如下:
<?xml version="1.0" encoding="utf-8"?>
<selector xmlns:android="http://schemas.android.com/apk/res/android">
  <item android:drawable="@mipmap/menu_personal_on" android:state_selected="true"/>
  <item android:drawable="@mipmap/menu_personal_off"/>
</selector>
(4)在drawable文件夾下新建tab_menu_send.xml文件,具體代碼如下:
<?xml version="1.0" encoding="utf-8"?>
<selector xmlns:android="http://schemas.android.com/apk/res/android">
  <item android:drawable="@mipmap/menu_send_on" android:state_selected="true"/>
  <item android:drawable="@mipmap/menu_send_off"/>
</selector>
(5)在drawable文件夾下新建tab_menu_list.xml文件,具體代碼如下:
<?xml version="1.0" encoding="utf-8"?>
<selector xmlns:android="http://schemas.android.com/apk/res/android">
  <item android:drawable="@mipmap/menu_send_on" android:state_selected="true"/>
  <item android:drawable="@mipmap/menu_send_off"/>
</selector>
(6)在layout文件夾下的activity_main.xml中具體代碼如下:
<?xml version="1.0" encoding="utf-8"?>
<RelativeLayout xmlns:android="http://schemas.android.com/apk/res/android"
  xmlns:tools="http://schemas.android.com/tools"
  android:id="@+id/activity_main"
  android:layout_width="match_parent"
  android:layout_height="match_parent"
  tools:context="com.bzu.fshiner.parttimejob.MainActivity">
  <RelativeLayout
    android:id="@+id/tab_title"
    android:layout_width="match_parent"
    android:layout_height="48dp">
    <TextView
      android:id="@+id/tv_top"
      android:layout_width="match_parent"
      android:layout_height="match_parent"
      android:gravity="center"
      android:textSize="18sp"
      android:textColor="@color/text_black"
      android:text="@string/tv_top"/>
    <View
      android:layout_width="match_parent"
      android:layout_height="2px"
      android:background="@color/text_black"
      android:layout_alignParentBottom="true"/>
  </RelativeLayout>
  <LinearLayout
    android:id="@+id/tab_menu"
    android:layout_width="match_parent"
    android:layout_height="56dp"
    android:orientation="horizontal"
    android:layout_alignParentBottom="true">
    <TextView
      android:id="@+id/tv_list"
      android:layout_width="0dp"
      android:layout_height="match_parent"
      android:layout_weight="1"
      android:drawablePadding="3dp"
      android:gravity="center"
      android:background="@drawable/tab_menu_bg"
      android:textColor="@drawable/tab_menu_text"
      android:drawableTop="@drawable/tab_menu_list"
      android:text="@string/tv_list"/>
    <TextView
      android:id="@+id/tv_send"
      android:layout_width="0dp"
      android:layout_height="match_parent"
      android:layout_weight="1"
      android:drawablePadding="3dp"
      android:gravity="center"
      android:background="@drawable/tab_menu_bg"
      android:textColor="@drawable/tab_menu_text"
      android:drawableTop="@drawable/tab_menu_send"
      android:text="@string/tv_send"/>
    <TextView android:id="@+id/tv_personal"
      android:layout_width="0dp"
      android:layout_height="match_parent"
      android:layout_weight="1"
      android:drawablePadding="3dp"
      android:gravity="center"
      android:background="@drawable/tab_menu_bg"
      android:textColor="@drawable/tab_menu_text"
      android:drawableTop="@drawable/tab_menu_personal"
      android:text="@string/tv_personal"/>
   </LinearLayout>
   <View
     android:id="@+id/div_tab_bar"
     android:layout_width="match_parent"
     android:layout_height="2px"
     android:layout_above="@id/tab_menu"/>
   <FrameLayout
     android:id="@+id/fragment_container"
     android:layout_width="match_parent"
     android:layout_height="match_parent"
     android:layout_below="@id/tab_title"
     android:layout_above="@id/tab_menu">
   </FrameLayout>
</RelativeLayout>
(7)在layout文件夾中新建first_fragment.xml文件,具體代碼如下:
<?xml version="1.0" encoding="utf-8"?>
<LinearLayout xmlns:android="http://schemas.android.com/apk/res/android"
  android:orientation="vertical"
  android:layout_width="match_parent"
  android:layout_height="match_parent">
  <TextView
    android:id="@+id/tv_content"
    android:layout_width="match_parent"
    android:layout_height="match_parent"
    android:gravity="center"
    android:text="哈哈"
    android:textSize="20sp"/>

</LinearLayout>
(8)在MainActivity中具體代碼如下:
package com.bzu.fshiner.parttimejob;

import android.os.Bundle;
import android.support.v7.app.AppCompatActivity;
import android.view.View;
import android.widget.FrameLayout;
import android.widget.TextView;

public class MainActivity extends AppCompatActivity implements View.OnClickListener {
  private TextView tv_top;
  private TextView tv_list;
  private TextView tv_send;
  private TextView tv_personal;
  private FrameLayout fragment_container;
  private FirstFragment f1,f2,f3;

  @Override
  protected void onCreate(Bundle savedInstanceState) {
    super.onCreate(savedInstanceState);
    setContentView(R.layout.activity_main);
    //ui組件初始化與事件綁定
    tv_top=(TextView)this.findViewById(R.id.tv_top);
    tv_list=(TextView)this.findViewById(R.id.tv_list);
    tv_send=(TextView)this.findViewById(R.id.tv_send);
    tv_personal=(TextView)this.findViewById(R.id.tv_personal);
    fragment_container=(FrameLayout)findViewById(R.id.fragment_container);
    tv_list.setOnClickListener(this);
    tv_send.setOnClickListener(this);
    tv_personal.setOnClickListener(this);
  }
  //重置所有文本的選中狀態
  public void selected(){
    tv_list.setSelected(false);
    tv_send.setSelected(false);
    tv_personal.setSelected(false);
  }

  //隱藏所有的Fragment
  private void hideAllFragment(android.app.FragmentTransaction transaction) {
    if(f1!=null){
      transaction.hide(f1);
    }
    if(f2!=null){
      transaction.hide(f2);
    }
    if(f3!=null){
      transaction.hide(f3);
    }
  }
  @Override
  public void onClick(View view){
    android.app.FragmentTransaction transaction=getFragmentManager().beginTransaction();
    hideAllFragment(transaction);
    switch(view.getId()){
      case R.id.tv_list:
        selected();
        tv_list.setSelected(true);
        if(f1==null){
          f1 = new FirstFragment("第一個Fragment");
          transaction.add(R.id.fragment_container,f1);
        }else{
          transaction.show(f1);
        }
        break;

      case R.id.tv_send:
        selected();
        tv_send.setSelected(true);
        if(f2==null){
          f2 = new FirstFragment("第2個Fragment");
          transaction.add(R.id.fragment_container,f2);
        }else{
          transaction.show(f2);
        }
        break;

      case R.id.tv_personal:
        selected();
        tv_personal.setSelected(true);
        if(f3==null){
          f3 = new FirstFragment("第三個Fragment");
          transaction.add(R.id.fragment_container,f3);
        }else{
          transaction.show(f3);
        }
        break;
    }
    transaction.commit();
  }

}
(9)創建類,類名為FistFragment,其中具體代碼如下:
package com.bzu.fshiner.parttimejob;

import android.app.Fragment;
import android.os.Bundle;
import android.view.LayoutInflater;
import android.view.View;
import android.view.ViewGroup;
import android.widget.TextView;

/**
 * Created by Administrator on 2017/5/9.
 */

public class FirstFragment extends Fragment {
  private String context;
  private TextView textView;

  public FirstFragment(String context) {
    this.context = context;
  }
  public View onCreateView(LayoutInflater inflater, ViewGroup container,Bundle savedInstanceState){
    View view=inflater.inflate(R.layout.first_fragment,container,false);
    textView=(TextView)view.findViewById(R.id.tv_content);
    textView.setText(context);
    return view;
  }
}
以上就是本文的全部內容,希望對大家的學習有所幫助,也希望大家多多支持億速云。
免責聲明:本站發布的內容(圖片、視頻和文字)以原創、轉載和分享為主,文章觀點不代表本網站立場,如果涉及侵權請聯系站長郵箱:is@yisu.com進行舉報,并提供相關證據,一經查實,將立刻刪除涉嫌侵權內容。