溫馨提示×
您好,登錄后才能下訂單哦!
點擊 登錄注冊 即表示同意《億速云用戶服務條款》
您好,登錄后才能下訂單哦!
前言
本文主要給大家介紹了關于react-native組件中NavigatorIOS和ListView結合使用的相關內容,分享出來供大家參考學習,下面話不多說了,來一起看看詳細的介紹吧。
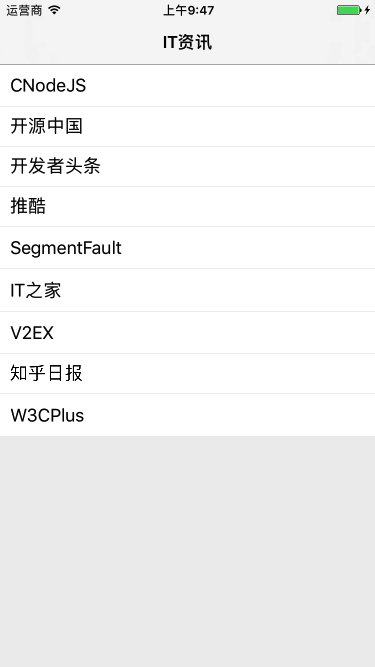
先看效果

使用方法
index.ios.js
import React, {Component} from 'react';
import {
 AppRegistry,
 NavigatorIOS
} from 'react-native';

import NewsList from './components/NewsList';
export default class ITNews extends Component {
 render() {
 return (
  <NavigatorIOS
  style=
  initialRoute=
  />
 );
 }
}
NewsList.js
import React, {Component} from 'react';
import {ListView, Text, StyleSheet, TouchableHighlight} from 'react-native';

const ds = new ListView.DataSource({rowHasChanged: (r1, r2) => r1 !== r2});

export default class NewsList extends Component {

 constructor(props) {
 super(props);
 this.state = ({
  dataSource: ds.cloneWithRows(['CNodeJS', '開源中國', '開發者頭條', '推酷', 'SegmentFault', 'IT之家', 'V2EX', '知乎日報', 'W3CPlus']),
 });
 }

 _onPress(rowData) {
 console.log(rowData);
 }

 render() {
 return <ListView
  style={styles.listView}
  dataSource={this.state.dataSource}
  renderRow={(rowData) =>
  <TouchableHighlight
   style={styles.rowStyle}
   underlayColor='#008b8b'
   onPress={() => this._onPress(rowData)}>
   <Text style={styles.rowText}>{rowData}</Text>
  </TouchableHighlight>}
 />
 }
}

const styles = StyleSheet.create({
 listView: {
 backgroundColor: '#eee',
 },
 rowText: {
 padding: 10,
 fontSize: 18,
 backgroundColor: '#FFFFFF'
 },
 rowStyle: {
 flex: 1,
 marginBottom: 1,
 justifyContent: 'center',
 },
});
說明
NavigationIOS必須要加上style=這個樣式,否則它里面裝載的組件不會顯示
總結
以上就是這篇文章的全部內容了,希望本文的內容對大家的學習或者工作具有一定的參考學習價值,如果有疑問大家可以留言交流,謝謝大家對億速云的支持。
參考
源碼:https://github.com/tomoya92/ITNews-React-Native
免責聲明:本站發布的內容(圖片、視頻和文字)以原創、轉載和分享為主,文章觀點不代表本網站立場,如果涉及侵權請聯系站長郵箱:is@yisu.com進行舉報,并提供相關證據,一經查實,將立刻刪除涉嫌侵權內容。