您好,登錄后才能下訂單哦!
您好,登錄后才能下訂單哦!
本文章向大家介紹如何在Vue 中不使用router-link方法實現一個頁面跳轉功能,主要包括如何在Vue 中不使用router-link方法實現一個頁面跳轉功能的使用實例、應用技巧、基本知識點總結和需要注意事項,具有一定的參考價值,需要的朋友可以參考一下。
Vue具體輕量級框架、簡單易學、雙向數據綁定、組件化、數據和結構的分離、虛擬DOM、運行速度快等優勢,Vue中頁面使用的是局部刷新,不用每次跳轉頁面都要請求所有數據和dom,可以大大提升訪問速度和用戶體驗。
1、給父頁面跳轉的地方設置事件
//原來的頁面上展示的信息
 <div v-if="!addShow" class="function">
 <el-row>
  <template slot-scope="scope">
   <el-button type="success" size="mini" @click="handleEdit(scope.$index, scope.row)">編輯</el-button>
    //帶參數進行編輯
   <el-button type="danger" size="mini" @click="handleDelete(scope.row)">刪除</el-button>
  </template>
 </el-row>
</div>

//要跳轉過去的頁面用隱藏來代替
    <div v-if="addShow" class="add-category ">
     <el-col :span="20" :offset="2">
      <el-form :model="formData" :rules="rules" ref="formData" label-position="left">
       <el-row>
        <el-col :span="10">
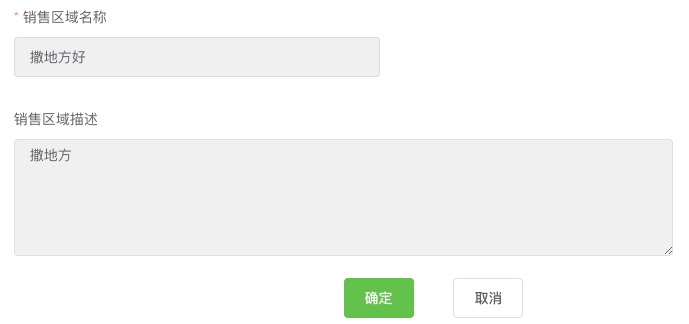
         <el-form-item label="銷售區域名稱" prop="name">
          <el-input v-model="formData.name"></el-input>
            //v-model綁定formData.name(name為需要的字段,formDataw為表格ref綁定的數據)
         </el-form-item>
        </el-col>
       </el-row>
       <el-col :span="18">
        <el-form-item label="銷售區域描述">
         <el-input type="textarea" :rows="5" v-model="formData.description"></el-input>
        </el-form-item>
       </el-col>
       <el-col :span="2" :offset="9">
        <el-button type="success" @click="handleSubmit('formData')" >確定</el-button>
       </el-col>
       <el-col :span="2" :offset="1">
        <el-button @click="onCancel">取消</el-button>
       </el-col>
      </el-form>
     </el-col>
    </div>
2、JS部分
data() {
  addShow: false //設置要顯示的頁面部分默認為false,隱藏
  checkdDistributor: null,
},

methods: {
// 編輯按鈕
    handleEdit(index,row){
      this.checkdDistributor = row; //接受傳參
      this.addShow = true; // addshow為要顯示的頁面
    }
}
watch: {
    // 帶參數編輯
    checkdDistributor(){
      for(let attr in this.formData){
        this.formData[attr] = ('' + this.checkdDistributor[attr]); //寫入參數
      }
    }
  },
3、最后上效果圖


補充:
vue router-link跳轉傳值示例
1、router-link
<router-link :to="{name:'deitail',params:{freezeMon:'2017-10',owerName:'西安'}}" tag="div" >
</router-link>
2、routes路由
export default new Router({
 routes: [
   {
    path: '/',
    name: 'Index',
    component: Index
   },
   {
    path: '/deitail',
    name: 'deitail',
    component: deitail
   }
 ]
})
3、取值
<h2>{{$route.params.freezeMon}}</h2>4、小結:router-link跳轉傳值要注意的地方
* to前面要加:
* to后面{中的name值要與路由中的name值一致
* 下面的這種方式是錯誤的
<router-link to="{path:'/deitail',params:{freezeMon:'2017-10',owerName:'西安'}}" tag="div" >
</router-link>
到此這篇關于如何在Vue 中不使用router-link方法實現一個頁面跳轉功能的文章就介紹到這了,更多相關的內容請搜索億速云以前的文章或繼續瀏覽下面的相關文章希望大家以后多多支持億速云!
免責聲明:本站發布的內容(圖片、視頻和文字)以原創、轉載和分享為主,文章觀點不代表本網站立場,如果涉及侵權請聯系站長郵箱:is@yisu.com進行舉報,并提供相關證據,一經查實,將立刻刪除涉嫌侵權內容。