您好,登錄后才能下訂單哦!
您好,登錄后才能下訂單哦!
這篇文章運用簡單易懂的例子給大家介紹Vue如何實現頁面跳轉的參數傳遞與接收,內容非常詳細,感興趣的小伙伴們可以參考借鑒,希望對大家能有所幫助。
一、配置路由
文件路徑:src/router/config.php
import Vue from 'vue'
import Router from 'vue-router'
import classify from '.././components/classify/classify.vue'
import classifyChild from '.././components/classify/classifyChild.vue'

export default new Router({
 mode: 'history',
 routes: [
  {
   path: '/classify',
   name: ' classify',
   component: classify
  },
  {
   path: '/classify/classifyChild',
   name: 'classifyChild',
   component: classifyChild
  },

 ]
})
二、頁面跳轉及傳參
//方式一
<router-link :to="{name:'classifyChild',params:{id:item.id}}">
  <button>跳轉</button>
</router-link>

//方式二
<router-link :to="{path:'/classify/classifyChild',query:{id:item.id}}">
  <button>跳轉</button>
</router-link>
三、參數接收
//對應于方式一
let id=this.$route.params.id;

//對應于方式二
let id=this.$route.query.id;
補充知識:關于vue3.0中的this.$router.replace({ path: '/'})刷新無效果問題
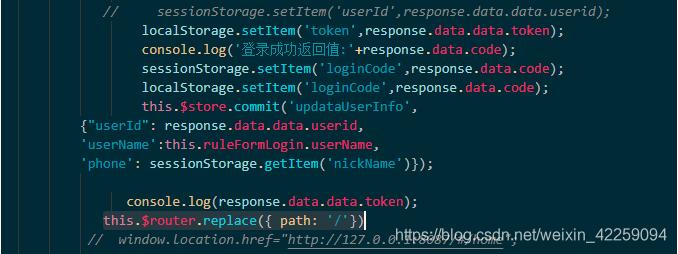
首先在store中定義所需要的變量可以進行初始化,再定義一個方法,登錄成功后A頁面,跳轉到B頁面之前,需要直接調用store中存儲數據的方法,全局可以使用,順序是,先調用store中的數據,其次調用sessionStorage和localStorage中的數據。
這樣的話,可以避免A頁面跳轉B頁面時候,手動刷新才顯示信息。
直接登錄成功后,直接調用store的方法,把值存儲進去,B頁面可以直接顯示用戶信息。必須在store定義方法,登錄成功后調用方法進行回顯用戶信息。在這里插入圖片描述

關于Vue如何實現頁面跳轉的參數傳遞與接收就分享到這里了,希望以上內容可以對大家有一定的幫助,可以學到更多知識。如果覺得文章不錯,可以把它分享出去讓更多的人看到。
免責聲明:本站發布的內容(圖片、視頻和文字)以原創、轉載和分享為主,文章觀點不代表本網站立場,如果涉及侵權請聯系站長郵箱:is@yisu.com進行舉報,并提供相關證據,一經查實,將立刻刪除涉嫌侵權內容。