您好,登錄后才能下訂單哦!
您好,登錄后才能下訂單哦!
小編給大家分享一下JS中原型鏈和利用原型實現繼承的示例分析,希望大家閱讀完這篇文章之后都有所收獲,下面讓我們一起去探討吧!
原型鏈
原型鏈是一種關系,實例對象和原型對象之間的關系,關系是通過原型(__proto__)來聯系的
實例對象中有__proto__,是對象,叫原型,不是標準的屬性,瀏覽器使用,并且有的游覽器不支持
構造函數中有prototype屬性,也是對象,叫原型
注意 原型中的方法是可以互相訪問的
實例代碼
 function Animal(name,age){
    this.name=name;
    thia.age=age;
   }

   //在原型中添加方法
   Animal.prototype.eat=function(){
    console.log("動物吃草")
    this.play()
   }
   Animal.prototype.play=function(){
    console.log("玩啥呢")
   }
原型的簡單語法
利用原型共享數據
第一種 寫法
 function Student(name,age,sex){
      this.name=name;
      this.age=age;
      this.sex=sex;
   }

   Student.prototype.height="188"
   Student.prototype.weight="55kg"
   Student.prototype.study=function(){
      console.log("好好學習i")
    }
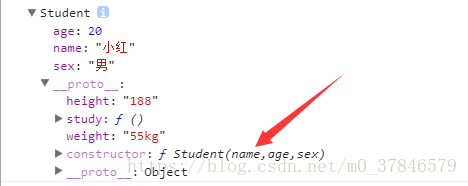
  var stu=new Student("小紅",20,"男")
  console.dir(stu)
結果
第二種 寫法
 function Student(name,age,sex){
      this.name=name;
      this.age=age;
      this.sex=sex;
   }
  Student.prototype={
    height:"188",
    weight:"55kg",
    study:function(){
      console.log("好好學習i")
    }
   }
  var stu=new Student("小紅",20,"男")
  console.dir(stu)
結果
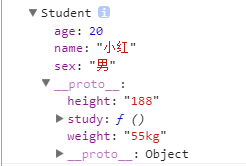
我們會發現 兩種寫法還是有差別的 ,第二種寫法會導致constructor構造器屬性消失 所以我們得手動修改構造器指向
最終代碼
function Student(name,age,sex){
      this.name=name;
      this.age=age;
      this.sex=sex;
   }
  Student.prototype={
    constructor:Student,
    height:"188",
    weight:"55kg",
    study:function(){
      console.log("好好學習i")
    }
   }
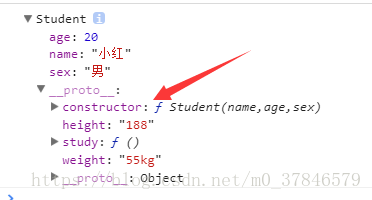
  var stu=new Student("小紅",20,"男")
  console.dir(stu)
好了,這回有了
實例對象使用屬性或方法的規則
實例對象使用的屬性或方法,現在實例中查找,如果有則使用自身的屬性或方法,
如果沒有,則通過__proto__指向的原型對象 查找方法,找到則使用,
如果找不到則繼續向__proto__尋找,直到未找到時報錯
構造函數和實例對象和原型對象之間的關系
構造函數可以實例化對象
構造函數中有一個屬性叫prototype,是構造函數的原型對象
構造函數的原型對象(prototype)中有一個constructor 構造器,這個構造器指向的就是自己所在的原型對象所在的構造函數
實例對象的原型對象(__proto__) 指向的是該構造函數的原型對象(prototype)
構造函數的原型對象(prototype)中的方法是可以被實例對象直接訪問
改變原型是否可以改變?
首先我們得知道構造函數和實例對象中的this 指向的是什么
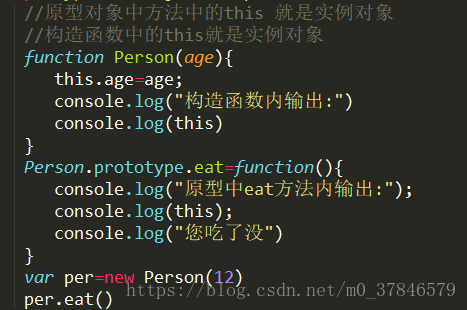
這里我創建了自定義構造函數 Person ,并在內部輸出了this
并且在Person 的原型對象上添加了一個eat 方法,也輸出了一個this,
接著我實例化了一個對象,并調用eat方法,
我們執行一下,查看結果如何
輸出結果
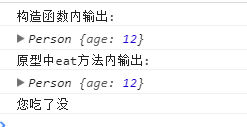
由此得出
原型對象中方法中的this 就是實例對象
構造函數中的this就是實例對象
接下來我們嘗試改變一下原型的指向
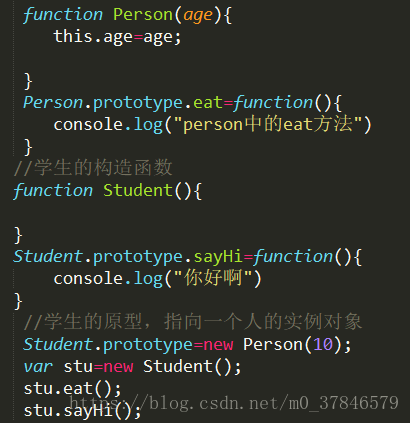
這段代碼中,首先我定義了一個Person自定義構造函數,并且在原型上添加了一個eat方法
定義了一個Student 函數,在原型上定義了一個sayHi方法,
然后我將 Student的原型指向 了一個 Person的實例對象
接著實例化一個Student,接著分別在stu 實例上 嘗試著調用 eat方法 和 sayHi 方法,
運行結果

到此我們可以確定,stu實例對象的原型指向被下面這條代碼改變了
Student.prototype=new Person(10);
總結
原型指向可以被改變的
實例對象的原型__proto__指向的是該對象所在的構造函數的原型對象
構造函數的原型對象(prototype)指向如果改變了,實例對象的原型(__proto__)指向也會發生改變
實例對象和原型對象之間的關系是通過__proto__ 原型來聯系起來的,這個關系就是原型鏈
如果原型指向改變了,那么就應該再原型改變指向之后添加原型方法
那么sayHi方法則會創建在 new Person(10) 這個實例對象上
原型最終指向了哪里
實例對象中的__proto__指向的是構造函數的prototype
以此代碼為例
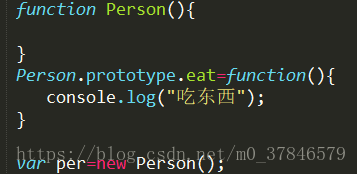
測試一下

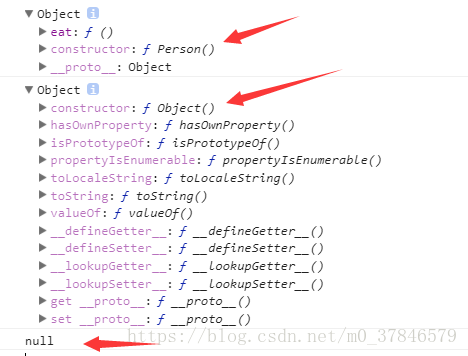
所以
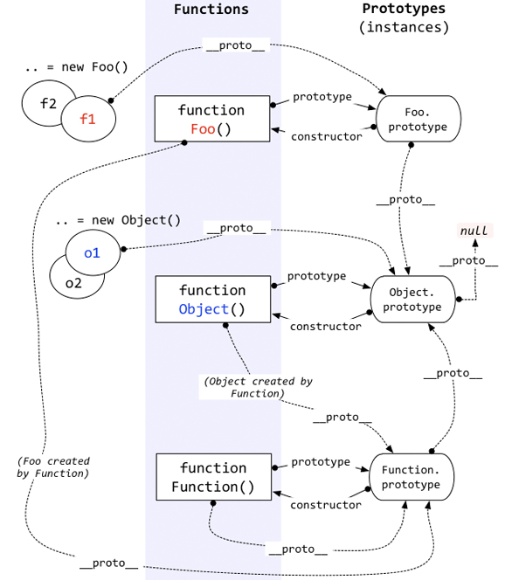
per實例對象的__proto__ ---指向---> Person.prototype的__proto__ ---指向---> Object.prototype的__proto__ 是Null
查看了一下html的dom對象,這有很有意思的原型鏈

這里祭出祖傳JPG
實現繼承
小知識---->instanceof的判斷方法:
從左邊操作數的__proto__路線出發,從右邊操作數的prototype出發,如果兩條路線最終指向一個引用就是true了
1.利用 call 借用構造函數繼承
優點:實現了繼承屬性,但值都不相同
缺點: 無法繼承父級類別中原型上的方法
function Person(name,age,sex,weight){
  this.name=name;
  this.age=age;
  this.sex=sex;
  this.weight=weight;
}
Person.prototype.sayHi=function(){
  console.log("您好")
}

function Student(name,age,sex,weight,score){
  //將當前實例對象傳入Person 借過來使用一次來達到繼承效果
  Person.call(this,name,age,sex,weight);
  this.score=score;
}

var stu1=new Student("小明",10,"男","10kg","100")
2. prototype 實現繼承
利用prototype,將Student 的prototype 指向 Person 來達到繼承效果,
優點:繼承了父級原型上的方法
缺點: 實例化多個Student 都必須共用相同的name 和 age
Student.prototype.constructor=Student
注意: 使用原型繼承時,需要將構造器的指向更改回正確的指向
function Person(name,age){
    this.name=name;
    this.age=age;
   }

   Person.prototype.eat=function(){
    console.log("Person 吃飯")
   }

   function Student(num,score){
    this.num=num
    this.score=score
   }
   //繼承
  Student.prototype=new Person("小紅",10)
  Student.prototype.constructor=Student

  var stu =new Student(2016002288,80)

  stu.eat()//Person 吃飯
3.組合繼承
組合繼承其實就是結合了上述的兩種方法來實現繼承,擁有兩種方法的優點
function Person(name,age,sex){
    this.name=name;
    this.age=age;
    this.sex=sex;
   }
   Person.prototype.sayHi=function(){
    console.log("你好")
   }

   function Student(name,age,sex,score){
    //借用構造函數
    Person.call(this,name,age,sex)
    this.score=score
   }

   // 改變了原型指向
   Student.prototype=new Person();//不傳值
   Student.prototype.eat=function(){
    console.log("吃東西");
   }

   var stu=new Student("小黑",20,"男","100分")
   console.log(stu.name,stu.age,stu.sex,stu.score);
   stu.sayHi()//你好
   stu.eat()//吃東西
4.拷貝繼承
類似于復制,把一個對象中的屬性和方法直接復制到另一個對象中
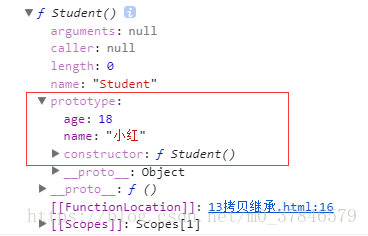
function Person(){
  }

  Person.prototype.name="小紅"
  Person.prototype.age=18

  function Student(){
  }

  var p=Person.prototype;
  var s=Student.prototype;

  for(key in p){
    s[key]=p[key]
  }

  console.dir(Student)
console
每次都要for in 好累 , 可以進行優化封裝一下
function extend(Child,Parent) {

    var p = Parent.prototype;
    var c = Child.prototype;

    for (var i in p) {
      c[i] = p[i];
      }

    //這個屬性直接指向父對象的prototype屬性,可以直接調用父對象的方法,為了實現繼承的完備性,純屬備用性質
    c.par = p;

  }
5. 直接繼承prototype
優點 : 效率比較高
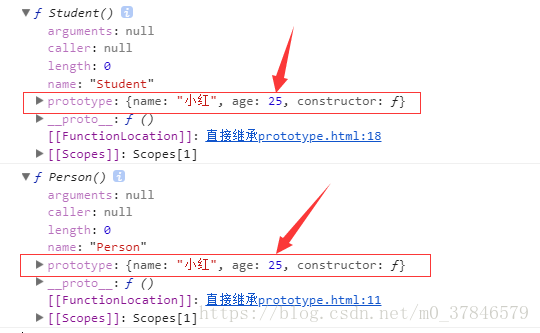
缺點 : 因為相當于是個傳址過程 所以修改Student的屬性 Person 的也會被更改
  function Person(){};

  Person.prototype.name="小紅";
  Person.prototype.age=18;

  function Student(){};

  Student.prototype=Person.prototype;

  console.dir(Student);
  console.dir(Person);
  Student.prototype.age=25;
console
6.利用空對象作中介實現繼承
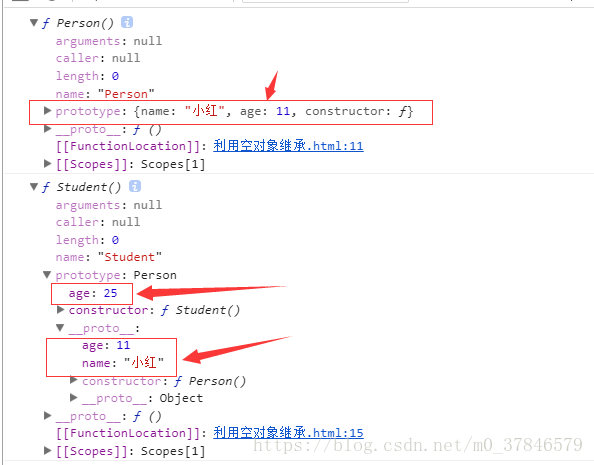
用這種方式修改 Student 的prototype 不會影響到 Person的prototype
function Person(){};
  Person.prototype.name="小紅";
  Person.prototype.age=11;

  function Student(){};
  var F=function(){};
  F.prototype=Person.prototype;

  Student.prototype=new F();
  Student.prototype.constructor=Student;

  Student.prototype.age=25;

  console.dir(Person)
  console.dir(Student)
console
封裝一下
function extend(Child,Parent) {

    var F = function(){};

    F.prototype = Parent.prototype;

    Child.prototype = new F();

    Child.prototype.constructor = Child;

    Child.par = Parent.prototype;

  }
看完了這篇文章,相信你對“JS中原型鏈和利用原型實現繼承的示例分析”有了一定的了解,如果想了解更多相關知識,歡迎關注億速云行業資訊頻道,感謝各位的閱讀!
免責聲明:本站發布的內容(圖片、視頻和文字)以原創、轉載和分享為主,文章觀點不代表本網站立場,如果涉及侵權請聯系站長郵箱:is@yisu.com進行舉報,并提供相關證據,一經查實,將立刻刪除涉嫌侵權內容。