您好,登錄后才能下訂單哦!
您好,登錄后才能下訂單哦!
下面,我們將演示如何搭建一個純注解配置的springmvc,并通過跟蹤源碼的方式解析隨著應用服務器的啟動我們的springmvc配置是如何生效的。使用web容器版本:apache-tomcat-8.5.27 。代碼中一些不重要的內容未展示。
1. 編寫一個簡單的web應用:
maven依賴:
<groupId>per.ym</groupId>
  <artifactId>mvcdemo</artifactId>
  <version>0.0.1-SNAPSHOT</version>
  <packaging>war</packaging>

  <name>mvcdemo</name>
  <url>http://maven.apache.org</url>

  <properties>
    <project.build.sourceEncoding>UTF-8</project.build.sourceEncoding>
    <maven.compiler.encoding>UTF-8</maven.compiler.encoding>
    <java.version>1.8</java.version>
    <maven.compiler.source>1.8</maven.compiler.source>
    <maven.compiler.target>1.8</maven.compiler.target>
  </properties>

  <dependencies>
    <dependency>
      <groupId>junit</groupId>
      <artifactId>junit</artifactId>
      <version>3.8.1</version>
      <scope>test</scope>
    </dependency>

    <dependency>
        <groupId>org.springframework</groupId>
        <artifactId>spring-webmvc</artifactId>
        <version>4.3.20.RELEASE</version>
    </dependency>

    <!-- https://mvnrepository.com/artifact/org.springframework/spring-web -->
    <dependency>
        <groupId>org.springframework</groupId>
        <artifactId>spring-web</artifactId>
        <version>4.3.20.RELEASE</version>
    </dependency>

    <dependency>
        <groupId>javax.servlet</groupId>
        <artifactId>javax.servlet-api</artifactId>
        <version>3.1.0</version>
    </dependency>
  </dependencies>

  <build>
  <plugins>
    <plugin>
        <groupId>org.apache.maven.plugins</groupId>
        <artifactId>maven-war-plugin</artifactId>
        <version>2.2</version>
        <configuration>
          <webXml>WebContent\WEB-INF\web.xml</webXml>
        </configuration>
    </plugin>
  </plugins>
  </build>
springmvc配置類:
package per.ym.mvcdemo.config;

import org.springframework.web.servlet.support.AbstractAnnotationConfigDispatcherServletInitializer;

public class MyWebAppInitializer extends AbstractAnnotationConfigDispatcherServletInitializer {

    @Override
    protected Class<?>[] getRootConfigClasses() {
        return new Class<?>[] {RootConfig.class};
    }

    @Override
    protected Class<?>[] getServletConfigClasses() {
        return new Class<?>[] {WebConfig.class};
    }

    @Override
    protected String[] getServletMappings() {
        return new String[] {"/"};
    }

    @Override
    protected Filter[] getServletFilters() {
        return null;
    }

    @Override
    protected void customizeRegistration(ServletRegistration.Dynamic registration) {
        registration.setMultipartConfig(new MultipartConfigElement("/temp/uploads"));
    }
}
root:
package per.ym.mvcdemo.config;

@Configuration
@ComponentScan(basePackages = "per.ym.mvcdemo.service",
        excludeFilters = {@Filter(type=FilterType.ANNOTATION, value = EnableWebMvc.class)})
public class RootConfig {

}
web:
package per.ym.mvcdemo.config;

@Configuration
@EnableWebMvc
@ComponentScan("per.ym.mvcdemo.controller")
public class WebConfig extends WebMvcConfigurerAdapter{
    @Override
    public void configureViewResolvers(ViewResolverRegistry registry) {
        registry.jsp("/WEB-INF/views/", ".jsp");
    }

    @Override
    public void configureDefaultServletHandling(DefaultServletHandlerConfigurer configurer) {
        configurer.enable();
    }

    @Override
    public void addInterceptors(InterceptorRegistry registry) {
        registry.addInterceptor(new MyInterceptor()).addPathPatterns("/**");
    }
}
service:
package per.ym.mvcdemo.service;

import org.springframework.stereotype.Service;

@Service
public class HelloService {

    public String hello() {
        return "Hello world.";
    }
}
controller:
package per.ym.mvcdemo.controller;

import per.ym.mvcdemo.service.HelloService;

@RestController
@RequestMapping("/")
public class HelloWorld {

    @Autowired
    private HelloService service;

    public HelloWorld() {
        System.out.println("construct!");
    }

    @RequestMapping("/hello")
    public String sayHello() {
        return service.hello();
    }
}
interceptor:
package per.ym.mvcdemo.interceptor;

public class MyInterceptor implements HandlerInterceptor {
    //目標方法運行之前執行
    public boolean preHandle(HttpServletRequest request, HttpServletResponse response, Object handler)
            throws Exception {
        return true;
    }

    //目標方法執行正確以后執行
    public void postHandle(HttpServletRequest request, HttpServletResponse response, Object handler,
                           ModelAndView modelAndView) throws Exception {
    }

    //頁面響應以后執行
    public void afterCompletion(HttpServletRequest request, HttpServletResponse response, Object handler, Exception ex)
            throws Exception {
    }
}
2. 原理解析
2.1. AbstractAnnotationConfigDispatcherServletInitializer剖析
在Servlet 3.0環境中,容器會在類路徑中查找實現javax.servlet.ServletContainerInitializer接口的類,如果能發現的話,就會用它來配置Servlet容器。
Spring提供了這個接口的實現,名為SpringServletContainerInitializer,這個類反過來又會查找實現WebApplicationInitializer的類并將配置的任務交給它們來完成。Spring 3.2引入了一個便利的WebApplicationInitializer基礎實現,也就是AbstractAnnotationConfigDispatcherServletInitializer。因為我們的
MyWebAppInitializer擴展了AbstractAnnotationConfigDispatcherServletInitializer,當然也就實現了WebApplicationInitializer,因此當部署到Servlet 3.0容器中的時候,容器會自動發現它,并用它來配置Servlet上下文。
盡管它的名字很長,但是AbstractAnnotationConfigDispatcherServletInitializer使用起來很簡便。它僅要求我們重寫其中的三個方法,其他的方法是否重寫則根據你的具體需求而定。
第一個方法是getServletMappings(),它會將一個或多個路徑映射到DispatcherServlet上。在本例中,它映射的是“/”,這表示它會是應用的默認Servlet。它會處理進入應用的所有請求。
為了理解其他的兩個方法,我們首先要理解DispatcherServlet和一個Servlet監聽器,也就是ContextLoaderListene(你是否記得使用web.xml方式配置時也會有它的身影)的關系。
兩個應用上下文之間的故事:
當DispatcherServlet啟動的時候,它會創建Spring應用上下文,并加載配置文件或配置類中所聲明的bean。在MyWebAppInitializer的getServletConfigClasses()方法中,我們要求DispatcherServlet加載應用上下文時,使用定義在WebConfig配置類(使用Java配置)中的bean。但是在Spring Web應用中,通常還會有另外一個應用上下文。另外的這個應用上下文是由ContextLoaderListener創建的。
我們希望DispatcherServlet加載包含Web組件的bean,如控制器、視圖解析器以及處理器映射,而ContextLoaderListener要加載應用中的其他bean。這些bean通常是驅動應用后端的中間層和數據層組件。
實際上,AbstractAnnotationConfigDispatcherServletInitializer會同時創建DispatcherServlet和ContextLoaderListener。getServletConfigClasses()方法返回的帶有@Configuration注解的類將會用來定義DispatcherServlet應用上下文中的bean,我們暫且把它記為context1。getRootConfigClasses()方法返回的帶有@Configuration注解的類將會用來配置ContextLoaderListener創建的應用上下文中的bean,記為context2。那這兩個上下文的關系是什么呢?答案是,context1會把context2設置為parent,這樣,當context1中的bean需要使用到context2中的bean時就可以在其中直接獲取,比如當我們把一個service層的bean注入到controller中時。
在本例中,根配置定義在RootConfig中,DispatcherServlet的配置聲明在WebConfig中。稍后我們將會看到這兩個類的內容。
需要注意的是,通過AbstractAnnotationConfigDispatcherServletInitializer來配置DispatcherServlet是傳統web.xml方式的替代方案。如果你愿意的話,可以同時包含web.xml和AbstractAnnotationConfigDispatcherServletInitializer,但這其實并沒有必要。
如果按照這種方式配置DispatcherServlet,而不是使用web.xml的話,那唯一問題在于它只能部署到支持Servlet 3.0的服務器中才能正常工作,如Tomcat 7或更高版本。如果你還沒有使用支持Servlet 3.0的服務器,那么在AbstractAnnotationConfigDispatcherServletInitializer子類中配置DispatcherServlet的方法就不適合你了。你別無選擇,只能使用web.xml了。
2.2. 源碼解析
2.2.1. 查找實現javax.servlet.ServletContainerInitializer接口的類
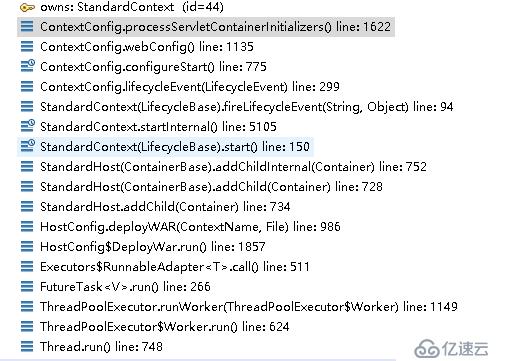
先看一下tomcat調用棧:

這個發生在web應用的部署過程,看這個方法名稱就是處理servlet容器的初始化相關的東西。我們來看看里面是什么內容:
protected void processServletContainerInitializers() {
            //類路徑下查找ServletContainerInitializer的實現類
           detectedScis = loader.load(ServletContainerInitializer.class);
}
我們進入 loader.load(ServletContainerInitializer.class);
public List<T> load(Class<T> serviceType) throws IOException {
        String configFile = SERVICES + serviceType.getName();

                Enumeration<URL> resources;
        if (loader == null) {
            resources = ClassLoader.getSystemResources(configFile);
        } else {
            //類路徑下查找是否有指定的文件
           resources = loader.getResources(configFile);
        }
        while (resources.hasMoreElements()) {
        //將查找到的文件里的內容讀取到containerServicesFound中
         parseConfigFile(containerServicesFound, resources.nextElement());
        }
        //使用反射創建查找到的ServletContainerInitializer的實現類
        return loadServices(serviceType, containerServicesFound);
    }
我們看看configFile和containerServicesFound的內容都是什么


正如上述中所示的一樣,在我們的spring-web-4.3.20.RELEASE.jar中的確有這個文件,其值也是我們查找到的類


找到ServletContainerInitializer的實現類后我們返回到processServletContainerInitializers方法中,看它后續的處理
    protected void processServletContainerInitializers() {

        List<ServletContainerInitializer> detectedScis;
        try {
            WebappServiceLoader<ServletContainerInitializer> loader = new WebappServiceLoader<>(context);
            //類路徑下查找ServletContainerInitializer的實現類
            detectedScis = loader.load(ServletContainerInitializer.class);
        } catch (IOException e) {
            log.error(sm.getString(
                    "contextConfig.servletContainerInitializerFail",
                    context.getName()),
                e);
            ok = false;
            return;
        }

        for (ServletContainerInitializer sci : detectedScis) {
            initializerClassMap.put(sci, new HashSet<Class<?>>());

            HandlesTypes ht;
            try {
                //獲取類上的HandlesTypes注解
                ht = sci.getClass().getAnnotation(HandlesTypes.class);
            } catch (Exception e) {
                if (log.isDebugEnabled()) {
                    log.info(sm.getString("contextConfig.sci.debug",
                            sci.getClass().getName()),
                            e);
                } else {
                    log.info(sm.getString("contextConfig.sci.info",
                            sci.getClass().getName()));
                }
                continue;
            }
            if (ht == null) {
                continue;
            }
            //拿到注解上的value值
            Class<?>[] types = ht.value();
            if (types == null) {
                continue;
            }

            for (Class<?> type : types) {
                if (type.isAnnotation()) {
                    handlesTypesAnnotations = true;
                } else {
                    handlesTypesNonAnnotations = true;
                }
                Set<ServletContainerInitializer> scis =
                        typeInitializerMap.get(type);
                if (scis == null) {
                    scis = new HashSet<>();
                    //保存HandlesTypes注解上的value值
                    typeInitializerMap.put(type, scis);
                }
                scis.add(sci);
            }
        }
    }
看到這里是不是有點懵,HandlesTypes注解上的value用來干什么?下面,我們來看看它是用來干嘛的。
2.2.2. 查找實現WebApplicationInitializer接口的類
首先,我們看看SpringServletContainerInitializer頭上的東西
@HandlesTypes(WebApplicationInitializer.class)
public class SpringServletContainerInitializer implements ServletContainerInitializer {
    ......
}看到這里或許能猜到一些東西了吧,實際上,web容器會根據HandlesTypes注解上的value值在類路徑下查找它的實現類,在SpringServletContainerInitializer上該值為WebApplicationInitializer,因此它會去查找WebApplicationInitializer的實現類,而這個實現類在我們的類路徑下就有我們自己寫的MyWebAppInitializer,因此它最終會找到我們的MyWebAppInitializer,而在后面調用SpringServletContainerInitializer的onStartup方法時,它將作為參數被傳進去
2.2.3. WebApplicationInitializer實現類接管工作
我們在SpringServletContainerInitializer的onStartup方法中打上斷點,既然springmvc是通過該類配置的,那么它肯定會在某個時候調用其中唯一的方法onStartup。
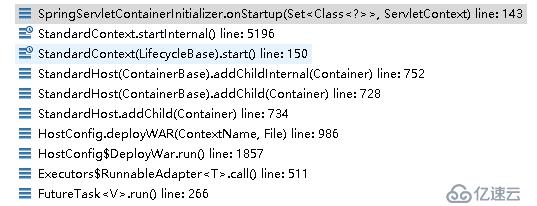
看看它的調用棧

在啟動standardContext時它會調用所有ServletContainerInitializer的實現類以給應用一個自身配置的機會
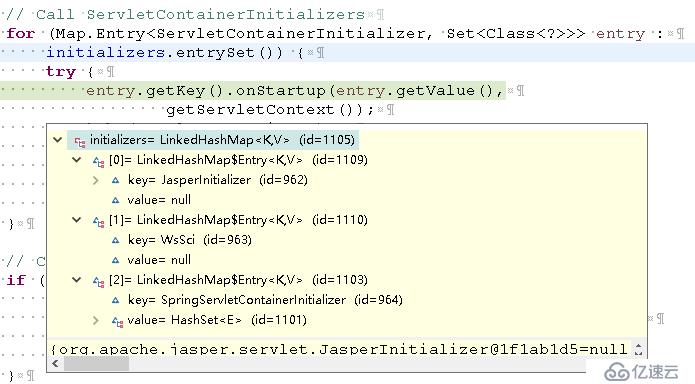
我們回到StandardContext.startInternal()中看看

正如我們前面所看到的一樣,還是它們三。進入到SpringServletContainerInitializer的onStartup()方法中
public void onStartup(Set<Class<?>> webAppInitializerClasses, ServletContext servletContext)
            throws ServletException {

            List<WebApplicationInitializer> initializers = new LinkedList<WebApplicationInitializer>();

            if (webAppInitializerClasses != null) {
            for (Class<?> waiClass : webAppInitializerClasses) {
                //不是接口不是抽象的WebApplicationInitializer的子類
                if (!waiClass.isInterface() && !Modifier.isAbstract(waiClass.getModifiers()) &&
                        WebApplicationInitializer.class.isAssignableFrom(waiClass)) {
                    try {
                        initializers.add((WebApplicationInitializer) waiClass.newInstance());
                    }
                    catch (Throwable ex) {
                        throw new ServletException("Failed to instantiate WebApplicationInitializer class", ex);
                    }
                }
            }
        }

        servletContext.log(initializers.size() + " Spring WebApplicationInitializers detected on classpath");
        AnnotationAwareOrderComparator.sort(initializers);
        for (WebApplicationInitializer initializer : initializers) {
             //調用WebApplicationInitializer實現類的onStartup方法
            initializer.onStartup(servletContext);
        }
只有我們的MyWebAppInitializer

看到這里你也就應該明白了2.1中所說的內容
在Servlet 3.0環境中,容器會在類路徑中查找實現javax.servlet.ServletContainerInitializer接口的類,如果能發現的話,就會用它來配置Servlet容器。
Spring提供了這個接口的實現,名為SpringServletContainerInitializer,這個類反過來又會查找實現WebApplicationInitializer的類并將配置的任務交給它們來完成。
2.2.4. MyWebAppInitializer開工
進入AbstractDispatcherServletInitializer#onStartup(servletContext)方法
@Override
public void onStartup(ServletContext servletContext) throws ServletException {
    //a.調用父類AbstractContextLoaderInitializer的該方法,用于注冊ContextLoaderListener
    super.onStartup(servletContext);
    //b.注冊dispatcherServlet
    registerDispatcherServlet(servletContext);
}
a.繼續進入父類AbstractContextLoaderInitializer#onStartup(ServletContext servletContext)方法
@Override
public void onStartup(ServletContext servletContext) throws ServletException {
    //注冊ContextLoaderListener
    registerContextLoaderListener(servletContext);
}
registerContextLoaderListener(servletContext)方法
protected void registerContextLoaderListener(ServletContext servletContext) {
    //創建spring上下文
    WebApplicationContext rootAppContext = createRootApplicationContext();
    if (rootAppContext != null) {
        ContextLoaderListener listener = new ContextLoaderListener(rootAppContext);
        listener.setContextInitializers(getRootApplicationContextInitializers());
        //將ContextLoaderListener添加到servletContext中,這一步等同在web.xml中配置ContextLoaderListener
        servletContext.addListener(listener);
    }
    else {
        logger.debug("No ContextLoaderListener registered, as " +
                "createRootApplicationContext() did not return an application context");
    }
}
先到createRootApplicationContext()中看看
@Override
protected WebApplicationContext createRootApplicationContext() {
    //獲取根上下文配置類,會調用到我們自己的MyWebAppInitializer#getRootConfigClasses(),模板方法設計模式
    Class<?>[] configClasses = getRootConfigClasses();
    if (!ObjectUtils.isEmpty(configClasses)) {
        AnnotationConfigWebApplicationContext rootAppContext = new AnnotationConfigWebApplicationContext();
        rootAppContext.register(configClasses);
        return rootAppContext;
    }
    else {
        return null;
    }
}
進入MyWebAppInitializer#getRootConfigClasses()
@Override
protected Class<?>[] getRootConfigClasses() {
    //使用我們的RootConfig配置類,這會使得ContextLoaderListener所加載的上下文掃 描"per.ym.mvcdemo.service"
    //包下所有的組件并將其納入到容器中
    return new Class<?>[] {RootConfig.class};
}
ContextLoaderListener配置完成,重新回到AbstractDispatcherServletInitializer#registerDispatcherServlet(servletContext)方法中
protected void registerDispatcherServlet(ServletContext servletContext) {
    String servletName = getServletName();
    //創建dispaherServlet的spring上下文
    WebApplicationContext servletAppContext = createServletApplicationContext();

    //創建DispatcherServlet并傳入servletAppContext,它將在servlet生命周期的init方法中被reFresh
    FrameworkServlet dispatcherServlet = createDispatcherServlet(servletAppContext);
    dispatcherServlet.setContextInitializers(getServletApplicationContextInitializers());

    //將DispatcherServlet加入到servletContext中,加上下面的幾步同web.xml中配置DispatcherServlet
    ServletRegistration.Dynamic registration = servletContext.addServlet(servletName, dispatcherServlet);
    //設置DispatcherServlet隨著該servlet容器啟動而啟動
    registration.setLoadOnStartup(1);
    //設置DispatcherServlet路徑映射,將調用我們MyWebAppInitializer#getServletMappings(),即“/”
    registration.addMapping(getServletMappings());
    registration.setAsyncSupported(isAsyncSupported());

    //獲取過濾器,該方法默認為空,可重寫它加入我們自己的過濾器
    Filter[] filters = getServletFilters();
    if (!ObjectUtils.isEmpty(filters)) {
        for (Filter filter : filters) {
            registerServletFilter(servletContext, filter);
        }
    }

    //該方法默認也為空,我們可以重寫它來對DispatcherServlet進行一些額外配置,比如同MyWebAppInitializer
    //中一樣,配置一下用于文件上傳的multipart
    customizeRegistration(registration);
}
到 createServletApplicationContext()中看看
    @Override
    protected WebApplicationContext createServletApplicationContext() {
        AnnotationConfigWebApplicationContext servletAppContext = new AnnotationConfigWebApplicationContext();
        //獲取dispaherServlet的spring上下文配置類,即MyWebAppInitializer#getServletConfigClasses中的WebConfig
        Class<?>[] configClasses = getServletConfigClasses();
        if (!ObjectUtils.isEmpty(configClasses)) {
            servletAppContext.register(configClasses);
        }
        return servletAppContext;
    }
到這里,我們的MyWebAppInitializer的主要任務也就完成了,即向servlet容器中添加ContextLoaderListener和DispatcherServlet
2.2.5. ContextLoaderListener創建spring上下文
由于ContextLoaderListener實現了javax.servlet.ServletContextListener接口,因此在servlet容器啟動時會調用它的contextInitialized方法。
執行ContextLoaderListener#contextInitialized方法
@Override
public void contextInitialized(ServletContextEvent event) {
    initWebApplicationContext(event.getServletContext());
}
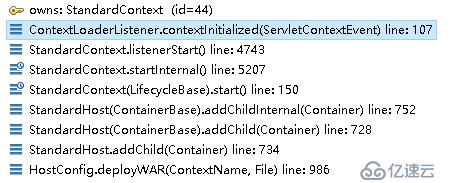
在該方法中打個斷點,看看tomcat是在哪里調用它的

也是在StandardContext#startInternal里,到startInternal中看看
        // Call ServletContainerInitializers
        for (Map.Entry<ServletContainerInitializer, Set<Class<?>>> entry :
            initializers.entrySet()) {
            try {
                entry.getKey().onStartup(entry.getValue(),
                        getServletContext());
            } catch (ServletException e) {
                log.error(sm.getString("standardContext.sciFail"), e);
                ok = false;
                break;
            }
        }

        // Configure and call application event listeners
        if (ok) {
                            //觸發監聽器
            if (!listenerStart()) {
                log.error(sm.getString("standardContext.listenerFail"));
                ok = false;
            }
        }
在執行完ServletContainerInitializer相關操作后就立刻執行監聽器的相關方法
言歸正傳,看看ContextLoaderListener#contextInitialized方法
/**
 * Initialize the root web application context.
 */
@Override
public void contextInitialized(ServletContextEvent event) {
    initWebApplicationContext(event.getServletContext());
}
進入父類ContextLoader#initWebApplicationContext方法
public WebApplicationContext initWebApplicationContext(ServletContext servletContext) {
        if (this.context instanceof ConfigurableWebApplicationContext) {
            //這個cwac就是傳入ContextLoaderListener的spring上下文
            ConfigurableWebApplicationContext cwac = (ConfigurableWebApplicationContext) this.context;
            if (!cwac.isActive()) {
                if (cwac.getParent() == null) {
                    // The context instance was injected without an explicit parent ->
                    // determine parent for root web application context, if any.
                    ApplicationContext parent = loadParentContext(servletContext);
                    cwac.setParent(parent);
                }
                //配置并刷新spring上下文
                configureAndRefreshWebApplicationContext(cwac, servletContext);

        return this.context;
    }
}
進入configureAndRefreshWebApplicationContext(cwac, servletContext)
protected void configureAndRefreshWebApplicationContext(ConfigurableWebApplicationContext wac, ServletContext sc) {

    wac.setServletContext(sc);
    String configLocationParam = sc.getInitParameter(CONFIG_LOCATION_PARAM);
    if (configLocationParam != null) {
        wac.setConfigLocation(configLocationParam);
    }

    // The wac environment's #initPropertySources will be called in any case when the context
    // is refreshed; do it eagerly here to ensure servlet property sources are in place for
    // use in any post-processing or initialization that occurs below prior to #refresh
    ConfigurableEnvironment env = wac.getEnvironment();
    if (env instanceof ConfigurableWebEnvironment) {
        ((ConfigurableWebEnvironment) env).initPropertySources(sc, null);
    }

    customizeContext(sc, wac);
    //刷新spring上下文,這里就進入到spring的節奏里了,我們不在往下了
    wac.refresh();
}
2.2.6. 配置DispatcherServlet
在2.2.4,向ServletContext中添加DispatcherServlet時,我們設置了DispatcherServlet隨servlet容器的啟動而啟動,而servlet啟動時會執行它的生命周期方法init,DispatcherServlet的init方法在其父類HttpServletBean中
@Override
public final void init() throws ServletException {

    // Set bean properties from init parameters.
    PropertyValues pvs = new ServletConfigPropertyValues(getServletConfig(), this.requiredProperties);
    if (!pvs.isEmpty()) {
        try {
            BeanWrapper bw = PropertyAccessorFactory.forBeanPropertyAccess(this);
            ResourceLoader resourceLoader = new ServletContextResourceLoader(getServletContext());
            bw.registerCustomEditor(Resource.class, new ResourceEditor(resourceLoader, getEnvironment()));
            initBeanWrapper(bw);
            bw.setPropertyValues(pvs, true);
        }
        catch (BeansException ex) {
            if (logger.isErrorEnabled()) {
                logger.error("Failed to set bean properties on servlet '" + getServletName() + "'", ex);
            }
            throw ex;
        }
    }

    // Let subclasses do whatever initialization they like.
    //調用子類中的方法,在FrameworkServlet中
    initServletBean();
}
進入FrameworkServlet#initServletBean()
@Override
protected final void initServletBean() throws ServletException {
    if (this.logger.isInfoEnabled()) {
        this.logger.info("FrameworkServlet '" + getServletName() + "': initialization started");
    }
    long startTime = System.currentTimeMillis();

    try {
        //初始化spring上下文
        this.webApplicationContext = initWebApplicationContext();
        //該方法默認為空
        initFrameworkServlet();
    }
    catch (ServletException ex) {
        this.logger.error("Context initialization failed", ex);
        throw ex;
    }
    catch (RuntimeException ex) {
        this.logger.error("Context initialization failed", ex);
        throw ex;
    }
}
先到initWebApplicationContext()中看看
    protected WebApplicationContext initWebApplicationContext() {
    //rootContext,這個就是ContextLoaderListener加載的spring上下文
    WebApplicationContext rootContext =
            WebApplicationContextUtils.getWebApplicationContext(getServletContext());
    WebApplicationContext wac = null;

    if (this.webApplicationContext != null) {
        // A context instance was injected at construction time -> use it
        //這個wac就是DispatcherServlet的spring上下文
        wac = this.webApplicationContext;
        if (wac instanceof ConfigurableWebApplicationContext) {
            ConfigurableWebApplicationContext cwac = (ConfigurableWebApplicationContext) wac;
            if (!cwac.isActive()) {
                if (cwac.getParent() == null) {
                    //設置rootContext為parent,這樣當需要注入某個bean時就可以從父上下文中獲取
                    cwac.setParent(rootContext);
                }
                //配置并刷新spring上下文
                configureAndRefreshWebApplicationContext(cwac);
            }
        }
    }
    return wac;
}
設置父上下文,刷新當前上下文。到這里,我們整個init方法也就完成了
2.2.7. @EnableWebMvc是干什么的
@Configuration
@EnableWebMvc
@ComponentScan("per.ym.mvcdemo.controller")
public class WebConfig extends WebMvcConfigurerAdapter{
看看這個@EnableWebMvc是什么樣子的
//這個是關鍵,向spring上下文中引入DelegatingWebMvcConfiguration
@Import(DelegatingWebMvcConfiguration.class)
public @interface EnableWebMvc {
}
進入DelegatingWebMvcConfiguration
@Configuration
public class DelegatingWebMvcConfiguration extends WebMvcConfigurationSupport {

        private final WebMvcConfigurerComposite configurers = new WebMvcConfigurerComposite();

        @Autowired(required = false)
        public void setConfigurers(List<WebMvcConfigurer> configurers) {
            if (!CollectionUtils.isEmpty(configurers)) {
                this.configurers.addWebMvcConfigurers(configurers);
            }
        }

        @Override
        protected void configurePathMatch(PathMatchConfigurer configurer) {
            this.configurers.configurePathMatch(configurer);
        }

        @Override
        protected void configureContentNegotiation(ContentNegotiationConfigurer configurer) {
            this.configurers.configureContentNegotiation(configurer);
        }

        @Override
        protected void configureAsyncSupport(AsyncSupportConfigurer configurer) {
            this.configurers.configureAsyncSupport(configurer);
        }

        @Override
        protected void configureDefaultServletHandling(DefaultServletHandlerConfigurer configurer) {
            this.configurers.configureDefaultServletHandling(configurer);
        }

        @Override
        protected void addFormatters(FormatterRegistry registry) {
            this.configurers.addFormatters(registry);
        }

        @Override
        protected void addInterceptors(InterceptorRegistry registry) {
            this.configurers.addInterceptors(registry);
        }

        @Override
        protected void addResourceHandlers(ResourceHandlerRegistry registry) {
            this.configurers.addResourceHandlers(registry);
        }

        @Override
        protected void addCorsMappings(CorsRegistry registry) {
            this.configurers.addCorsMappings(registry);
        }

        @Override
        protected void addViewControllers(ViewControllerRegistry registry) {
            this.configurers.addViewControllers(registry);
        }

        @Override
        protected void configureViewResolvers(ViewResolverRegistry registry) {
            this.configurers.configureViewResolvers(registry);
        }

        @Override
        protected void addArgumentResolvers(List<HandlerMethodArgumentResolver> argumentResolvers) {
            this.configurers.addArgumentResolvers(argumentResolvers);
        }

        @Override
        protected void addReturnValueHandlers(List<HandlerMethodReturnValueHandler> returnValueHandlers) {
            this.configurers.addReturnValueHandlers(returnValueHandlers);
        }

        @Override
        protected void configureMessageConverters(List<HttpMessageConverter<?>> converters) {
            this.configurers.configureMessageConverters(converters);
        }

        @Override
        protected void extendMessageConverters(List<HttpMessageConverter<?>> converters) {
            this.configurers.extendMessageConverters(converters);
        }

        @Override
        protected void configureHandlerExceptionResolvers(List<HandlerExceptionResolver> exceptionResolvers) {
            this.configurers.configureHandlerExceptionResolvers(exceptionResolvers);
        }

        @Override
        protected void extendHandlerExceptionResolvers(List<HandlerExceptionResolver> exceptionResolvers) {
            this.configurers.extendHandlerExceptionResolvers(exceptionResolvers);
        }

        @Override
        protected Validator getValidator() {
            return this.configurers.getValidator();
        }

        @Override
        protected MessageCodesResolver getMessageCodesResolver() {
            return this.configurers.getMessageCodesResolver();
        }

    }
該類中有很多配置方法,而這些配置方法都是調用this.configurers來進行配置的,這個configurers是通過下面這種方式注入進來的,注入的參數的類型是WebMvcConfigurer,這個時候你再看看我們的WebConfig,他繼承自WebMvcConfigurerAdapter,而這個WebMvcConfigurerAdapter又實現了WebMvcConfigure。因此,這里會把我們的WebConfig注入進來并加入到this.configurers中,最終配置時就會調用我們WebConfig重寫的方法,這也是我們的WebConfig為什么要繼承WebMvcConfigurerAdapter并重寫父類方法的原因
@Autowired(required = false)
//類型是(List<WebMvcConfigurer>,關鍵是這個WebMvcConfigurer
public void setConfigurers(List<WebMvcConfigurer> configurers) {
    if (!CollectionUtils.isEmpty(configurers)) {
        this.configurers.addWebMvcConfigurers(configurers);
    }
}
說到這里,那么我們WebConfig中重寫的方法是在什么時候被調用的呢,DelegatingWebMvcConfiguration繼承自WebMvcConfigurationSupport,在這個類里它會引入很多bean到spring上下文中,包括RequestMappingHandlerMapping、PathMatcher、HandlerMapping、BeanNameUrlHandlerMapping等等,這里我們以RequestMappingHandlerMapping為例,進行說明
@Bean
public RequestMappingHandlerMapping requestMappingHandlerMapping() {
    RequestMappingHandlerMapping mapping = createRequestMappingHandlerMapping();
    mapping.setOrder(0);
    //看這里,設置攔截器
    mapping.setInterceptors(getInterceptors());
    mapping.setContentNegotiationManager(mvcContentNegotiationManager());
    mapping.setCorsConfigurations(getCorsConfigurations());

    PathMatchConfigurer configurer = getPathMatchConfigurer();

    Boolean useSuffixPatternMatch = configurer.isUseSuffixPatternMatch();
    if (useSuffixPatternMatch != null) {
        mapping.setUseSuffixPatternMatch(useSuffixPatternMatch);
    }
    Boolean useRegisteredSuffixPatternMatch = configurer.isUseRegisteredSuffixPatternMatch();
    if (useRegisteredSuffixPatternMatch != null) {
        mapping.setUseRegisteredSuffixPatternMatch(useRegisteredSuffixPatternMatch);
    }
    Boolean useTrailingSlashMatch = configurer.isUseTrailingSlashMatch();
    if (useTrailingSlashMatch != null) {
        mapping.setUseTrailingSlashMatch(useTrailingSlashMatch);
    }

    UrlPathHelper pathHelper = configurer.getUrlPathHelper();
    if (pathHelper != null) {
        mapping.setUrlPathHelper(pathHelper);
    }
    PathMatcher pathMatcher = configurer.getPathMatcher();
    if (pathMatcher != null) {
        mapping.setPathMatcher(pathMatcher);
    }

    return mapping;
}

到getInterceptors()方法中看看

    protected final Object[] getInterceptors() {
    if (this.interceptors == null) {
        InterceptorRegistry registry = new InterceptorRegistry();
        //看這個方法
        addInterceptors(registry);
        registry.addInterceptor(new ConversionServiceExposingInterceptor(mvcConversionService()));
        registry.addInterceptor(new ResourceUrlProviderExposingInterceptor(mvcResourceUrlProvider()));
        this.interceptors = registry.getInterceptors();
    }
    return this.interceptors.toArray();
}
子類DelegatingWebMvcConfiguration重寫這個addInterceptors(registry)方法
@Override
protected void addInterceptors(InterceptorRegistry registry) {
    this.configurers.addInterceptors(registry);
}
這樣,他就會調用的我們WebConfig中的addInterceptors(registry)方法了
@Override
public void addInterceptors(InterceptorRegistry registry) {
    registry.addInterceptor(new MyInterceptor()).addPathPatterns("/**");
}
而我們在WebConfig中重寫的其他方法也會在創建WebMvcConfigurationSupport中定義的其他bean時被調用
然后,我們就在這里結束了吧......
免責聲明:本站發布的內容(圖片、視頻和文字)以原創、轉載和分享為主,文章觀點不代表本網站立場,如果涉及侵權請聯系站長郵箱:is@yisu.com進行舉報,并提供相關證據,一經查實,將立刻刪除涉嫌侵權內容。