您好,登錄后才能下訂單哦!
您好,登錄后才能下訂單哦!
本文源碼:GitHub·點這里 || GitEE·點這里
適配器模式把一個類的接口變換成客戶端所期待的另一種接口,從而使原本因接口不匹配而無法在一起工作的兩個類能夠在一起工作。適配器模式有類適配器模式和對象適配器模式,以及缺省(接口)適配器,三種不同的形式。
基于適配器模式,把220V的電壓,轉換為需要的110V電壓。
public class C01_InScene {
    public static void main(String[] args) {
        CurrentAdapter adapter = new CurrentAdapter() ;
        System.out.println(adapter.get110VCurrent()) ;
    }
}
// 220V電流
class Current220V {
    public int get220VCurrent (){
        return 220 ;
    }
}
// 110V電流接口
interface Current110V {
    int get110VCurrent () ;
}
// 電流適配器
class CurrentAdapter extends Current220V implements Current110V {
    // 電流轉換方法
    @Override
    public int get110VCurrent() {
        int high = get220VCurrent() ;
        int low = high/2 ;
        return low ;
    }
}類的適配器模式把適配的類的API轉換成為目標類的API。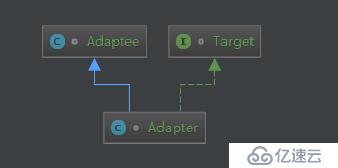
這就是所期待得到的接口。
現在需要適配的接口。
適配器類是本模式的核心。適配器把源接口轉換成目標接口。
interface Target {
    void sampleOperation1();
    void sampleOperation2();
}
class Adaptee {
    public void sampleOperation1(){
        System.out.println("Adaptee.sampleOperation1()");
    }
}
class Adapter extends Adaptee implements Target{

    @Override
    public void sampleOperation2() {
        System.out.println("Adapter.sampleOperation2()");
    }
}與類的適配器模式一樣,對象的適配器模式把被適配的類的API轉換成為目標類的API,與類的適配器模式不同的是,對象的適配器模式不是使用繼承關系連接到Adaptee類,而是使用委派關系連接到Adaptee類。
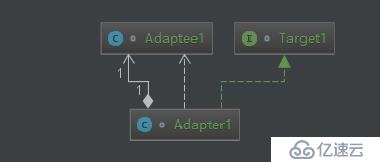
interface Target1 {
    void sampleOperation1();
    void sampleOperation2();
}
class Adaptee1 {
    public void sampleOperation1(){
        System.out.println("Adaptee.sampleOperation1()");
    }
}
class Adapter1 implements Target1 {
    private Adaptee1 adaptee ;
    public Adapter1 (Adaptee1 adaptee){
        this.adaptee = adaptee;
    }

    public void sampleOperation1() {
        this.adaptee.sampleOperation1();
    }

    @Override
    public void sampleOperation2() {
        System.out.println("Adapter.sampleOperation2()");
    }
}缺省(接口)適配(Default Adapter)模式為一個接口提供缺省實現,這樣子類型可以從這個缺省實現進行擴展,而不必從原有接口進行擴展。
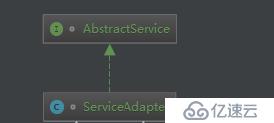
public class C04_AdapterInte {
    public static void main(String[] args) {
        ServiceAdapter adapter = new ServiceAdapter(){
            @Override
            public int serviceOperation2() {
                return 22 ;
            }
        };
        System.out.println(adapter.serviceOperation2());
    }
}
interface AbstractService {
    void serviceOperation1();
    int serviceOperation2();
    String serviceOperation3();
}
class ServiceAdapter implements AbstractService{
    @Override
    public void serviceOperation1() {

    }
    @Override
    public int serviceOperation2() {
        return 0;
    }
    @Override
    public String serviceOperation3() {
        return null;
    }
}在SpringMvc執行控制執行請求的時候,有這樣一個流程
1)前段控制器DispatcherServlet調用處理器適配器去執行Handler(也就是Controller);
2)處理器適配器去執行Handler,給適配器返回ModelAndView ;
3)處理器適配器向前端控制器返回ModelAndView ;
Controller和HandlerAdapter兩核心接口。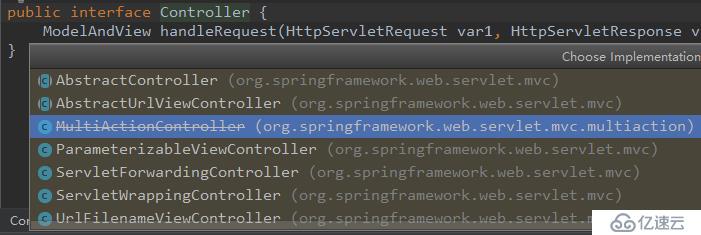
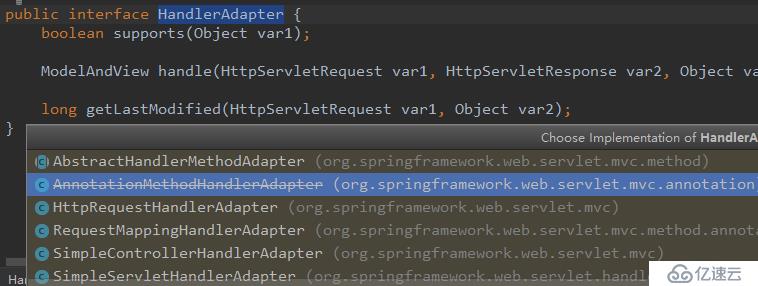
適配器接口,使Handler有對應的適配器實現類,適配器代替Handler(控制層Controller)執行相應的方法。
public interface HandlerAdapter {
    // 判斷類型是否匹配
    boolean supports(Object var1);
    // 執行方法,返回ModelAndView
    ModelAndView handle(HttpServletRequest var1,
                        HttpServletResponse var2, Object var3)
                        throws Exception;
}
supports()方法傳入處理器,判斷適配器是否支持,如果支持則返回支持的適配器實現類。
抽取源碼中體現流程的幾個步驟。
protected void doDispatch(HttpServletRequest request, HttpServletResponse response) throws Exception {
    HandlerExecutionChain mappedHandler = null;
    mappedHandler = this.getHandler(processedRequest);
    HandlerAdapter ha = this.getHandlerAdapter(mappedHandler.getHandler());
    mv = ha.handle(processedRequest, response, mappedHandler.getHandler());
    mappedHandler.applyPostHandle(processedRequest, response, mv);
}最后看下supports和handle兩個方法的具體實現。
public class SimpleControllerHandlerAdapter implements HandlerAdapter {
    public SimpleControllerHandlerAdapter() {
    }
    public boolean supports(Object handler) {
        return handler instanceof Controller;
    }
    public ModelAndView handle(HttpServletRequest request,
                               HttpServletResponse response, Object handler)
                               throws Exception {
        return ((Controller)handler).handleRequest(request, response);
    }
}更好的復用性,系統需要使用現有的類,而此類的接口不符合系統的需要。那么通過適配器模式就可以讓這些功能得到更好的復用。更好的擴展性。
過多的使用適配器,會讓系統非常零亂,不易整體進行把控。
GitHub·地址
https://github.com/cicadasmile/model-arithmetic-parent
GitEE·地址
https://gitee.com/cicadasmile/model-arithmetic-parent
免責聲明:本站發布的內容(圖片、視頻和文字)以原創、轉載和分享為主,文章觀點不代表本網站立場,如果涉及侵權請聯系站長郵箱:is@yisu.com進行舉報,并提供相關證據,一經查實,將立刻刪除涉嫌侵權內容。