您好,登錄后才能下訂單哦!
您好,登錄后才能下訂單哦!
前言
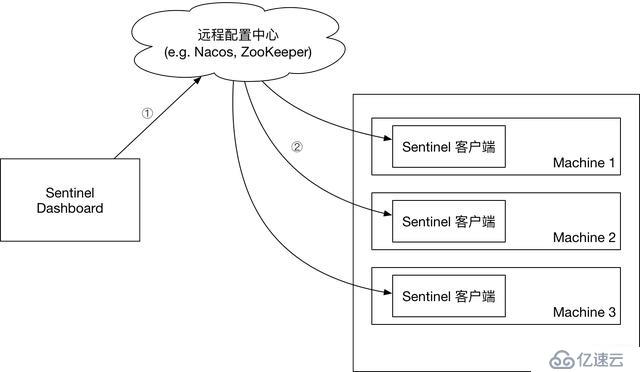
Sentinel 原生版本的規則管理通過API 將規則推送至客戶端并直接更新到內存中,并不能直接用于生產環境。不過官方也提供了一種 Push模式,擴展讀數據源ReadableDataSource,規則中心統一推送,客戶端通過注冊監聽器的方式時刻監聽變化,比如使用 Nacos、Zookeeper 等配置中心。這種方式有更好的實時性和一致性保證。這里我們通過配置 Nacos 來實現流控規則的統一存儲配置。
架構

控制臺推送規則至配置中心,客戶端通過監聽事件從配置中心獲取流控規則。
客戶端配置
pom.xml 引入:
<dependency>
?<groupId>com.alibaba.csp</groupId>
?<artifactId>sentinel-datasource-nacos</artifactId>
?<version>1.6.3</version>
?</dependency>
配置文件:
#?nacos的訪問地址,配置參考?https://blog.52itstyle.vip/archives/4174/?
spring.cloud.sentinel.datasource.ds.nacos.server-addr=47.104.187.19:8848
#nacos中存儲規則的dataId,對于dataId使用了${spring.application.name}變量,這樣可以根據應用名來區分不同的規則配置
spring.cloud.sentinel.datasource.ds.nacos.dataId=${spring.application.name}-flow-rules
#nacos中存儲規則的groupId
spring.cloud.sentinel.datasource.ds.nacos.groupId=SENTINEL_GROUP
#定義存儲的規則類型
spring.cloud.sentinel.datasource.ds.nacos.rule-type=flow
控制臺配置
修改 pom.xml,原來的<scope>test</scope>去掉:
<dependency>
?<groupId>com.alibaba.csp</groupId>
?<artifactId>sentinel-datasource-nacos</artifactId>
</dependency>
把 src/test 下面的包 com.alibaba.csp.sentinel.dashboard.rule.nacos 拷貝到src/main/java 下面。
修改 NacosConfig:
/**
?*?@author?Eric?Zhao
?*?@since?1.4.0
?*/
@Configuration
public?class?NacosConfig?{
?@Value("${nacos.address}")
?private?String?address;
?@Bean
?public?Converter<List<FlowRuleEntity>,?String>?flowRuleEntityEncoder()?{
?return?JSON::toJSONString;
?}
?@Bean
?public?Converter<String,?List<FlowRuleEntity>>?flowRuleEntityDecoder()?{
?return?s?->?JSON.parseArray(s,?FlowRuleEntity.class);
?}
?@Bean
?public?ConfigService?nacosConfigService()?throws?Exception?{
?Properties?properties?=?new?Properties();
?properties.put("serverAddr",address);
?return?ConfigFactory.createConfigService(properties);
?}
}
application.properties 配置引入 Nacos:
#?nacos的訪問地址,配置參考?https://blog.52itstyle.vip/archives/4174/?
nacos.address=47.104.197.19:8848
FlowControllerV2 指定對應的 Bean 開啟 Nacos 適配。
@Autowired
@Qualifier("flowRuleNacosProvider")
private?DynamicRuleProvider<List<FlowRuleEntity>>?ruleProvider;
@Autowired
@Qualifier("flowRuleNacosPublisher")
private?DynamicRulePublisher<List<FlowRuleEntity>>?rulePublisher;
修改sidebar.html頁面, 流控規則路由從 dashboard.flowV1 改成 dashboard.flow
<--?nacos?動態規則配置-->
<li?ui-sref-active="active"?ng-if="!entry.isGateway">
?<a?ui-sref="dashboard.flow({app:?entry.app})">
?<i?class="glyphicon?glyphicon-filter"></i>?流控規則</a>
</li>
如圖所示,界面會多了一個回到單機頁面的按鈕,這里我們新增一個流控規則。

登錄 Nacos 后臺,配置管理->配置列表:

點擊進入配置詳情,配置內容如下:
[{
?"app":?"blog",
?"clusterConfig":?{
?"fallbackToLocalWhenFail":?true,
?"sampleCount":?10,
?"strategy":?0,
?"thresholdType":?0,
?"windowIntervalMs":?1000
?},
?"clusterMode":?false,
?"controlBehavior":?0,
?"count":?2.0,
?"gmtCreate":?1568617671812,
?"gmtModified":?1568622253889,
?"grade":?1,
?"id":?6,
?"ip":?"10.136.168.88",
?"limitApp":?"default",
?"port":?8720,
?"resource":?"blogView",
?"strategy":?0
}]
小結
生產環境下,推送規則正確做法應該是 配置中心控制臺/Sentinel 控制臺 → 配置中心 → Sentinel 數據源 → Sentinel。
案例
https://gitee.com/52itstyle/spring-boot-blog
點擊獲取?附送學習進階架構資料、PDF書籍文檔、面試資料


免責聲明:本站發布的內容(圖片、視頻和文字)以原創、轉載和分享為主,文章觀點不代表本網站立場,如果涉及侵權請聯系站長郵箱:is@yisu.com進行舉報,并提供相關證據,一經查實,將立刻刪除涉嫌侵權內容。