您好,登錄后才能下訂單哦!
您好,登錄后才能下訂單哦!
這篇文章主要介紹“SpringBoot防御CSRF攻擊的流程及原理是什么”的相關知識,小編通過實際案例向大家展示操作過程,操作方法簡單快捷,實用性強,希望這篇“SpringBoot防御CSRF攻擊的流程及原理是什么”文章能幫助大家解決問題。
想要防御 CSRF 攻擊,那我們需要先搞清楚什么是 CSRF 攻擊,通過下面圖例來和大家梳理 CSRF 攻擊流程:

其實這個流程很簡單:
1.假設用戶打開了招商網上銀行網站,并且登錄。
2.登錄成功后,網上銀行會返回Cookie給前端,瀏覽器將Cookie保存下來。
3.用戶在沒有登出網上銀行的情況下,在瀏覽器里打開了一個新的選項卡,然后又去訪問了一個危險網站。
4.這個危險網站上有一個超鏈接,超鏈接的地址指向了招商網上銀行。
4.用戶點擊了這個鏈接,由于這個超鏈接會自動攜帶上瀏覽器中保存的Cookie,所以用戶不知不覺中就訪問了網上銀行,進而可能給自己造成了損失。
CSRF的流程大致就是這樣,接下來用一個簡單的例子展示一下CSRF到底是怎么一回事。
1.我創建一個名為 csrf-mry 的 Spring Boot 項目,這個項目相當于我們上面所說的網上銀行網站,創建項目時引入 Web 和 Spring Security依賴,如下:
<dependencies>
	<dependency>
		<groupId>org.springframework.boot</groupId>
		<artifactId>spring-boot-starter-security</artifactId>
	</dependency>
	<dependency>
		<groupId>org.springframework.boot</groupId>
		<artifactId>spring-boot-starter-web</artifactId>
	</dependency>
</dependencies>
2.創建成功后,方便起見,我們直接將 Spring Security 用戶名/密碼 配置在 application.properties 文件中:
server.port= 8866
spring.security.user.name=javaboy
spring.security.user.password=123
3.然后我們提供兩個測試接口
package com.mry.csrf.controller;
import org.springframework.web.bind.annotation.GetMapping;
import org.springframework.web.bind.annotation.PostMapping;
import org.springframework.web.bind.annotation.RestController;
@RestController
public class CsrfDemoController {
    @PostMapping("/transfer")
    public void transferMoney(String name, Integer money) {
        System.out.println("name = " + name);
        System.out.println("money = " + money);
    }
    @GetMapping("/hello")
    public String hello() {
        return "hello";
    }
}
假設 /transfer 是一個轉賬接口(這里是假設,主要是給大家演示 CSRF 攻擊,真實的轉賬接口比這復雜)。
4.我們還需要配置一下 Spring Security,因為 Spring Security 中默認是可以自動防御 CSRF 攻擊的,所以我們要把這個關閉掉。
package com.mry.csrf.config;
import org.springframework.context.annotation.Configuration;
import org.springframework.security.config.annotation.web.builders.HttpSecurity;
import org.springframework.security.config.annotation.web.configuration.WebSecurityConfigurerAdapter;
@Configuration
public class SecurityConfig extends WebSecurityConfigurerAdapter {
    @Override
    protected void configure(HttpSecurity http) throws Exception {
        http.authorizeRequests().anyRequest().authenticated()
                .and()
                .formLogin()
                .and()
                .csrf()
                .disable();
    }
}
配置完成后,我們啟動 csrf-simulate-web 項目。
5.我們再創建一個 csrf-loophole-web 項目,這個項目相當于是一個危險網站,為了方便,這里創建時我們只需要引入 web 依賴即可。
項目創建成功后,首先修改項目端口:
server.port= 8855
6.然后我們在 resources/static 目錄下創建一個 hello.html ,內容如下。
<!DOCTYPE html>
<html lang="en">
<head>
    <meta charset="UTF-8">
    <title>Title</title>
</head>
<body>
    <form action="http://localhost:8866/transfer" method="post">
        <input type="hidden" value="javaboy" name="name">
        <input type="hidden" value="10000" name="money">
        <input type="submit" value="點擊查看美女圖片">
    </form>
</body>
</html>
這里有一個超鏈接,超鏈接的文本是點擊查看美女圖片,當你點擊了超鏈接之后,會自動請求 http://localhost:8866/transfer 接口,同時隱藏域還攜帶了兩個參數。
配置完成后,就可以啟動 csrf-loophole-web 項目了。
接下來,用戶首先訪問 csrf-simulate-web 項目中的接口,在訪問的時候需要登錄,用戶就執行了登錄操作,訪問完整后,用戶并沒有執行登出操作,然后用戶訪問 csrf-loophole-web 中的頁面,看到了超鏈接,好奇這美女到底長啥樣,一點擊,結果錢就被人轉走了。
先來說說防御思路。
CSRF 防御,一個核心思路就是在前端請求中,添加一個隨機數。
因為在 CSRF 攻擊中,黑客網站其實是不知道用戶的 Cookie 具體是什么的,他是讓用戶自己發送請求到網上銀行這個網站的,因為這個過程會自動攜帶上 Cookie 中的信息。
所以我們的防御思路是這樣:用戶在訪問網上銀行時,除了攜帶 Cookie 中的信息之外,還需要攜帶一個隨機數,如果用戶沒有攜帶這個隨機數,則網上銀行網站會拒絕該請求。黑客網站誘導用戶點擊超鏈接時,會自動攜帶上 Cookie 中的信息,但是卻不會自動攜帶隨機數,這樣就成功的避免掉 CSRF 攻擊了。
Spring Security 中對此提供了很好的支持,我們一起來看下。
Spring Security 中默認實際上就提供了 csrf 防御,但是需要開發者做的事情比較多。
首先我們來創建一個新的 Spring Boot 工程,創建時引入 Spring Security、Thymeleaf 和 web 依賴。
1.pom信息
<dependencies>
	<dependency>
		<groupId>org.springframework.boot</groupId>
		<artifactId>spring-boot-starter-web</artifactId>
	</dependency>
	<dependency>
		<groupId>org.springframework.boot</groupId>
		<artifactId>spring-boot-starter-security</artifactId>
	</dependency>
	<dependency>
		<groupId>org.springframework.boot</groupId>
		<artifactId>spring-boot-starter-thymeleaf</artifactId>
	</dependency>
	<dependency>
		<groupId>org.springframework.boot</groupId>
		<artifactId>spring-boot-starter-test</artifactId>
		<scope>test</scope>
	</dependency>
</dependencies>
2.項目創建成功后,我們還是在 application.properties 中配置用戶名/密碼
spring.security.user.name=mry
spring.security.user.password=123456
3.接下來,我們提供一個測試接口
package com.mry.csrf.controller;
import org.springframework.web.bind.annotation.PostMapping;
import org.springframework.web.bind.annotation.ResponseBody;
import org.springframework.web.bind.annotation.RestController;
@RestController
public class SecurityCsrfController {
    @PostMapping("/hello")
    @ResponseBody
    public String hello() {
        return "hello";
    }
}
注意,這個測試接口是一個 POST 請求,因為默認情況下,GET、HEAD、TRACE 以及 OPTIONS 是不需要驗證 CSRF 攻擊的。
4.然后,我們在 resources/templates 目錄下,新建一個 thymeleaf 模版
<!DOCTYPE html>
<!--導入thymeleaf的名稱空間-->
<html lang="en" xmlns:th="http://www.thymeleaf.org">
<head>
    <meta charset="UTF-8">
    <title>Title</title>
</head>
<body>
    <form action="/hello" method="post">
        <input type="hidden" th:value="${_csrf.token}" th:name="${_csrf.parameterName}">
        <input type="submit" value="hello">
    </form>
</body>
</html>
注意,在發送 POST 請求的時候,還額外攜帶了一個隱藏域,隱藏域的 key 是 ${_csrf.parameterName},value 則是 ${_csrf.token}。
這兩個值服務端會自動帶過來,我們只需要在前端渲染出來即可。
5.接下來給前端 hello.html 頁面添加一個控制器
@GetMapping("/hello")
public String hello2() {
	return "hello";
}
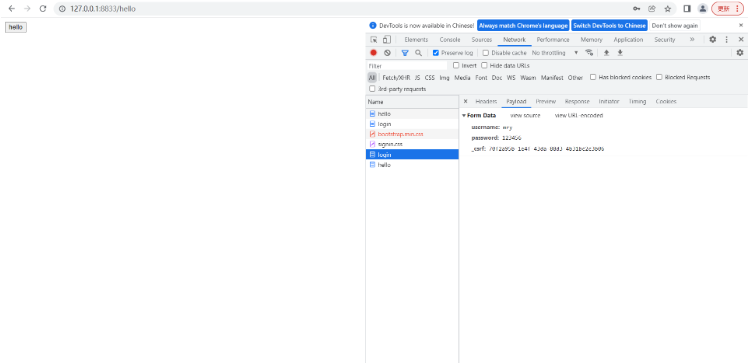
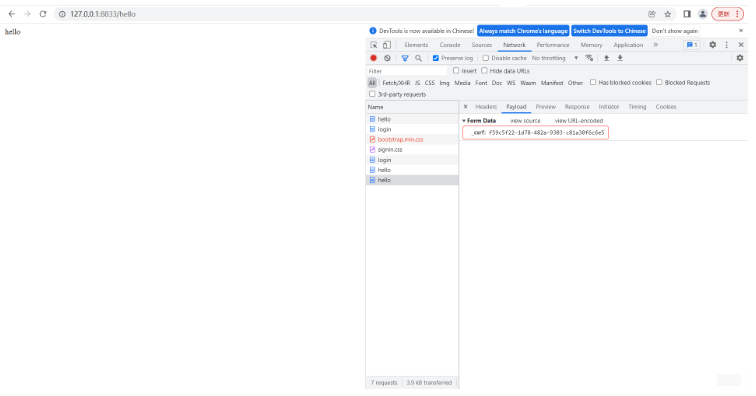
6.添加完成后,啟動項目,我們訪問 hello 頁面,在訪問時候,需要先登錄,登錄成功之后,我們可以看到登錄請求中也多了一個參數

這里我們用了 Spring Security 的默認登錄頁面,如果大家使用自定義登錄頁面,可以參考上面 hello.html 的寫法,通過一個隱藏域傳遞 _csrf 參數。
訪問到 hello 頁面之后,再去點擊【hello】按鈕,就可以訪問到 hello 接口了。

這是 Spring Security 中默認的方案,通過 Model 將相關的數據帶到前端來。
如果你的項目是前后端不分項目,這種方案就可以了,如果你的項目是前后端分離項目,這種方案很明顯不夠用。
如果是前后端分離項目,Spring Security 也提供了解決方案。
這次不是將 _csrf 放在 Model 中返回前端了,而是放在 Cookie 中返回前端,配置方式如下:
package com.mry.csrf.config;
import org.springframework.context.annotation.Configuration;
import org.springframework.security.config.annotation.web.builders.HttpSecurity;
import org.springframework.security.config.annotation.web.configuration.WebSecurityConfigurerAdapter;
import org.springframework.security.web.csrf.CookieCsrfTokenRepository;
@Configuration
public class SecurityConfig extends WebSecurityConfigurerAdapter {
    @Override
    protected void configure(HttpSecurity http) throws Exception {
        http.authorizeRequests().anyRequest().authenticated()
                .and()
                .formLogin()
                .and()
                .csrf().csrfTokenRepository(CookieCsrfTokenRepository.withHttpOnlyFalse());
    }
}
有小伙伴可能會說放在 Cookie 中不是又被黑客網站盜用了嗎?其實不會的,大家注意如下兩個問題:
(1)黑客網站根本不知道你的 Cookie 里邊存的啥,他也不需要知道,因為 CSRF 攻擊是瀏覽器自動攜帶上 Cookie 中的數據的。
(2)我們將服務端生成的隨機數放在 Cookie 中,前端需要從 Cookie 中自己提取出來 _csrf 參數,然后拼接成參數傳遞給后端,單純的將 Cookie 中的數據傳到服務端是沒用的。
理解透了上面兩點,你就會發現 _csrf 放在 Cookie 中是沒有問題的,但是大家注意,配置的時候我們通過 withHttpOnlyFalse 方法獲取了 CookieCsrfTokenRepository 的實例,該方法會設置 Cookie 中的 HttpOnly 屬性為 false,也就是允許前端通過 js 操作 Cookie(否則你就沒有辦法獲取到 _csrf)。
配置完成后,重啟項目,此時我們就發現返回的 Cookie 中多了一項:

接下來,我們通過自定義登錄頁面,來看看前端要如何操作。
首先我們在 resources/static 目錄下新建一個 html 頁面叫做 login.html:
<!DOCTYPE html>
<html lang="en">
<head>
    <meta charset="UTF-8">
    <title>Title</title>
    <script src="https://libs.baidu.com/jquery/2.1.4/jquery.min.js"></script>
    <script src="https://cdn.bootcss.com/jquery-cookie/1.4.1/jquery.cookie.min.js"></script>
</head>
<body>
<div>
    <input type="text" id="username">
    <input type="password" id="password">
    <input type="button" value="登錄" id="loginBtn">
</div>
<script>
    $("#loginBtn").click(function () {
        let _csrf = $.cookie('XSRF-TOKEN');
        $.post('/login.html',{username:$("#username").val(),password:$("#password").val(),_csrf:_csrf},function (data) {
            alert(data);
        })
    })
</script>
</body>
</html>
這段 html 給大家解釋一下:
(1)首先引入 jquery 和 jquery.cookie ,方便我們一會操作 Cookie。
(2)定義三個 input,前兩個是用戶名和密碼,第三個是登錄按鈕。
(3)點擊登錄按鈕之后,我們先從 Cookie 中提取出 XSRF-TOKEN,這也就是我們要上傳的 csrf 參數。
(4)通過一個 POST 請求執行登錄操作,注意攜帶上 _csrf 參數。
服務端我們也稍作修改,如下:
package com.mry.csrf.config;
import org.springframework.context.annotation.Configuration;
import org.springframework.security.config.annotation.web.builders.HttpSecurity;
import org.springframework.security.config.annotation.web.builders.WebSecurity;
import org.springframework.security.config.annotation.web.configuration.WebSecurityConfigurerAdapter;
import org.springframework.security.web.csrf.CookieCsrfTokenRepository;
@Configuration
public class SecurityConfig extends WebSecurityConfigurerAdapter {
    @Override
    public void configure(WebSecurity web) throws Exception {
        web.ignoring().antMatchers("/static/js/**");
    }
    @Override
    protected void configure(HttpSecurity http) throws Exception {
        http.authorizeRequests().anyRequest().authenticated()
                .and()
                .formLogin()
                .loginPage("/login.html")
                .successHandler((req,resp,authentication)->{
                    resp.getWriter().write("success");
                })
                .permitAll()
                .and()
                .csrf().csrfTokenRepository(CookieCsrfTokenRepository.withHttpOnlyFalse());
    }
}
一方面這里給 js 文件放行。
另一方面配置一下登錄頁面,以及登錄成功的回調,這里簡單期間,登錄成功的回調我就給一個字符串就可以了。在登錄成功后回調的詳細解釋。
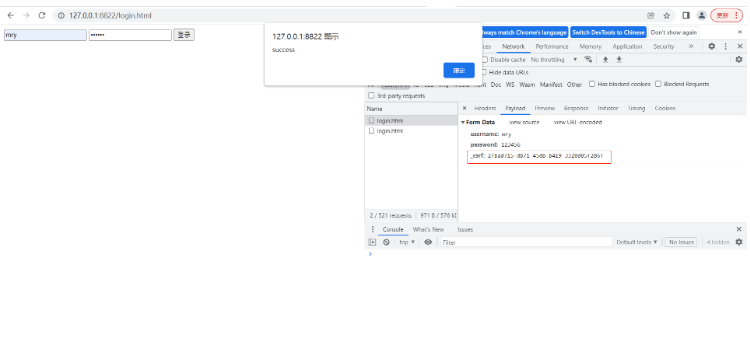
OK,所有事情做完之后,我們訪問 login.html 頁面,輸入用戶名密碼進行登錄,結果如下:

可以看到,我們的 _csrf 配置已經生效了。
關于“SpringBoot防御CSRF攻擊的流程及原理是什么”的內容就介紹到這里了,感謝大家的閱讀。如果想了解更多行業相關的知識,可以關注億速云行業資訊頻道,小編每天都會為大家更新不同的知識點。
免責聲明:本站發布的內容(圖片、視頻和文字)以原創、轉載和分享為主,文章觀點不代表本網站立場,如果涉及侵權請聯系站長郵箱:is@yisu.com進行舉報,并提供相關證據,一經查實,將立刻刪除涉嫌侵權內容。