溫馨提示×
您好,登錄后才能下訂單哦!
點擊 登錄注冊 即表示同意《億速云用戶服務條款》
您好,登錄后才能下訂單哦!
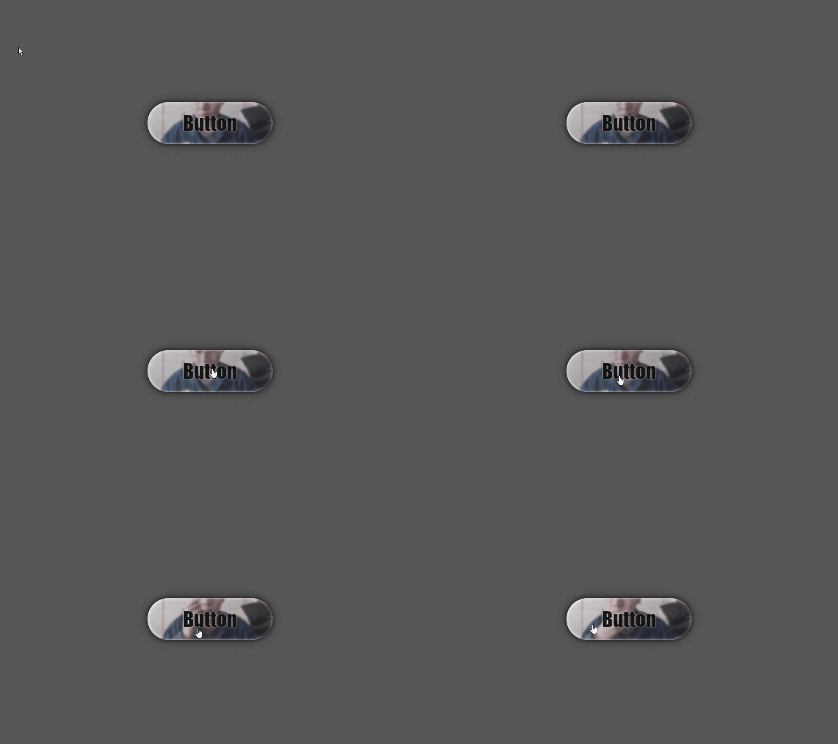
這篇文章主要介紹“vue.js怎么在網頁中實現一個金屬拋光質感的按鈕”的相關知識,小編通過實際案例向大家展示操作過程,操作方法簡單快捷,實用性強,希望這篇“vue.js怎么在網頁中實現一個金屬拋光質感的按鈕”文章能幫助大家解決問題。


主要思路是使用 navigator.mediaDevices.getUserMedia()調用設備攝像頭來實現鏡面反射,css部分用到了filter屬性,后期可以根據需要調整它的屬性值,做出更多反射效果。有了思路,實現起來還是比較簡單的。
需要注意的是window.navigator.mediaDevices.getUserMedia()只能在localhost或https下才能使用,否則會報錯哦。
index.html
<!DOCTYPE html>
<html lang="en">

<head>
	<meta charset="UTF-8">
	<meta name="viewport" content="width=device-width, user-scalable=no, minimum-scale=1.0, maximum-scale=1.0">
	<script src="https://cdn.jsdelivr.net/npm/vue@2/dist/vue.js"></script>
	<style>
		body {
		  background-color: rgb(86, 86, 86);
		}

		:root {
		  --transition: 0.1s;
		  --border-radius: 56px;
		}

		.button-wrap {
		  margin: calc(30vh - 50px) auto 0;
		  width: 300px;
		  height: 100px;
		  position: relative;
		  transition: transform var(--transition), box-shadow var(--transition);
		}

		.button-wrap.pressed {
		  transform: translateZ(0) scale(0.98);
		}

		.button {
		  width: 100%;
		  height: 100%;
		  overflow: hidden;
		  border-radius: var(--border-radius);
		  box-shadow:
		    0px 0px 10px rgba(0, 0, 0, 0.6),
		    0px 0px 20px rgba(0, 0, 0, 0.4),
		    0px 0px 40px rgba(0, 0, 0, 0.2),
		    inset 0 2px 2px rgba(255, 255, 255, 0.8),
		    inset 0 -2px 2px rgba(255, 255, 255, 0.8);
		  transform: translateZ(0);
		  cursor: pointer;
		}

		.button.pressed {
		  box-shadow:
		    0px 0px 5px rgba(0, 0, 0, 0.6),
		    0px 0px 10px rgba(0, 0, 0, 0.4),
		    0px 0px 20px rgba(0, 0, 0, 0.2),
		    inset 0 2px 2px rgba(255, 255, 255, 0.8),
		    inset 0 -2px 2px rgba(255, 255, 255, 0.8);
		}

		.text {
		  position: absolute;
		  left: 50%;
		  top: 50%;
		  transform: translate(-50%, -50%);
		  pointer-events: none;
		  color: rgba(0, 0, 0, 0.9);
		  font-size: 48px;
		  font-weight: bold;
		  text-shadow:
		    0px 2px 1px rgba(255, 255, 255, 0.3),
		    0px -2px 1px rgba(255, 255, 255, 0.3);
		}

		.text::selection {
		  background-color: transparent;
		}

		.button .button-reflection {
		  width: 100%;
		  height: 100%;
		  transform: scaleX(-1);
		  object-fit: cover;
		  opacity: 0.7;
		  filter: blur(2px) saturate(0.6) brightness(1.1);
		  object-position: 0 -100px;
		}
	</style>
</head>

<body>
	<div id="app">
		<div v-show="cameraOpened" :class="`button-wrap ${buttonPressed ? 'pressed' : ''}`">
			<div :class="`button ${buttonPressed ? 'pressed' : ''}`" @mousedown="setButtonPressed(true)"
				@mouseup="setButtonPressed(false)" @touchstart="setButtonPressed(true)" @touchend="setButtonPressed(false)">
				<video class="button-reflection" ref="reflectionRef" />
			</div>
			<div class="text">Button</div>
		</div>
	</div>
	<script>
		new Vue({
			el: '#app',
			data: {
				cameraOpened: false,
				buttonPressed: false
			},
			mounted() {
				const _this = this
				navigator.mediaDevices.getUserMedia({
					video: true,
					audio: false
				}).then((stream) => {
					const video = this.$refs.reflectionRef
					video.srcObject = stream;
					video.onloadedmetadata = () => {
						_this.cameraOpened = true
						video.play()
					}
				})
			},
			methods: {
				setButtonPressed(val) {
					this.buttonPressed = val
				}
			}
		})
	</script>
</body>

</html>
關于“vue.js怎么在網頁中實現一個金屬拋光質感的按鈕”的內容就介紹到這里了,感謝大家的閱讀。如果想了解更多行業相關的知識,可以關注億速云行業資訊頻道,小編每天都會為大家更新不同的知識點。
免責聲明:本站發布的內容(圖片、視頻和文字)以原創、轉載和分享為主,文章觀點不代表本網站立場,如果涉及侵權請聯系站長郵箱:is@yisu.com進行舉報,并提供相關證據,一經查實,將立刻刪除涉嫌侵權內容。