您好,登錄后才能下訂單哦!
您好,登錄后才能下訂單哦!
本篇內容主要講解“vuex的實現原理是什么”,感興趣的朋友不妨來看看。本文介紹的方法操作簡單快捷,實用性強。下面就讓小編來帶大家學習“vuex的實現原理是什么”吧!
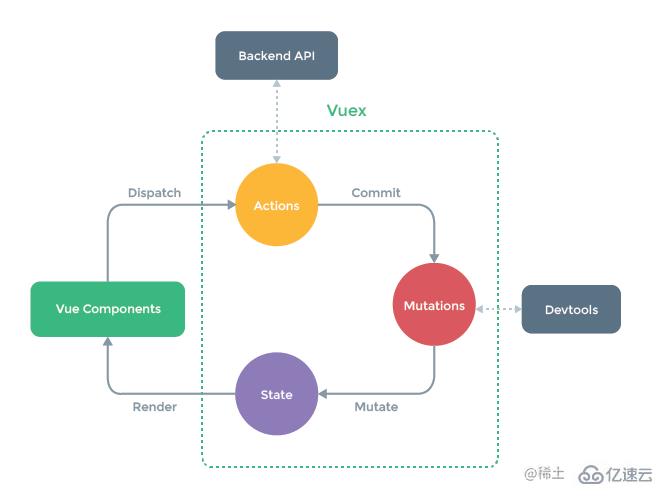
關于vuex就不再贅述,簡單回顧一下:當應用碰到多個組件共享狀態時,簡單的單向數據流很容易被破壞:第一,多個視圖依賴于同一狀態;第二,來自不同視圖的行為需要變更同一狀態。若解決前者使用傳參的方式,則不適用于多層嵌套的組件以及兄弟組件;若解決后者使用父子組件直接引用或事件變更和同步狀態的多份拷貝,則不利于代碼維護。
所以,最好的辦法是:把組件的共享狀態抽取出,以一個全局單例模式管理!這也正是vuex背后的基本思想。

所以,vuex的大致框架如下:
class Store {
    constructor() {
        // state
        // getters
        // mutations
        // actions
    }
    // commit
    // dipatch
}
接下來,就寫寫看。
vue create vue2-vuex//創建vue2項目

yarn add vuex@next --save//安裝vuex

yarn serve//啟動項目
1、State
(1)使用
//store.js
// 倉庫
import Vue from 'vue'
import Vuex from 'vuex'
import extra from './extra.js'

Vue.use(Vuex) //引入vuex的方式,說明Store需要install方法
export default new Vuex.Store({
    // 倉庫數據源
    state: {
        count: 1,
        dowhat: 'addCount'
    },
}
//app.vue
<template>
<div class="testState">
<p>{{mycount}}</p>
<p>{{dowhat}}:{{count}}</p>
</div>
</template>
<script>
export default {
import {
mapState
} from 'vuex'
// 推薦方式
computed: mapState()({
mycount: state => state.count
}),
// 推薦方式的簡寫方式
computed: {
// 解構的是getters
...mapState(['count', 'dowhat'])
},
}
</script>
(2)注意
由于 Vuex 的狀態存儲是響應式的,從 store 實例中讀取狀態最簡單的方法就是在計算屬性 中返回某個狀態,這種模式導致組件依賴全局狀態單例。在模塊化的構建系統中,在每個需要使用 state 的組件中需要頻繁地導入,并且在測試組件時需要模擬狀態
Vuex 通過 store 選項,提供了一種機制將狀態從根組件“注入”到每一個子組件中(需調用 Vue.use(Vuex))
(3)實現
所以除了Store內部的五大屬性以外,還需要考慮插件的一個install方法,所以大致框架如下:
class Store {
    constructor() {
        // state
        // getters
        // mutations
        // actions
        //modules
    }
    // commit
    // dipatch
}
let Vuex = {
    Store,
    Install
}
export default Vuex
所以,接下來就可以具體實現了,
class Store {
    constructor(options) {
        // state
        this.state = options.state
    }
}
let install = function(_Vue) {
    _Vue.mixin({
        beforeCreate() { //在組件創建之前自動調用,每個組件都有這個鉤子
            if (this.$options && this.$options.store) { //this.$options讀取根組件
                this.$store = this.$options.store
            } else {
                this.$store = this.$parent && this.$parent.$store
            }
        }
    })
}
然而,上述的state的實現有一個缺點:當改變數據的時候,state的數據不能動態的渲染。所以如何把state里的數據成為響應式成為關鍵問題?實際上,類似vue里的data,也可以通過這種方式讓其成為響應式。那么就得從install方法中傳入Vue,所以改變后:
let Vue=null
class Store {
    constructor(options) {
        // state
        this.vm = new _Vue({
          data: {
            state: options.state//data中的數據才是響應式
          }
        })
    }
      get state() {
        return this.vm.state
    }
}
let install = function(_Vue) {//用于Vue.use(plugin)
    Vue=_Vue
    _Vue.mixin({
        onBeforeCreate() { //在組件創建之前自動調用,每個組件都有這個鉤子
            if (this.$options && this.$options.store) { //this.$options讀取根組件
                this.$store = this.$options.store
            } else {
                this.$store = this.$parent && this.$parent.$store
            }
        }
    })
}
2、getters
(1)使用
//store.js
export default new Vuex.Store({
    // 計算屬性
    getters: {
        // 這里的函數不需要調用,可以直接使用,官方默認前面有get
        getCount(state) {//接受 state 作為其第一個參數
            return state.count * 100;
        }
    },
}
(2)注意
有時候我們需要從 store 中的 state 中派生出一些狀態(比如增加,刪除,過濾等等),Vuex 允許我們在 store 中定義“getter”(可以認為是 store 的計算屬性)。就像計算屬性一樣,getter 的返回值會根據它的依賴被緩存起來,且只有當它的依賴值發生了改變才會被重新計算,Getter 接受 state 作為其第一個參數,getter 在通過方法訪問時,每次都會去進行調用,而不會緩存結果
(3)實現
 // getters
    let getters = options.getters || {}
    this.getters = {}
    Object.keys(getters).forEach(getterName => {
      Object.defineProperty(this.getters, getterName, {
        get: () => {
          return getters[getterName](this.state)
        }
      })
    })
3、mutations
(1)使用
//store.js
export default new Vuex.Store({
        // 相當于methods
    mutations: {
        // mutations內部的函數,天生具備一個形參
        add(state, n) {
            state.count += n;
        },
        decrease(state, n) {
            state.count -= n;
        }
    },
}
methods: {
submit() {
console.log('success');
},
// 解構倉庫mutations里面的方法,要啥解構啥
...mapMutations(['add', 'decrease']),
// this.$store.commit('add'),
...mapActions(['addAction', 'decreaseAction']),
// this.addAction()調用actions里面的方法
// this.$store.dispatch('add'),
}
(2)注意
更改 Vuex 的 store 中的狀態的唯一方法是提交 mutation。Vuex 中的 mutation 類似于事件:每個 mutation 都有一個字符串的 事件類型 (type) 和 一個 回調函數 (handler) 。這個回調函數就是進行狀態更改的地方,并且它會接受 state 作為第一個參數,不能直接調用一個 mutation handler。這個選項更像是事件注冊:“當觸發一個類型為 increment 的 mutation 時,調用此函數。”要喚醒一個 mutation handler,你需要以相應的 type 調用 store.commit 方法
可以向 store.commit 傳入額外的參數,即 mutation 的 載荷(payload) ,在大多數情況下,載荷應該是一個對象,這樣可以包含多個字段并且記錄的 mutation 會更易讀
(3)實現
   // mutations
    let mutations = options.mutations || {}
    this.mutations = {}
    Object.keys(mutations).forEach(mutationName => {
      this.mutations[mutationName] = (arg) => {//保證多個(第二個)參數的傳入
        mutations[mutationName](this.state, arg)
      }
    })

    commit = (method, arg) => {//使用箭頭函數改變被調用的this的指向
        // console.log(this);
        this.mutations[method](arg)
  }
4、actions
(1)使用
//store.js
export default new Vuex.Store({
    actions: {
        addAction(context) {
            // 在這里調用add方法
            context.commit('add', 10);
        },
        decreaseAction({
            commit
        }) {
            commit('decreaseAction', 5)
        }
    },
}
(2)注意
Action 提交的是 mutation,而不是直接變更狀態。
Action 可以包含任意異步操作
Action 函數接受一個與 store 實例具有相同方法和屬性的 context 對象
Action 通過 store.dispatch 方法觸發
Action 通常是異步的,store.dispatch 可以處理被觸發的 action 的處理函數返回的 Promise,并且 store.dispatch 仍舊返回 Promise
一個 store.dispatch 在不同模塊中可以觸發多個 action 函數。在這種情況下,只有當所有觸發函數完成后,返回的 Promise 才會執行
(3)實現
    // actions
    let actions = options.actions || {}
    this.actions = {}
    Object.keys(actions).forEach(actionName => {
      this.actions[actionName] = (arg) => {
        actions[actionName](this, arg)
      }
    })

   dispatch=(method, arg) =>{
    this.actions[method](arg)
  }
5、modules
(1)使用
    // actions
    let actions = options.actions || {}
    this.actions = {}
    Object.keys(actions).forEach(actionName => {
      this.actions[actionName] = (arg) => {
        actions[actionName](this, arg)
      }
    })

   dispatch=(method, arg) =>{
    this.actions[method](arg)
  }
//store.js
modules: {
extra: extra
}
(2)注意
由于使用單一狀態樹,應用的所有狀態會集中到一個比較大的對象。當應用變得非常復雜時,store 對象就有可能變得相當臃腫,Vuex 允許我們將 store 分割成模塊(module) 。每個模塊擁有自己的 state、mutation、action、getter、甚至是嵌套子模塊——從上至下進行同樣方式的分割
對于模塊內部的 mutation 和 getter,接收的第一個參數是模塊的局部狀態對象
對于模塊內部的 action,局部狀態通過 context.state 暴露出來,根節點狀態則為 context.rootState
對于模塊內部的 getter,根節點狀態(rootState)會作為第三個參數暴露出來
let Vue = null//全局的_Vue

class Store {
  constructor (options) {
    // state
    //this.state = options.state 寫法不完美,當改變數據的時候,不能動態的渲染,所以需要把data中的數據做成響應式的
    this.vm = new _Vue({
      data: {
        state: options.state//data中的數據才是響應式
      }
    })

    // getters
    let getters = options.getters || {}
    this.getters = {}
    Object.keys(getters).forEach(getterName => {
      Object.defineProperty(this.getters, getterName, {
        get: () => {
          return getters[getterName](this.state)
        }
      })
    })

    // mutations
    let mutations = options.mutations || {}
    this.mutations = {}
    Object.keys(mutations).forEach(mutationName => {
      this.mutations[mutationName] = (arg) => {//保證多個(第二個)參數的傳入
        mutations[mutationName](this.state, arg)
      }
    })

    // actions
    let actions = options.actions || {}
    this.actions = {}
    Object.keys(actions).forEach(actionName => {
      this.actions[actionName] = (arg) => {
        actions[actionName](this, arg)
      }
    })

  }

  dispatch=(method, arg) =>{
    this.actions[method](arg)
  }

  commit = (method, arg) => {
    // console.log(this);
    this.mutations[method](arg)
  }

  get state() {
    return this.vm.state
  }

}

let install = function(_Vue) {
  Vue = _Vue
  Vue.mixin({
    beforeCreate() {//在組件創建之前自動調用,每個組件都有這個鉤子
      if (this.$options && this.$options.store) {  // this.$options讀取到根組件
        this.$store = this.$options.store
      } else { // //如果不是根組件的話,也把$store掛到上面,因為是樹狀組件
        this.$store = this.$parent && this.$parent.$store
      }
    }
  })
}

let Vuex = {
  Store,
  install
}

export default Vuex
到此,相信大家對“vuex的實現原理是什么”有了更深的了解,不妨來實際操作一番吧!這里是億速云網站,更多相關內容可以進入相關頻道進行查詢,關注我們,繼續學習!
免責聲明:本站發布的內容(圖片、視頻和文字)以原創、轉載和分享為主,文章觀點不代表本網站立場,如果涉及侵權請聯系站長郵箱:is@yisu.com進行舉報,并提供相關證據,一經查實,將立刻刪除涉嫌侵權內容。