您好,登錄后才能下訂單哦!
您好,登錄后才能下訂單哦!
這篇“Vue的URL轉跳與參數傳遞方法是什么”文章的知識點大部分人都不太理解,所以小編給大家總結了以下內容,內容詳細,步驟清晰,具有一定的借鑒價值,希望大家閱讀完這篇文章能有所收獲,下面我們一起來看看這篇“Vue的URL轉跳與參數傳遞方法是什么”文章吧。
寫業務中,從一個頁面跳轉到另一個頁面,經常需要傳值和取值,如何實現?
使用query傳遞參數,路由必須使用path引入
<-- 在a頁面進行傳值 -->

<router-link :to="{path: '/home', query: {key: 'hello', value: 'world'}}">
  <button>跳轉</button>
</router-link>
跳轉地址 => /home?key=hello&value=world
在b頁面取值: this.$route.query.key
使用params傳遞參數,路由必須使用name引入
<-- 在a頁面進行傳值 -->

<router-link :to="{name: '/home', params: {key: 'hello', value: 'world'}}">
  <button>跳轉</button>
</router-link>
跳轉地址 ==> /home
在b頁面取值:this.$route.params.key
通過query
this.$router.push({
  path: '/detail',
  query: {
    name: 'admin',
    code: 10021
  }
});
跳轉地址 => /detail?name=admin&code=10021
取值:this.$route.query.name
如果是vue頁面中的內部跳轉,可以用this.$router.push()實現,但是如果用這種方法跳到外部鏈接,就會報錯,原因是直接把外部鏈接加在了http://localhost:8080/#/的后面,這就導致跳轉出現問題。
那么如何跳轉到外部鏈接呢,其實只需用 window.location.href = ‘url’就能實現。
具體代碼如下:html <span @click="See(url)">點擊轉跳</span>
上面是觸發一個點擊事件,其中url是傳給see的url鏈接,下面是事件執行的函數
js See(e) { window.location.href = e }開發過程中參數傳遞

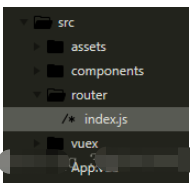
圖一

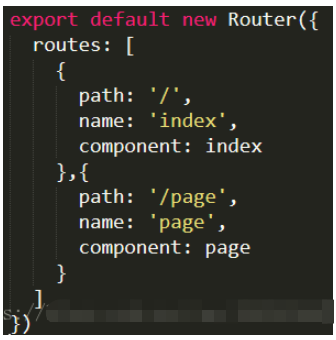
圖二
我們常把頁面的路由配置在圖一中的 router 文件夾下的 js 文件中,圖二為配置的內容。這其中的 name 屬性是可以作為參數傳遞的,在模版中直接只用 {{$route.name}} 接收,即可以在模版中顯示。
使用 < router-link to=" /page "> page < /router-link > 可以實現頁面的跳轉,這里面 to 是可以帶上參數跳轉的,我們需要在給 to 進行綁定,即 : to (v-bind:to)
<router-link :to="{name:'page',params:{data:'我是App.vue傳至page.vue的參數'}}" >page</router-link>這其中需要注意的是要給 to 加上綁定,后面跟的是對象形式的字符串。
其中的 name 是我們在路由配置文件(上圖圖二)中配置的 name 兩者要對應。
params 即是我們要傳的參數,它可以是多個值。
隨后在對應的模版頁面中(這里為 page.vue)進行接收。
{{$route.params.data}}當在業務邏輯中需要實現頁面跳轉經常能夠使用到編程式導航:
this.$router.go(1),進入下一級
this.$router.back(-1),返回上一級,通俗的說就是前進與后退。
this.$router.push(’/page’),跳轉到 page.vue
那么我們應該如何傳遞參數呢?例如,我們在判斷完某個條件后需要跳轉到 page 頁并且需要傳遞 age 和 address 兩個參數過去,我們的操作方法是:
App.vue
<div @click="toPage">page</div>
我們在需要的地方加上點擊事件
toPage(){
      this.$router.push({
        name: 'page',
        params: {
          age: 22,
          address: 'China'
        }
      })
    }
隨后在 methods 中寫入該事件,需要注意的是這里面的 name 同樣是要與在配置路由時配置的 name 屬性保持一致。
params 是我們傳入的參數,可以是常量也可以是變量。
page.vue
在 page.vue 中接收參數,可以在生命周期的 mounted() 接收并且放入 data ,再在模版上顯示出來。
<template>
	<div>
		{{myage}}-{{myaddress}}
	</div>
</template>

<script>
	export default {
		name: "page111",
		data() {
			return {
				myage: '',
				myaddress: ''
			}
		},
		mounted(){
			// 在掛載時接收到參數并且賦值
			this.myage = this.$route.params.age;
			this.myaddress = this.$route.params.address;
		},
	}
</script>在項目開發過程中常常通過 url 進行參數傳遞,在 vue-cli 中該如何操作呢?
1.在配置路由處以冒號形式,在 url 后方加上參數(/src/router/index.js)
{
	path: '/page/:pageId/:pageTitle',
    name: 'page',
    component: page
}
2.在< router-link >< /router-link > 的 to 屬性中加入參數(App.vue)
<template>
  <div id="app">
    <img src="./assets/logo.png"><br/>
      <router-link to="/" >index</router-link>
      <router-link to="/page/1/標題" >page</router-link>
    <router-view/>
  </div>
</template>
3.在 page.vue 中接收參數
<template>
	<div>
		<p>id: {{$route.params.pageId}}</p>
		<p>標題: {{$route.params.pageTitle}}</p>
	</div>
</template>項目中組件是經常被使用到的,那么父組件與子組件之間的聯動是非常重要的。
1.先建立一個組件并且使用,在 components 文件夾下新建 component.vue 文件作為組件。
<template>
	<div>
		<p>我的組件 {{msg}}-{{content}}</p>
	</div>
</template>

<script>
	export default{
		name: 'child',
		props: ["msg","content"],
	}
</script>
隨后在 page.vue 中引入該組件,在 < script > </ script > 中 import 且引用,隨后在模版中使用,如下:
<template>
	<div>
		<children></children>
	</div>
</template>

<script>
	import children from "./component";
	export default {
		name: "page",
		components: {
			children
		}
	}
</script>
要傳遞參數,可以在 < children > </ children >標簽中加入要傳入的參數,并且在組件(component.vue)中使用 props 接收再使用插值在模版中顯示。
同時我們也可以給要傳的參數綁定起來,如下第二種寫法,在參數前加上冒號(v-bind)這樣我們就能在 data 中編輯我們的參數了。
// page.vue
<children msg="我是信息" content="我是內容"></children>

<children :msg="message" :content="content"></children>
<script>
	import children from "./component";
	export default{
		name: 'page',
		components: {
			children
		},
		data(){
			return {
				message: '我是信息',
				content: '我是內容'
			}
		}
	}
</script>

// component.vue
<p>我的組件 {{msg}}-{{content}}</p>

<script>
	export default{
		name: 'child',
		props: ["msg","content"]
	}
</script>
子組件再傳值回父組件,在函數中使用 this.$emit()
// component.vue
<script>
	export default{
		name: 'component',
		data() {
			return {
				param:"需要傳回的參數",
				data: "參數2"
			}
		},
		props: ["msg","content"],
		methods: {
			// 假設在子組件選擇完畢后點擊將 param 傳回
			chooseOk(){
				// ...中間的邏輯處理省略
				this.$emit('changeData',this.param,this.data);
			}
		}
	}
</script>
在 page.vue 的 < children > 標簽中加入 @changeData,即可在點擊子組件之后在父組件出接收到傳過來的參數
<children :msg="msg" :content="content" @changeData="dataChange"></children>

<script>
	import children from "./component";
	export default {
		name: "page",
		components: {
			children
		},
		methods: {
			dataChange(param,data){
				console.log(param + ',' + data);
			}
		}
	}
</script>
最后在附加一點,在父組件中該如何調用子組件中的函數呢,這里需要用到 ref 屬性,添加在我們的 < children > 標簽中
// page.vue
<div @click="ifClick">click</div>
<children ref="child" :msg="msg" :content="content" @changeData="dataChange"></children>

// 重復部分省略 ...
methods: {
	ifClick(){
		this.$refs.child.isClick();
	}
}

// component.vue
methods: {
	isClick(){
		console.log("父組件點擊了");
	}
}
以上就是關于“Vue的URL轉跳與參數傳遞方法是什么”這篇文章的內容,相信大家都有了一定的了解,希望小編分享的內容對大家有幫助,若想了解更多相關的知識內容,請關注億速云行業資訊頻道。
免責聲明:本站發布的內容(圖片、視頻和文字)以原創、轉載和分享為主,文章觀點不代表本網站立場,如果涉及侵權請聯系站長郵箱:is@yisu.com進行舉報,并提供相關證據,一經查實,將立刻刪除涉嫌侵權內容。