您好,登錄后才能下訂單哦!
您好,登錄后才能下訂單哦!
本篇內容主要講解“OpenMP task construct實現原理源碼分析”,感興趣的朋友不妨來看看。本文介紹的方法操作簡單快捷,實用性強。下面就讓小編來帶大家學習“OpenMP task construct實現原理源碼分析”吧!
在本小節當中主要給大家分析一下編譯器將 openmp 的 task construct 編譯成什么樣子,下面是一個 OpenMP 的 task 程序例子:
#include <stdio.h>
#include <omp.h>
int main()
{
#pragma omp parallel num_threads(4) default(none)
  {
#pragma omp task default(none)
    {
       printf("Hello World from tid = %d\n", omp_get_thread_num());
    }
  }
  return 0;
}
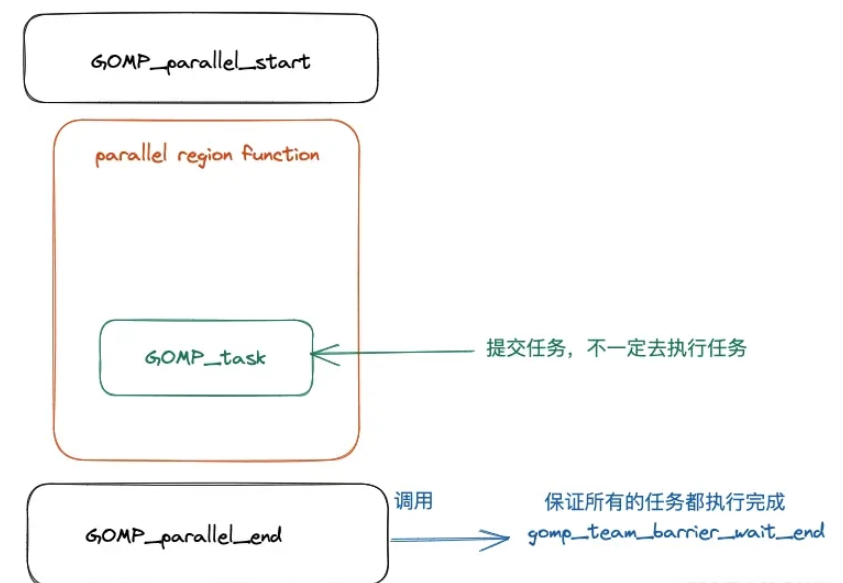
首先先捋一下整個程序被編譯之后的執行流程,經過前面的文章的學習,我們已經知道了并行域當中的代碼會被編譯器編譯成一個函數,關于這一點我們已經在前面的很多文章當中已經討論過了,就不再進行復述。事實上 task construct 和 parallel construct 一樣,task construct 也會被編譯成一個函數,同樣的這個函數也會被作為一個參數傳遞給 OpenMP 內部,被傳遞的這個函數可能被立即執行,也可能在函數 GOMP_parallel_end 被調用后,在到達同步點之前執行被執行(線程在到達并行域的同步點之前需要保證所有的任務都被執行完成)。
整個過程大致如下圖所示:

上面的 OpenMP task 程序對應的反匯編程序如下所示:
00000000004008ad <main>:
  4008ad:       55                      push   %rbp
  4008ae:       48 89 e5                mov    %rsp,%rbp
  4008b1:       ba 04 00 00 00          mov    $0x4,%edx
  4008b6:       be 00 00 00 00          mov    $0x0,%esi
  4008bb:       bf db 08 40 00          mov    $0x4008db,%edi
  4008c0:       e8 8b fe ff ff          callq  400750 <GOMP_parallel_start@plt>
  4008c5:       bf 00 00 00 00          mov    $0x0,%edi
  4008ca:       e8 0c 00 00 00          callq  4008db <main._omp_fn.0>
  4008cf:       e8 8c fe ff ff          callq  400760 <GOMP_parallel_end@plt>
  4008d4:       b8 00 00 00 00          mov    $0x0,%eax
  4008d9:       5d                      pop    %rbp
  4008da:       c3                      retq
00000000004008db <main._omp_fn.0>:
  4008db:       55                      push   %rbp
  4008dc:       48 89 e5                mov    %rsp,%rbp
  4008df:       48 83 ec 10             sub    $0x10,%rsp
  4008e3:       48 89 7d f8             mov    %rdi,-0x8(%rbp)
  4008e7:       c7 04 24 00 00 00 00    movl   $0x0,(%rsp)		# 參數 flags
  4008ee:       41 b9 01 00 00 00       mov    $0x1,%r9d			# 參數 if_clause
  4008f4:       41 b8 01 00 00 00       mov    $0x1,%r8d			# 參數 arg_align
  4008fa:       b9 00 00 00 00          mov    $0x0,%ecx			# 參數 arg_size
  4008ff:       ba 00 00 00 00          mov    $0x0,%edx			# 參數 cpyfn
  400904:       be 00 00 00 00          mov    $0x0,%esi			# 參數 data
  400909:       bf 15 09 40 00          mov    $0x400915,%edi # 這里就是調用函數 main._omp_fn.1
  40090e:       e8 9d fe ff ff          callq  4007b0 <GOMP_task@plt>
  400913:       c9                      leaveq
  400914:       c3                      retq
0000000000400915 <main._omp_fn.1>:
  400915:       55                      push   %rbp
  400916:       48 89 e5                mov    %rsp,%rbp
  400919:       48 83 ec 10             sub    $0x10,%rsp
  40091d:       48 89 7d f8             mov    %rdi,-0x8(%rbp)
  400921:       e8 4a fe ff ff          callq  400770 <omp_get_thread_num@plt>
  400926:       89 c6                   mov    %eax,%esi
  400928:       bf d0 09 40 00          mov    $0x4009d0,%edi
  40092d:       b8 00 00 00 00          mov    $0x0,%eax
  400932:       e8 49 fe ff ff          callq  400780 <printf@plt>
  400937:       c9                      leaveq
  400938:       c3                      retq
  400939:       0f 1f 80 00 00 00 00    nopl   0x0(%rax)
從上面程序反匯編的結果我們可以知道,在主函數當中仍然和之前一樣在并行域前后分別調用了 GOMP_parallel_start 和 GOMP_parallel_end,然后在兩個函數之間調用并行域的代碼 main._omp_fn.0 ,并行域當中的代碼被編譯成函數 main._omp_fn.0 ,從上面的匯編代碼我們可以看到在函數 main._omp_fn.0 調用了函數 GOMP_task ,這個函數的函數聲明如下所示:
void
GOMP_task (void (*fn) (void *), void *data, void (*cpyfn) (void *, void *),
	   long arg_size, long arg_align, bool if_clause, unsigned flags);
在這里我們重要解釋一下部分參數,首先我們需要了解的是在 x86 當中的函數調用規約:
| 寄存器 | 含義 |
|---|---|
| rdi | 第一個參數 |
| rsi | 第二個參數 |
| rdx | 第三個參數 |
| rcx | 第四個參數 |
| r8 | 第五個參數 |
| r9 | 第六個參數 |
根據上面的寄存器和參數的對應關系,在上面的匯編代碼當中已經標注了對應的參數。在這些參數當中最重要的一個參數就是第一個函數指針,對應的匯編語句為 mov $0x400915,%edi,可以看到的是傳入的函數的地址為 0x400915,根據上面的匯編程序可以知道這個地址對應的函數就是 main._omp_fn.1,這其實就是 task 區域之間被編譯之后的對應的函數,從上面的 main._omp_fn.1 匯編程序當中也可以看出來調用了函數 omp_get_thread_num,這和前面的 task 區域當中代碼是相對應的。
現在我們來解釋一下其他的幾個參數:
fn,task 區域被編譯之后的函數地址。
data,函數 fn 的參數。
cpyfn,參數拷貝函數,一般是 NULL,有時候需要 task 當中的數據不能是共享的,需要時私有的,這個時候可能就需要數據拷貝函數,如果有數據需要及進行拷貝而且這個參數還為 NULL 的話,那么在 OpenMP 內部就會使用 memcpy 進行內存拷貝。
arg_size,參數的大小。
arg_align,參數多少字節對齊。
if_clause,if 子句當中的比較結果,如果沒有 if 字句的話就是 true 。
flags,用于表示 task construct 的特征或者屬性,比如是否是最終任務。
我們現在使用另外一個例子,來看看參數傳遞的變化。
#include <stdio.h>
#include <omp.h>
int main()
{
#pragma omp parallel num_threads(4) default(none)
  {
     int data = omp_get_thread_num();
#pragma omp task default(none) firstprivate(data) if(data > 100)
    {
       data = omp_get_thread_num();
       printf("data = %d Hello World from tid = %d\n", data, omp_get_thread_num());
    }
  }
  return 0;
}
上面的程序被編譯之后對應的匯編程序如下所示:
00000000004008ad <main>:
  4008ad:       55                      push   %rbp
  4008ae:       48 89 e5                mov    %rsp,%rbp
  4008b1:       48 83 ec 10             sub    $0x10,%rsp
  4008b5:       ba 04 00 00 00          mov    $0x4,%edx
  4008ba:       be 00 00 00 00          mov    $0x0,%esi
  4008bf:       bf df 08 40 00          mov    $0x4008df,%edi
  4008c4:       e8 87 fe ff ff          callq  400750 <GOMP_parallel_start@plt>
  4008c9:       bf 00 00 00 00          mov    $0x0,%edi
  4008ce:       e8 0c 00 00 00          callq  4008df <main._omp_fn.0>
  4008d3:       e8 88 fe ff ff          callq  400760 <GOMP_parallel_end@plt>
  4008d8:       b8 00 00 00 00          mov    $0x0,%eax
  4008dd:       c9                      leaveq
  4008de:       c3                      retq
00000000004008df <main._omp_fn.0>:
  4008df:       55                      push   %rbp
  4008e0:       48 89 e5                mov    %rsp,%rbp
  4008e3:       48 83 ec 20             sub    $0x20,%rsp
  4008e7:       48 89 7d e8             mov    %rdi,-0x18(%rbp)
  4008eb:       e8 80 fe ff ff          callq  400770 <omp_get_thread_num@plt>
  4008f0:       89 45 fc                mov    %eax,-0x4(%rbp)
  4008f3:       83 7d fc 64             cmpl   $0x64,-0x4(%rbp)
  4008f7:       0f 9f c2                setg   %dl
  4008fa:       8b 45 fc                mov    -0x4(%rbp),%eax
  4008fd:       89 45 f0                mov    %eax,-0x10(%rbp)
  400900:       48 8d 45 f0             lea    -0x10(%rbp),%rax
  400904:       c7 04 24 00 00 00 00    movl   $0x0,(%rsp)	# 參數 flags
  40090b:       41 89 d1                mov    %edx,%r9d	# 參數 if_clause
  40090e:       41 b8 04 00 00 00       mov    $0x4,%r8d	# 參數 arg_align
  400914:       b9 04 00 00 00          mov    $0x4,%ecx	# 參數 arg_size
  400919:       ba 00 00 00 00          mov    $0x0,%edx	# 參數 cpyfn
  40091e:       48 89 c6                mov    %rax,%rsi	# 參數 data
  400921:       bf 2d 09 40 00          mov    $0x40092d,%edi	# 這里就是調用函數 main._omp_fn.1
  400926:       e8 85 fe ff ff          callq  4007b0 <GOMP_task@plt>
  40092b:       c9                      leaveq
  40092c:       c3                      retq
000000000040092d <main._omp_fn.1>:
  40092d:       55                      push   %rbp
  40092e:       48 89 e5                mov    %rsp,%rbp
  400931:       48 83 ec 20             sub    $0x20,%rsp
  400935:       48 89 7d e8             mov    %rdi,-0x18(%rbp)
  400939:       48 8b 45 e8             mov    -0x18(%rbp),%rax
  40093d:       8b 00                   mov    (%rax),%eax
  40093f:       89 45 fc                mov    %eax,-0x4(%rbp)
  400942:       e8 29 fe ff ff          callq  400770 <omp_get_thread_num@plt>
  400947:       89 c2                   mov    %eax,%edx
  400949:       8b 45 fc                mov    -0x4(%rbp),%eax
  40094c:       89 c6                   mov    %eax,%esi
  40094e:       bf f0 09 40 00          mov    $0x4009f0,%edi
  400953:       b8 00 00 00 00          mov    $0x0,%eax
  400958:       e8 23 fe ff ff          callq  400780 <printf@plt>
  40095d:       c9                      leaveq
  40095e:       c3                      retq
  40095f:       90                      nop
在上面的函數當中我們將 data 一個 4 字節的數據作為線程私有數據,可以看到給函數 GOMP_task 傳遞的參數參數的大小以及參數的內存對齊大小都發生來變化,從原來的 0 變成了 4,這因為 int 類型數據占 4 個字節。
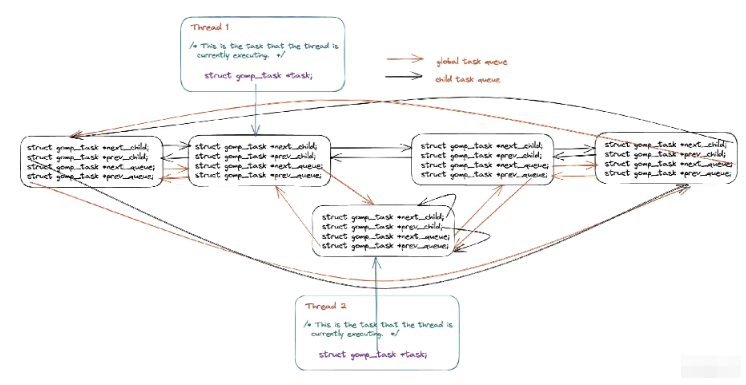
在本小節當中主要談論在 OpenMP 內部是如何實現 task 的,關于這一部分內容設計的內容還是比較龐雜,首先需要了解的是在 OpenMP 當中使用 task construct 的被稱作顯示任務(explicit task),這種任務在 OpenMP 當中會有兩個任務隊列(雙向循環隊列),將所有的任務都保存在這樣一張列表當中,整體結構如下圖所示:

在上圖當中由同一個線程創建的任務為 child_task,他們之間使用 next_child 和 prev_child 兩個指針進行連接,不同線程創建的任務之間可以使用 next_queue 和 prev_queue 兩個指針進行連接。
任務的結構體描述如下所示:
struct gomp_task
{
  struct gomp_task *parent;	// 任務的父親任務
  struct gomp_task *children;	// 子任務
  struct gomp_task *next_child;	// 下一個子任務
  struct gomp_task *prev_child;	// 上一個子任務
  struct gomp_task *next_queue;	// 下一個任務 (不一定是同一個線程創建的子任務)
  struct gomp_task *prev_queue;	// 上一個任務 (不一定是同一個線程創建的子任務)
  struct gomp_task_icv icv; // openmp 當中內部全局設置使用變量的值(internal control variable)
  void (*fn) (void *);	// task construct 被編譯之后的函數
  void *fn_data;	// 函數參數
  enum gomp_task_kind kind; // 任務類型 具體類型如下面的枚舉類型
  bool in_taskwait;	// 是否處于 taskwait 狀態
  bool in_tied_task; // 是不是在綁定任務當中
  bool final_task; // 是不是最終任務
  gomp_sem_t taskwait_sem; // 對象鎖 用于保證線程操作這個數據的時候的線程安全
};
// openmp 當中的任務的狀態
enum gomp_task_kind
{
  GOMP_TASK_IMPLICIT,
  GOMP_TASK_IFFALSE,
  GOMP_TASK_WAITING,
  GOMP_TASK_TIED
};
在了解完上面的數據結構之后我們來看一下前面的給 OpenMP 內部提交任務的函數 GOMP_task,其源代碼如下所示:
/* Called when encountering an explicit task directive.  If IF_CLAUSE is
   false, then we must not delay in executing the task.  If UNTIED is true,
   then the task may be executed by any member of the team.  */
void
GOMP_task (void (*fn) (void *), void *data, void (*cpyfn) (void *, void *),
	   long arg_size, long arg_align, bool if_clause, unsigned flags)
{
  struct gomp_thread *thr = gomp_thread ();
  // team 是 OpenMP 一個線程組當中共享的數據
  struct gomp_team *team = thr->ts.team;
#ifdef HAVE_BROKEN_POSIX_SEMAPHORES
  /* If pthread_mutex_* is used for omp_*lock*, then each task must be
     tied to one thread all the time.  This means UNTIED tasks must be
     tied and if CPYFN is non-NULL IF(0) must be forced, as CPYFN
     might be running on different thread than FN.  */
  if (cpyfn)
    if_clause = false;
  if (flags & 1)
    flags &= ~1;
#endif
  // 這里表示如果是 if 子句的條件為真的時候或者是孤立任務(team == NULL )或者是最終任務的時候或者任務隊列當中的任務已經很多的時候
  // 提交的任務需要立即執行而不能夠放入任務隊列當中然后在 GOMP_parallel_end 函數當中進行任務的取出
  // 再執行
  if (!if_clause || team == NULL
      || (thr->task && thr->task->final_task)
      || team->task_count > 64 * team->nthreads)
    {
      struct gomp_task task;
      gomp_init_task (&task, thr->task, gomp_icv (false));
      task.kind = GOMP_TASK_IFFALSE;
      task.final_task = (thr->task && thr->task->final_task) || (flags & 2);
      if (thr->task)
	task.in_tied_task = thr->task->in_tied_task;
      thr->task = &task;
      if (__builtin_expect (cpyfn != NULL, 0))
	{
        // 這里是進行數據的拷貝
	  char buf[arg_size + arg_align - 1];
	  char *arg = (char *) (((uintptr_t) buf + arg_align - 1)
				& ~(uintptr_t) (arg_align - 1));
	  cpyfn (arg, data);
	  fn (arg);
	}
      else
        // 如果不需要進行數據拷貝則直接執行這個函數
	fn (data);
      /* Access to "children" is normally done inside a task_lock
	 mutex region, but the only way this particular task.children
	 can be set is if this thread's task work function (fn)
	 creates children.  So since the setter is *this* thread, we
	 need no barriers here when testing for non-NULL.  We can have
	 task.children set by the current thread then changed by a
	 child thread, but seeing a stale non-NULL value is not a
	 problem.  Once past the task_lock acquisition, this thread
	 will see the real value of task.children.  */
      if (task.children != NULL)
	{
	  gomp_mutex_lock (&team->task_lock);
	  gomp_clear_parent (task.children);
	  gomp_mutex_unlock (&team->task_lock);
	}
      gomp_end_task ();
    }
  else
    {
    // 下面就是將任務先提交到任務隊列當中然后再取出執行
      struct gomp_task *task;
      struct gomp_task *parent = thr->task;
      char *arg;
      bool do_wake;
      task = gomp_malloc (sizeof (*task) + arg_size + arg_align - 1);
      arg = (char *) (((uintptr_t) (task + 1) + arg_align - 1)
		      & ~(uintptr_t) (arg_align - 1));
      gomp_init_task (task, parent, gomp_icv (false));
      task->kind = GOMP_TASK_IFFALSE;
      task->in_tied_task = parent->in_tied_task;
      thr->task = task;
    // 這里就是參數拷貝邏輯 如果存在拷貝函數就通過拷貝函數進行參數賦值 否則使用 memcpy 進行
    // 參數的拷貝
      if (cpyfn)
	cpyfn (arg, data);
      else
	memcpy (arg, data, arg_size);
      thr->task = parent;
      task->kind = GOMP_TASK_WAITING;
      task->fn = fn;
      task->fn_data = arg;
      task->in_tied_task = true;
      task->final_task = (flags & 2) >> 1;
    // 在這里獲取全局隊列鎖 保證下面的代碼在多線程條件下的線程安全
    // 因為在下面的代碼當中會對全局的隊列進行修改操作 下面的操作就是隊列的一些基本操作啦
      gomp_mutex_lock (&team->task_lock);
      if (parent->children)
	{
	  task->next_child = parent->children;
	  task->prev_child = parent->children->prev_child;
	  task->next_child->prev_child = task;
	  task->prev_child->next_child = task;
	}
      else
	{
	  task->next_child = task;
	  task->prev_child = task;
	}
      parent->children = task;
      if (team->task_queue)
	{
	  task->next_queue = team->task_queue;
	  task->prev_queue = team->task_queue->prev_queue;
	  task->next_queue->prev_queue = task;
	  task->prev_queue->next_queue = task;
	}
      else
	{
	  task->next_queue = task;
	  task->prev_queue = task;
	  team->task_queue = task;
	}
      ++team->task_count;
      gomp_team_barrier_set_task_pending (&team->barrier);
      do_wake = team->task_running_count + !parent->in_tied_task
		< team->nthreads;
      gomp_mutex_unlock (&team->task_lock);
      if (do_wake)
	gomp_team_barrier_wake (&team->barrier, 1);
    }
}
對于上述所討論的內容大家只需要了解相關的整體流程即可,細節除非你是 openmp 的開發人員,否則事實上沒有多大用,大家只需要了解大致過程即可,幫助你進一步深入理解 OpenMP 內部的運行機制。
但是需要了解的是上面的整個過程還只是將任務提交到 OpenMP 內部的任務隊列當中,還沒有執行,我們在前面談到過在線程執行完并行域的代碼會執行函數 GOMP_parallel_end 在這個函數內部還會調用其他函數,最終會調用函數 gomp_barrier_handle_tasks 將內部的所有的任務執行完成。
void
gomp_barrier_handle_tasks (gomp_barrier_state_t state)
{
  struct gomp_thread *thr = gomp_thread ();
  struct gomp_team *team = thr->ts.team;
  struct gomp_task *task = thr->task;
  struct gomp_task *child_task = NULL;
  struct gomp_task *to_free = NULL;
  // 首先對全局的隊列結構進行加鎖操作
  gomp_mutex_lock (&team->task_lock);
  if (gomp_barrier_last_thread (state))
    {
      if (team->task_count == 0)
	{
	  gomp_team_barrier_done (&team->barrier, state);
	  gomp_mutex_unlock (&team->task_lock);
	  gomp_team_barrier_wake (&team->barrier, 0);
	  return;
	}
      gomp_team_barrier_set_waiting_for_tasks (&team->barrier);
    }
  while (1)
    {
      if (team->task_queue != NULL)
	{
	  struct gomp_task *parent;
	// 從任務隊列當中拿出一個任務
	  child_task = team->task_queue;
	  parent = child_task->parent;
	  if (parent && parent->children == child_task)
	    parent->children = child_task->next_child;
	  child_task->prev_queue->next_queue = child_task->next_queue;
	  child_task->next_queue->prev_queue = child_task->prev_queue;
	  if (child_task->next_queue != child_task)
	    team->task_queue = child_task->next_queue;
	  else
	    team->task_queue = NULL;
	  child_task->kind = GOMP_TASK_TIED;
	  team->task_running_count++;
	  if (team->task_count == team->task_running_count)
	    gomp_team_barrier_clear_task_pending (&team->barrier);
	}
      gomp_mutex_unlock (&team->task_lock);
      if (to_free) // 釋放任務的內存空間 to_free 在后面會被賦值成 child_task
	{
	  gomp_finish_task (to_free);
	  free (to_free);
	  to_free = NULL;
	}
      if (child_task) // 調用任務對應的函數
	{
	  thr->task = child_task;
	  child_task->fn (child_task->fn_data);
	  thr->task = task;
	}
      else
	return; // 退出 while 循環
      gomp_mutex_lock (&team->task_lock);
      if (child_task)
	{
	  struct gomp_task *parent = child_task->parent;
	  if (parent)
	    {
	      child_task->prev_child->next_child = child_task->next_child;
	      child_task->next_child->prev_child = child_task->prev_child;
	      if (parent->children == child_task)
		{
		  if (child_task->next_child != child_task)
		    parent->children = child_task->next_child;
		  else
		    {
		      /* We access task->children in GOMP_taskwait
			 outside of the task lock mutex region, so
			 need a release barrier here to ensure memory
			 written by child_task->fn above is flushed
			 before the NULL is written.  */
		      __atomic_store_n (&parent->children, NULL,
					MEMMODEL_RELEASE);
		      if (parent->in_taskwait)
			gomp_sem_post (&parent->taskwait_sem);
		    }
		}
	    }
	  gomp_clear_parent (child_task->children);
	  to_free = child_task;
	  child_task = NULL;
	  team->task_running_count--;
	  if (--team->task_count == 0
	      && gomp_team_barrier_waiting_for_tasks (&team->barrier))
	    {
	      gomp_team_barrier_done (&team->barrier, state);
	      gomp_mutex_unlock (&team->task_lock);
	      gomp_team_barrier_wake (&team->barrier, 0);
	      gomp_mutex_lock (&team->task_lock);
	    }
	}
    }
}
到此,相信大家對“OpenMP task construct實現原理源碼分析”有了更深的了解,不妨來實際操作一番吧!這里是億速云網站,更多相關內容可以進入相關頻道進行查詢,關注我們,繼續學習!
免責聲明:本站發布的內容(圖片、視頻和文字)以原創、轉載和分享為主,文章觀點不代表本網站立場,如果涉及侵權請聯系站長郵箱:is@yisu.com進行舉報,并提供相關證據,一經查實,將立刻刪除涉嫌侵權內容。