您好,登錄后才能下訂單哦!
您好,登錄后才能下訂單哦!
本篇內容介紹了“Springboot怎么添加server.servlet.context-path”的有關知識,在實際案例的操作過程中,不少人都會遇到這樣的困境,接下來就讓小編帶領大家學習一下如何處理這些情況吧!希望大家仔細閱讀,能夠學有所成!
定義: server.servlet.context-path= # Context path of the application. 應用的上下文路徑,也可以稱為項目路徑,是構成url地址的一部分。
server.servlet.context-path不配置時,默認為 / ,如:localhost:8080/xxxxxx
當server.servlet.context-path有配置時,比如 /demo,此時的訪問方式為localhost:8080/demo/xxxxxx
1、springboot 2.0之前,配置為 server.context-path
2、springboot 2.0之后,配置為 server.servlet.context-path
原來的運營項目(已上線),配置文件添加 server.servlet.context-path 配置后,需要在thymleaf 中進行action請求的追加嗎?
答案:不需要。
栗子:
前端頁面采取form請求
<form th:action="@{/user/userLogin}" method="post" id="userLogin"></form>action攔截接受方式
@Controller
@RequestMapping("/user")
public class LoginController {

@PostMapping("/userLogin")
public String userLogin(HttpServletRequest request, Model model) {
原項目的基礎上,追加一個配置
server: port: 8080 servlet: context-path: /demo
只需要再開始進入首頁時,追加 localhost:8080/demo ,后續的thymleaf中的href和action等無需添加/demo 。
設定應用的context-path.
根據 springboot版本context-path不同:
如果是springboot2.0以下,用配置server.context-path=/demo
如果是springboot2.0以上,用配置server.servlet.context-path=/demo
設定dispatcher servlet的監聽路徑,默認為: /
示例:
如果配置了server.servlet-path = /demo,訪問路徑就是http://ip:port/demo/...
不配置或server.servlet-path = /,訪問路徑就是http://ip:port/...
小拓展:
1.只配置了server.servlet-path = /demo,訪問路徑是http://ip:port/demo/...
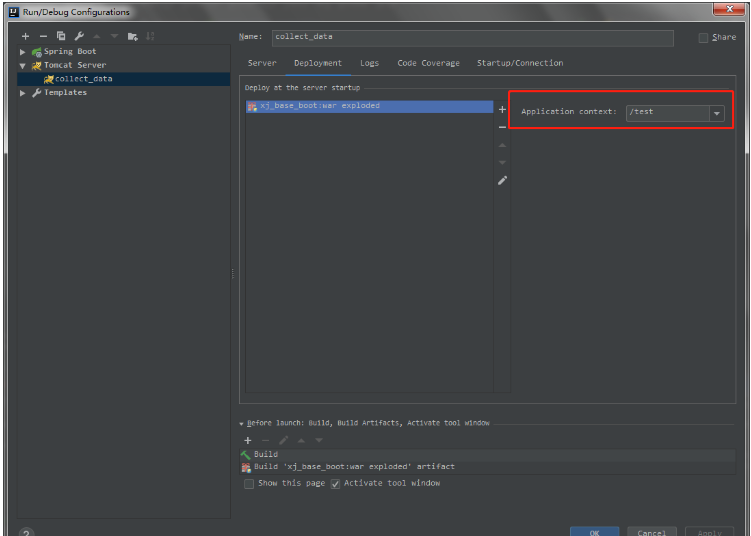
2.如果使用的idea,只在Tomcat配置了 Application context了,訪問路徑是http://ip:port/test/...
3.如果使用的idea,已經在Tomcat配置了 Application context了(下圖),也配置了server.servlet-path = /demo,訪問路徑是http://ip:port/test/demo/...

“Springboot怎么添加server.servlet.context-path”的內容就介紹到這里了,感謝大家的閱讀。如果想了解更多行業相關的知識可以關注億速云網站,小編將為大家輸出更多高質量的實用文章!
免責聲明:本站發布的內容(圖片、視頻和文字)以原創、轉載和分享為主,文章觀點不代表本網站立場,如果涉及侵權請聯系站長郵箱:is@yisu.com進行舉報,并提供相關證據,一經查實,將立刻刪除涉嫌侵權內容。