您好,登錄后才能下訂單哦!
您好,登錄后才能下訂單哦!
這篇文章主要介紹“Android在子線程中怎么調用Handler”的相關知識,小編通過實際案例向大家展示操作過程,操作方法簡單快捷,實用性強,希望這篇“Android在子線程中怎么調用Handler”文章能幫助大家解決問題。
如果是Handler寫在了子線程中的話,我們就需要自己創建一個Looper對象了:創建的流程如下:
直接調用Looper.prepare()方法即可為當前線程創建Looper對象,而它的構造器會創建配套的MessageQueue;
創建Handler對象,重寫handleMessage( )方法就可以處理來自于其他線程的信息了!
調用Looper.loop()方法啟動Looper
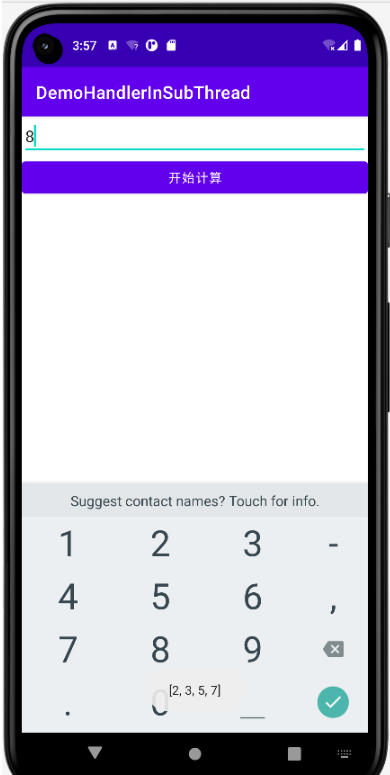
輸入一個數,計算后通過Toast輸出在這個范圍內的所有質數,如下截圖。

<?xml version="1.0" encoding="utf-8"?>
<LinearLayout
    xmlns:android="http://schemas.android.com/apk/res/android"
    android:layout_width="match_parent"
    android:layout_height="match_parent"
    android:orientation="vertical">
    <EditText
        android:id="@+id/inputNum"
        android:inputType="number"
        android:layout_width="match_parent"
        android:layout_height="wrap_content"
        android:hint="請輸入計算范圍"/>
    <Button
        android:id="@+id/buttonCalc"
        android:layout_width="match_parent"
        android:layout_height="wrap_content"
        android:text="開始計算"/>
</LinearLayout>
很簡單,前端有一個輸入框一個按鈕。
來看后端代碼
package org.mk.android.demo;

import androidx.annotation.NonNull;
import androidx.appcompat.app.AppCompatActivity;

import android.os.Bundle;
import android.os.Handler;
import android.os.Looper;
import android.os.Message;
import android.view.View;
import android.widget.Button;
import android.widget.EditText;
import android.widget.Toast;

import java.util.ArrayList;
import java.util.List;

public class MainActivity extends AppCompatActivity {

    private static final String INPUT_NUM = "inputNum";
    private EditText inputNum;
    private Button buttonCal;
    CalThread calThread;

    class CalThread extends Thread
    {
        public Handler mHandler;

        public void run()
        {
            Looper.prepare();
            mHandler = new Handler(new Handler.Callback() {
                @Override
                public boolean handleMessage(@NonNull Message msg) {
                    if(msg.what == 101)
                    {
                        int inputNum = msg.getData().getInt(INPUT_NUM);
                        List<Integer> nums = new ArrayList<Integer>();
                        // 計算從2開始、到upper的所有質數
                        outer:
                        for (int i = 2 ; i <= inputNum ; i++)
                        {
                            // 用i處于從2開始、到i的平方根的所有數
                            for (int j = 2 ; j <= Math.sqrt(i) ; j++)
                            {
                                // 如果可以整除,表明這個數不是質數
                                if(i != 2 && i % j == 0)
                                {
                                    continue outer;
                                }
                            }
                            nums.add(i);
                        }
                        // 使用Toast顯示統計出來的所有質數
                        Toast.makeText(MainActivity.this , nums.toString()
                                , Toast.LENGTH_LONG).show();
                    }
                    return false;
                }
            });

            Looper.loop();
        }
    }
    public void cal(View source)
    {
        // 創建消息
        Message msg = new Message();
        msg.what = 101;
        Bundle bundle = new Bundle();
        bundle.putInt(INPUT_NUM ,
                Integer.parseInt(inputNum.getText().toString()));
        msg.setData(bundle);
        // 向新線程中的Handler發送消息
        calThread.mHandler.sendMessage(msg);
    }
    @Override
    protected void onCreate(Bundle savedInstanceState) {
        super.onCreate(savedInstanceState);
        setContentView(R.layout.activity_main);
        buttonCal=(Button)findViewById(R.id.buttonCalc);
        inputNum=(EditText)findViewById(R.id.inputNum);
        buttonCal.setOnClickListener(new View.OnClickListener() {
            @Override
            public void onClick(View view) {
                cal(view);
            }
        });
        calThread=new CalThread();
        calThread.start();
    }
}
后端代碼我們使用的是求給定數字范圍內有幾個質數里比較高效的一種算法。
關鍵在于:
使用線程,在線程開始我們使用:Loop.prepare,在運算完后使用Loop.loop();
使用mHandler = new Handler(new Handler.Callback()進行監聽;
使用message發送主界面輸入的“質數”給到在監聽的mHandler;
當mHandler監聽到有消息到達后開始運算質數集,運算后把結果以Toast輸出
關于“Android在子線程中怎么調用Handler”的內容就介紹到這里了,感謝大家的閱讀。如果想了解更多行業相關的知識,可以關注億速云行業資訊頻道,小編每天都會為大家更新不同的知識點。
免責聲明:本站發布的內容(圖片、視頻和文字)以原創、轉載和分享為主,文章觀點不代表本網站立場,如果涉及侵權請聯系站長郵箱:is@yisu.com進行舉報,并提供相關證據,一經查實,將立刻刪除涉嫌侵權內容。