您好,登錄后才能下訂單哦!
您好,登錄后才能下訂單哦!
這篇文章主要介紹“Java中的異步與線程池怎么創建使用”的相關知識,小編通過實際案例向大家展示操作過程,操作方法簡單快捷,實用性強,希望這篇“Java中的異步與線程池怎么創建使用”文章能幫助大家解決問題。
	Thread01 thread01 = new Thread01();
	thread01.start();

    public static  class Thread01 extends Thread{
        @Override
        public void run() {
            System.out.println("當前線程:"+Thread.currentThread().getId());
            int i = 10 / 2;
            System.out.println("運行結果:"+i);
        }
} Runnable01 runnable01 = new Runnable01();
new Thread(runnable01).start();
public static class Runnable01 implements Runnable{
@Override
public void run() {
System.out.println("當前線程:"+Thread.currentThread().getId());
int i = 10 / 2;
System.out.println("運行結果:"+i);
}
} Callabel01 callabel01 = new Callabel01();
FutureTask<Integer> integerFutureTask = new FutureTask<>(callabel01);
//阻塞等待整個線程執行完成,獲取返回結果
Integer integer = integerFutureTask.get();
new Thread(integerFutureTask).start();
public static class Callabel01 implements Callable<Integer> {
@Override
public Integer call() throws Exception {
System.out.println("當前線程:"+Thread.currentThread().getId());
int i = 10 / 2;
System.out.println("運行結果:"+i);
return i;
}
}在業務代碼里面不建議使用以上三種啟動線程的方式
應該將所有的多線程異步任務都交給線程池執行,進行有效的資源控制
//當前系統中池只有一兩個,每一個異步任務直接提交給線程池,讓他自己去執行
ExecutorService service = Executors.newFixedThreadPool(10);
//執行
service.execute(new Runnable01());
區別
1/2兩種方式都不能獲取返回值
1/2/3都不能達到資源控制的效果
只有4能控制資源,系統性能是穩定的
//當前系統中池只有一兩個,每一個異步任務直接提交給線程池,讓他自己去執行
ExecutorService service = Executors.newFixedThreadPool(10);
//執行
service.execute(new Runnable01());
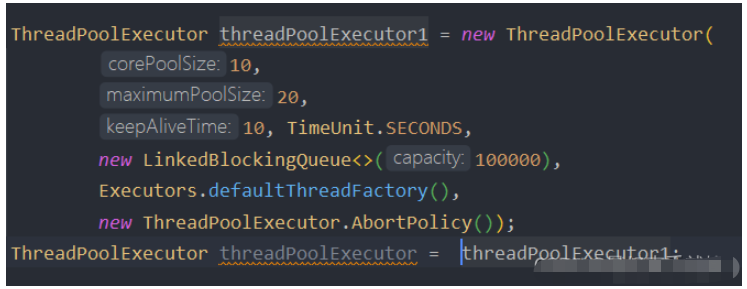
ThreadPoolExecutor需要傳入七大參數
corePoolSize 核心線程數【一直存在,除非設置了允許線程超時的設置:allowCoreThreadTimeOut】,保留在池中的線程數,線程池創建后好后就準備就緒的線程數,就等待異步任務去執行,new 好了 Thread,等待異步任務
maximumPoolSize 池中最大線程數量,控制資源并發
keepAliveTime 存活時間,當前正在運行的線程數量,大于核心線程數,就會釋放空閑的線程,只要線程空閑大于指定存活時間,釋放的線程是指最大的線程數量減去核心線程數,
unit 時間單位
BlockingQueue workQueue 阻塞隊列,如果任務有很多,就會將目前多的隊伍放在隊列里面,只要有空閑的線程,就會去隊列里面取出新的任務繼續執行。
new LinkedBlockingQueue<>() 默認值是Integer的最大值,會導致內存不夠,一定要傳入業務定制的大小,可以通過壓測得出峰值
threadFactory 線程的創建工廠
handler 如果隊列滿了,按照我們指定的拒絕策略拒絕執行任務
準備好core 數量的核心線程,準備接受任務新的任務進來,用core 準備好的空閑線程執行。
(1) 、core 滿了,就將再進來的任務放入阻塞隊列中。空閑的core 就會自己去阻塞隊列獲取任務執行
(2) 、阻塞隊列滿了,就直接開新線程執行,最大只能開到max 指定的數量
(3) 、max 都執行好了。Max-core 數量空閑的線程會在keepAliveTime 指定的時間后自動銷毀。最終保持到core 大小
(4) 、如果線程數開到了max 的數量,還有新任務進來,就會使用reject 指定的拒絕策略進行處理所有的線程創建都是由指定的factory 創建的。
一個線程池core 7; max 20 ,queue:50,100 并發進來怎么分配的;先有7 個能直接得到執行,接下來50 個進入隊列排隊,在多開13 個繼續執行。
現在70 個被安排上了。剩下30 個默認拒絕策略。拒絕策略一般是拋棄,如果不想拋棄還要執行,可以使用同步的方式執行,或者丟棄最老的
newCachedThreadPool創建一個可緩存線程池,如果線程池長度超過處理需要,可靈活回收空閑線程,若無可回收,則新建線程。核心線程固定是0,所有都可回收
newFixedThreadPool創建一個固定長線程池,可控制線程最大并發數,超出的線程會在隊列中等待。固定大小,核心 = 最大
newScheduledThreadPool創建一個固定長線程池,支持定時及周期性任務執行。定時任務線程池
newSingleThreadExecutor創建一個單線程化的線程池,它只會用唯一的工作線程來執行任務,保證所有任務按照指定順序(FIFO, LIFO, 優先級)執行。后臺從隊列里面獲取任務 挨個執行
降低資源的消耗
通過重復利用已經創建好的線程降低線程的創建和銷毀帶來的損耗
提高響應速度
因為線程池中的線程數沒有超過線程池的最大上限時,有的線程處于等待分配任務的狀態,當任務來時無需創建新的線程就能執行
提高線程的可管理性
線程池會根據當前系統特點對池內的線程進行優化處理,減少創建和銷毀線程帶來的系統開銷。無限的創建和銷毀線程不僅消耗系統資源,還降低系統的穩定性,使用線程池進行統一分配
業務場景:
查詢商品詳情頁的邏輯比較復雜,有些數據還需要遠程調用,必然需要花費更多的時間
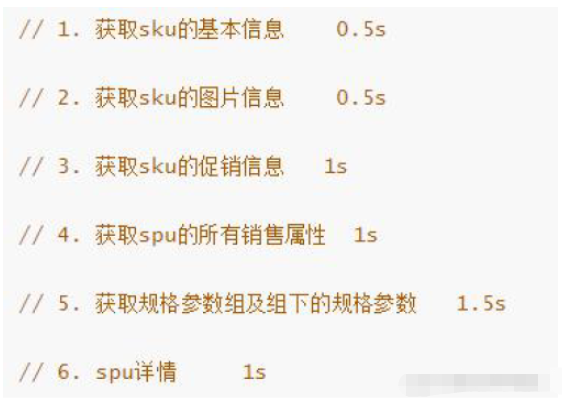
假如商品詳情頁的每個查詢,需要如下標注的時間才能完成那么,用戶需要5.5s 后才能看到商品詳情頁的內容。很顯然是不能接受的。
如果有多個線程同時完成這6 步操作,也許只需要1.5s 即可完成響應。
CompletableFuture 和FutureTask 同屬于Future 接口的實現類,都可以獲取線程的執行結果。
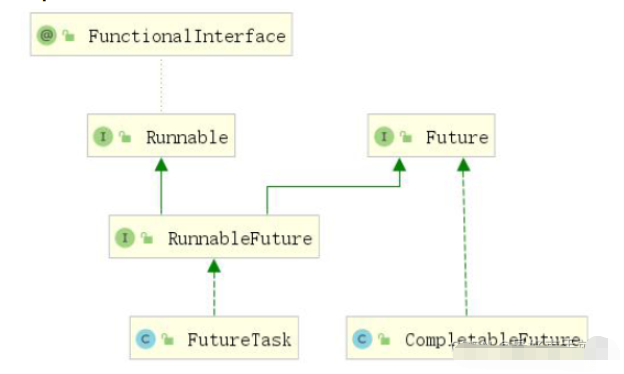

1、runXxxx 都是沒有返回結果的,supplyXxx 都是可以獲取返回結果的
2、可以傳入自定義的線程池,否則就用默認的線程池;
沒有返回結果的
static ExecutorService service = Executors.newFixedThreadPool(10);
CompletableFuture.runAsync(()->{
     System.out.println("當前線程:"+Thread.currentThread().getId());
     int i = 10 / 2;
     System.out.println("運行結果:"+i);
 },service);
有返回結果的
static ExecutorService service = Executors.newFixedThreadPool(10);
CompletableFuture<Integer> future = CompletableFuture.supplyAsync(() -> {
	 System.out.println("當前線程:" + Thread.currentThread().getId());
	 int i = 10 / 2;
	 System.out.println("運行結果:" + i);
	 return i;
}, service);
	Integer integer = future.get();
	System.out.println("main----end"+integer);
whenComplete 可以處理正常和異常的計算結果,雖然可以得到異常信息,但是不能修改返回數據exceptionally 處理異常情況。
可以感知異常并返回默認值whenComplete 和whenCompleteAsync 的區別:
whenComplete:是執行當前任務的線程執行繼續執行whenComplete 的任務。
whenCompleteAsync:是執行把whenCompleteAsync 這個任務繼續提交給線程池來進行執行。
方法不以Async 結尾,意味著Action 使用相同的線程執行,而Async 可能會使用其他線程執行(如果是使用相同的線程池,也可能會被同一個線程選中執行)
    public static void main(String[] args) throws ExecutionException, InterruptedException {
        System.out.println("main----start");
        CompletableFuture<Integer> future = CompletableFuture.supplyAsync(() -> {
            System.out.println("當前線程:" + Thread.currentThread().getId());
            int i = 10 / 0;
            System.out.println("運行結果:" + i);
            return i;
        }, service).whenComplete((res,excption)->{
            System.out.println("異步任務成功完成:結果是::::"+res+"異常是:"+excption);
        }).exceptionally(throwable->{
            //可以感知異常,同時返回數據
            return 10;
        });
        Integer integer = future.get();
        System.out.println("main----end"+integer);
    }
和complete 一樣,可對結果做最后的處理(可處理異常),可改變返回值。
        /* 方法完成后的處理*/
        CompletableFuture<Integer> future = CompletableFuture.supplyAsync(() -> {
            System.out.println("當前線程:" + Thread.currentThread().getId());
            int i = 10 / 4;
            System.out.println("運行結果:" + i);
            return i;
        }, service).handle((res,exption)->{
            if (res != null){
                return res*2;
            }
            if (exption != null){
                return 0;
            }
            return 0;
        });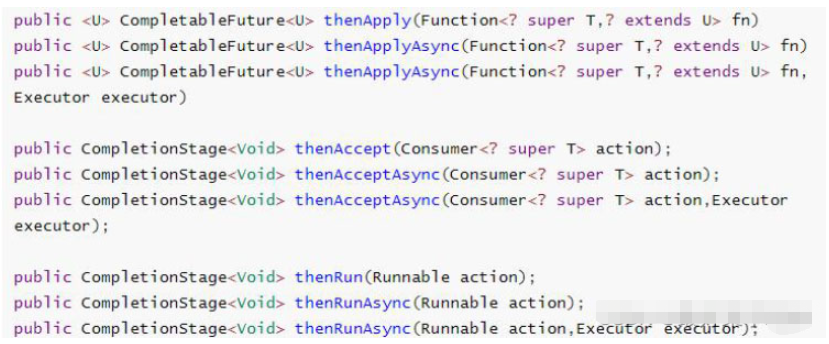
thenApply 方法:當一個線程依賴另一個線程時,獲取上一個任務返回的結果,并返回當前任務的返回值。
thenAccept 方法:能接收上一步的返回結果,但是不能改變返回值。
thenRun 方法:只要上面的任務執行完成,就開始執行thenRun,不能改變返回值帶有Async 默認是異步執行的。同之前。
以上都要前置任務成功完成。
Function<? super T,? extends U>
T:上一個任務返回結果的類型
U:當前任務的返回值類型
thenRun 方法:只要上面的任務執行完成,就開始執行thenRun,不能改變返回值
static ExecutorService service = Executors.newFixedThreadPool(10);

CompletableFuture<Void> future = CompletableFuture.supplyAsync(() -> {
            System.out.println("當前線程:" + Thread.currentThread().getId());
            int i = 10 / 4;
            System.out.println("運行結果:" + i);
            return i;
        }, service).thenRunAsync(() -> {
            System.out.println("任務2啟動了");
        }, service);
thenAccept 方法:能接收上一步的返回結果,但是不能改變返回值。
CompletableFuture<Void> future = CompletableFuture.supplyAsync(() -> {
            System.out.println("當前線程:" + Thread.currentThread().getId());
            int i = 10 / 4;
            System.out.println("運行結果:" + i);
            return i;
        }, service).thenAccept((res)->{
            System.out.println("異步啟動了:"+res);
        });
thenApplyAsync 技能接收上一步的結果,又能改變返回值
 CompletableFuture<Integer> future = CompletableFuture.supplyAsync(() -> {
            System.out.println("當前線程:" + Thread.currentThread().getId());
            int i = 10 / 4;
            System.out.println("運行結果:" + i);
            return i;
        }, service);
        future.thenApplyAsync((res) -> {
            System.out.println("任務2啟動了:" + res);
            return res + "hello";
        }, service);

        System.out.println("main----end"+future.get());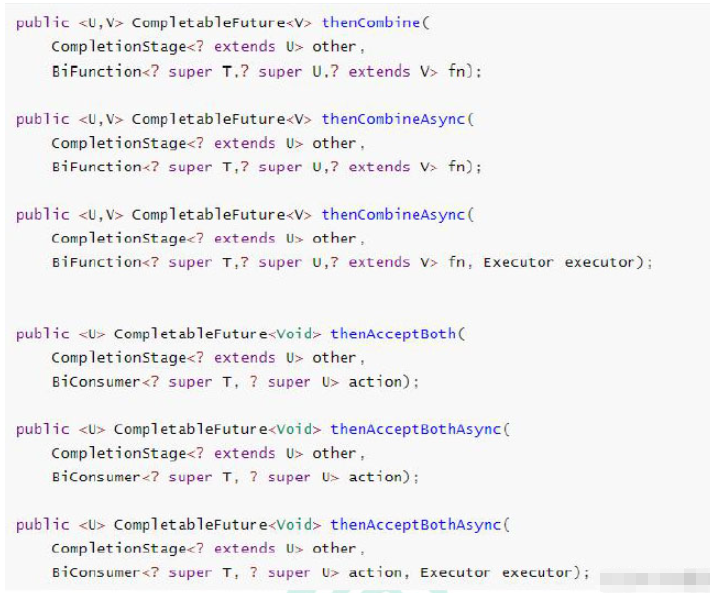

兩個任務必須都完成,觸發該任務。
thenCombine:組合兩個future,獲取兩個future 的返回結果,并返回當前任務的返回值
thenAcceptBoth:組合兩個future,獲取兩個future 任務的返回結果,然后處理任務,沒有返回值。
CompletableFuture<Integer> future01 = CompletableFuture.supplyAsync(() -> {
            System.out.println("任務1線程:" + Thread.currentThread().getId());
            int i = 10 / 4;
            System.out.println("任務1運行結果:" + i);
            return i;
        }, service);

        CompletableFuture<String> future02 = CompletableFuture.supplyAsync(() -> {
            System.out.println("任務2線程:" + Thread.currentThread().getId());
            System.out.println("任務2運行結果:");
            return "hello";
        }, service);

        future01.thenAcceptBothAsync(future02, (f1, f2) -> {
            System.out.println("任務3開始之前的結果---f1=" + f1 + "f2=" + f2);
}, service);runAfterBoth:組合兩個future,不獲取前兩個的結果,只需兩個future 處理完任務后,處理該任務。
        CompletableFuture<Integer> future01 = CompletableFuture.supplyAsync(() -> {
            System.out.println("任務1線程:" + Thread.currentThread().getId());
            int i = 10 / 4;
            System.out.println("任務1運行結果:" + i);
            return i;
        }, service);

        CompletableFuture<String> future02 = CompletableFuture.supplyAsync(() -> {
            System.out.println("任務2線程:" + Thread.currentThread().getId());
            System.out.println("任務2運行結果:");
            return "hello";
        }, service);

        future01.runAfterBothAsync(future02,()->{
            System.out.println("任務3開始");
        },service);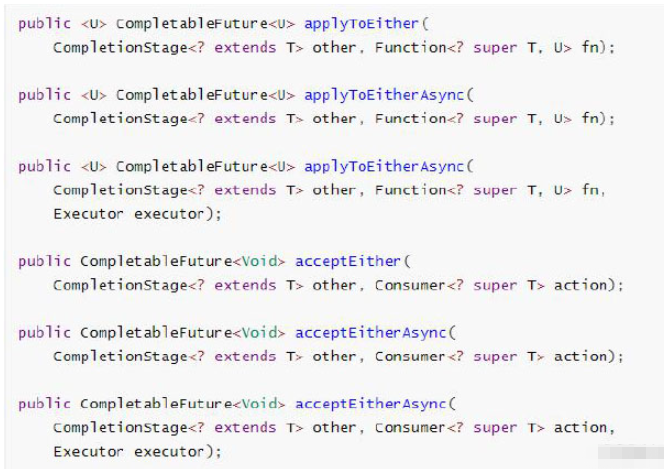

當兩個任務中,任意一個future 任務完成的時候,執行任務。
applyToEither:兩個任務有一個執行完成,獲取它的返回值,處理任務并自己有新的返回值。
        CompletableFuture<Object> future01 = CompletableFuture.supplyAsync(() -> {
            System.out.println("任務1線程:" + Thread.currentThread().getId());
            int i = 10 / 4;
            System.out.println("任務1運行結果:" + i);
            return i;
        }, service);

        CompletableFuture<Object> future02 = CompletableFuture.supplyAsync(() -> {
            System.out.println("任務2線程:" + Thread.currentThread().getId());
            System.out.println("任務2運行結果:");
            return "hello";
        }, service);

        future01.applyToEitherAsync(future02,(t) -> {
            System.out.println("任務3開始"+t);
            return t.toString() + "niubi";
}, service);acceptEither:兩個任務有一個執行完成,獲取它的返回值,處理任務,自己沒有新的返回值。
 CompletableFuture<Object> future01 = CompletableFuture.supplyAsync(() -> {
            System.out.println("任務1線程:" + Thread.currentThread().getId());
            int i = 10 / 4;
            System.out.println("任務1運行結果:" + i);
            return i;
        }, service);

        CompletableFuture<Object> future02 = CompletableFuture.supplyAsync(() -> {
            System.out.println("任務2線程:" + Thread.currentThread().getId());
            System.out.println("任務2運行結果:");
            return "hello";
        }, service);

        future01.acceptEitherAsync(future02,(t) -> {
            System.out.println("任務3開始"+t);
}, service);runAfterEither:兩個任務有一個執行完成,不獲取future 的結果,處理任務,自己也沒有返回值。
CompletableFuture<Integer> future01 = CompletableFuture.supplyAsync(() -> {
            System.out.println("任務1線程:" + Thread.currentThread().getId());
            int i = 10 / 4;
            System.out.println("任務1運行結果:" + i);
            return i;
        }, service);

        CompletableFuture<String> future02 = CompletableFuture.supplyAsync(() -> {
            System.out.println("任務2線程:" + Thread.currentThread().getId());
            System.out.println("任務2運行結果:");
            return "hello";
        }, service);

        future01.runAfterEitherAsync(future02,() -> {
            System.out.println("任務3開始");
        }, service);
allOf:等待所有任務完成
CompletableFuture<String> futureImg = CompletableFuture.supplyAsync(() -> {
            System.out.println("查詢商品的圖片信息");
            return "hello.png";
        }, service);
        CompletableFuture<String> futureAttr = CompletableFuture.supplyAsync(() -> {
            System.out.println("查詢商品的屬性");
            return "黑色+256g";
        }, service);
        CompletableFuture<String> futureDesc = CompletableFuture.supplyAsync(() -> {
            System.out.println("查詢商品的介紹");
            return "華為";
        }, service);

        CompletableFuture<Void> completableFuture = CompletableFuture.allOf(futureImg, futureAttr, futureDesc);
completableFuture.get(); //等待所有結果完成anyOf:只要有一個任務完成
1.添加配置類,新建線程池
package cn.cloud.xmall.product.config;

import org.springframework.context.annotation.Bean;
import org.springframework.context.annotation.Configuration;

import java.util.concurrent.Executors;
import java.util.concurrent.LinkedBlockingQueue;
import java.util.concurrent.ThreadPoolExecutor;
import java.util.concurrent.TimeUnit;

/**
 * @Description: ···
 * @author: Freedom
 * @QQ: 1556507698
 * @date:2022/3/21 17:41
 */
@Configuration
public class MyThreadConfig {

    @Bean
    public ThreadPoolExecutor threadPoolExecutor(){
       return new ThreadPoolExecutor(
                20,
                200,
                10,
                TimeUnit.SECONDS,
                new LinkedBlockingQueue<>(100000),
                Executors.defaultThreadFactory(),
                new ThreadPoolExecutor.AbortPolicy()
                );
    };
}
2.想要在配置文件中手動的配置參數
新建一個配置屬性類
package cn.cloud.xmall.product.config;

import lombok.Data;
import org.springframework.boot.context.properties.ConfigurationProperties;
import org.springframework.context.annotation.Configuration;
import org.springframework.stereotype.Component;

/**
 * @Description: ···
 * @author: Freedom
 * @QQ: 1556507698
 * @date:2022/3/21 17:47
 */
@ConfigurationProperties(prefix = "xmall.thread")
@Component  //加入容器
@Data
public class ThreadPollConfigProperties {
    private Integer coreSize;
    private Integer maxSize;
    private Integer keepAliveTime;
}
注:可以在依賴種添加此依賴,在配置文件中就會有我們自己配置屬性的提示
<dependency>
      <groupId>org.springframework.boot</groupId>
      <artifactId>spring-boot-configuration-processor</artifactId>
      <optional>true</optional>
  </dependency>
3.配置文件配置屬性
#線程池配置
xmall:
  thread:
    core-size: 20
    max-size: 200
    keep-alive-time: 10
4.使用配置文件中的屬性
@EnableConfigurationProperties(ThreadPollConfigProperties.class),如果配置文件類沒有添加@Component加入容器可以使用這種方式
package cn.cloud.xmall.product.config;

import org.springframework.boot.context.properties.EnableConfigurationProperties;
import org.springframework.cache.annotation.EnableCaching;
import org.springframework.context.annotation.Bean;
import org.springframework.context.annotation.Configuration;

import java.util.concurrent.Executors;
import java.util.concurrent.LinkedBlockingQueue;
import java.util.concurrent.ThreadPoolExecutor;
import java.util.concurrent.TimeUnit;

/**
 * @Description: ···
 * @author: Freedom
 * @QQ: 1556507698
 * @date:2022/3/21 17:41
 */
//@EnableConfigurationProperties(ThreadPollConfigProperties.class)
@Configuration
public class MyThreadConfig {

    @Bean
    public ThreadPoolExecutor threadPoolExecutor(ThreadPollConfigProperties pool){
       return new ThreadPoolExecutor(
                pool.getCoreSize(),
                pool.getMaxSize(),
                pool.getKeepAliveTime(),
                TimeUnit.SECONDS,
                new LinkedBlockingQueue<>(100000),
                Executors.defaultThreadFactory(),
                new ThreadPoolExecutor.AbortPolicy()
                );
    };
}
5.注入線程池
    @Autowired
    private ThreadPoolExecutor executor;
6.異步編排
    @Override
    public SkuItemVo item(Long skuId) throws ExecutionException, InterruptedException {

        SkuItemVo skuItemVo = new SkuItemVo();

        //1.使用自己的線程池來新建異步任務
        CompletableFuture<SkuInfoEntity> infoFuture = CompletableFuture.supplyAsync(() -> {
            //1.查詢基本信息 pms_sku_info
            SkuInfoEntity info = getById(skuId);
            skuItemVo.setInfo(info);
            return info;
        }, executor);

        //2.根據一號任務來繼續調用
        CompletableFuture<Void> saleAttrFuture = infoFuture.thenAcceptAsync((res) -> {
            //3.獲取當前spu的銷售屬性組合
            List<SkuItemSaleAttrVo> saleAttrVos = saleAttrValueService.getSaleAttrsBySpuId(res.getSpuId());
            skuItemVo.setSaleAttr(saleAttrVos);
        }, executor);

        //3.根據一號任務來繼續調用
        CompletableFuture<Void> descFuture = infoFuture.thenAcceptAsync((res) -> {
            //4.獲取Spu的介紹 pms_spu_info_desc
            SpuInfoDescEntity spuInfo = spuInfoDescService.getById(res.getSpuId());
            skuItemVo.setDesc(spuInfo);
        }, executor);

        //4.根據一號任務來繼續調用
        CompletableFuture<Void> baseAttrFuture = infoFuture.thenAcceptAsync((res) -> {
            //5.獲取spu的規格參數信息
            List<SpuItemAttrGroupVo> attrGroups = attrGroupService.getAttrGroupWithAttrsBySpuId(res.getSpuId(), res.getCatalogId());
            skuItemVo.setGroupAttrs(attrGroups);
        }, executor);

        //此任務不需要根據一號任務的返回調用,所以開一個新線程
        CompletableFuture<Void> imagesFuture = CompletableFuture.runAsync(() -> {
            //2.獲取sku的圖片信息 pms_sku_images
            List<SkuImagesEntity> images = imagesService.getImagesBySkuId(skuId);
            skuItemVo.setImages(images);
        }, executor);

        //等待所有任務都完成
        //TODO 可以選擇有異常情況下的處理結果
        CompletableFuture.allOf(saleAttrFuture,descFuture,baseAttrFuture,imagesFuture).get();

        return skuItemVo;
    }
關于“Java中的異步與線程池怎么創建使用”的內容就介紹到這里了,感謝大家的閱讀。如果想了解更多行業相關的知識,可以關注億速云行業資訊頻道,小編每天都會為大家更新不同的知識點。
免責聲明:本站發布的內容(圖片、視頻和文字)以原創、轉載和分享為主,文章觀點不代表本網站立場,如果涉及侵權請聯系站長郵箱:is@yisu.com進行舉報,并提供相關證據,一經查實,將立刻刪除涉嫌侵權內容。