您好,登錄后才能下訂單哦!
您好,登錄后才能下訂單哦!
本文小編為大家詳細介紹“fastjson轉換對象實體@JsonProperty不生效如何解決”,內容詳細,步驟清晰,細節處理妥當,希望這篇“fastjson轉換對象實體@JsonProperty不生效如何解決”文章能幫助大家解決疑惑,下面跟著小編的思路慢慢深入,一起來學習新知識吧。
請求第三方應用 返回json數據
第三方返回的數據中,存在java關鍵詞,無法直接使用原屬性名進行對應 例如(class、interface等)使用@JsonProperty注解不能返回正確的結果
@Data
static class User{
     @JsonProperty( "class")
     private String userClass;
     @JsonProperty("interface")
     private String userInterface;
}
public static void main(String[] args) {
    Map<String,Object> map = new HashMap<>();
    map.put("class","測試");
    map.put("interface","測試1");
    String mapStr = JSONObject.toJSONString(map);
    System.out.println(mapStr);
    User user = JSONObject.parseObject(mapStr, User.class);
    System.out.println(user);
}
正常情況來講 @JsonProperty 注解完全夠用,可以成功解析出想要的結果。
但往往事情并不是那么簡單
執行結果 :
{"interface":"測試1","class":"測試"}
User(userClass=null, userInterface=null)
可以看出并沒有成功映射到想要的數據
解決方法有兩種
1、修改屬性名稱,使用原屬性名 + “_”
@Data
static class User{
    @JsonProperty( "class")
    private String class_;
   @JsonProperty("interface")
   private String interface_;
}
public static void main(String[] args) {
    Map<String,Object> map = new HashMap<>();
    map.put("class","測試");
    map.put("interface","測試1");
    String mapStr = JSONObject.toJSONString(map);
    System.out.println(mapStr);
    User user = JSONObject.parseObject(mapStr, User.class);
    System.out.println(user);
}
執行結果 :
{"interface":"測試1","class":"測試"}
User(class_=測試, interface_=測試1)
2、使用fastjson @JSONField注解
@Data
static class User{
@JSONField(name = "class")
private String userClass;
@JSONField(name = "interface")
private String userInterface;
}
public static void main(String[] args) {
    Map<String,Object> map = new HashMap<>();
    map.put("class","測試");
    map.put("interface","測試1");
    String mapStr = JSONObject.toJSONString(map);
    System.out.println(mapStr);
    User user = JSONObject.parseObject(mapStr, User.class);
    System.out.println(user);
}
執行結果:
{"interface":"測試1","class":"測試"}
User(userClass=測試, userInterface=測試1)
@JsonProperty 是Jackson提供的一個用于注解屬性、類、方法等的json注解。使用它可以改變Json序列化時屬性的名稱,一般默認使用屬性名,比如如下的代碼示例,如果沒有使用@JsonProperty注解那么id轉化為json為{“id”:11}.使用了則就是{“Id”:11}.
@JsonInclude(Include.NON_NULL)
public class User implements Serializable {

	@JsonProperty("Id")
	private Integer id;
	@JsonProperty("Name")
	private String name;
	@JsonProperty("pwd")
	private Integer passWord;
}
在一次使用springboot項目時發現@JsonProperty不生效。
那么是因為啥呢?
因為在項目里還引用了fastJson,在debug時發現接口最后響應時是使用FastJson做json序列化。
解決方法:
使用@EnableWebMvc注解,加在啟動類上。或者直接在項目里不引用fastJson.
@EnableWebMvc
public class SpringBootMain extends SpringBootServletInitializer implements WebApplicationInitializer {

   @Override
    protected SpringApplicationBuilder configure(SpringApplicationBuilder application) {
        return application.sources(SpringBootMain.class);
    }
}
springboot 是如何選擇使用json序列化工具的呢?即如何調用jackson進行json序列化和反序列化?
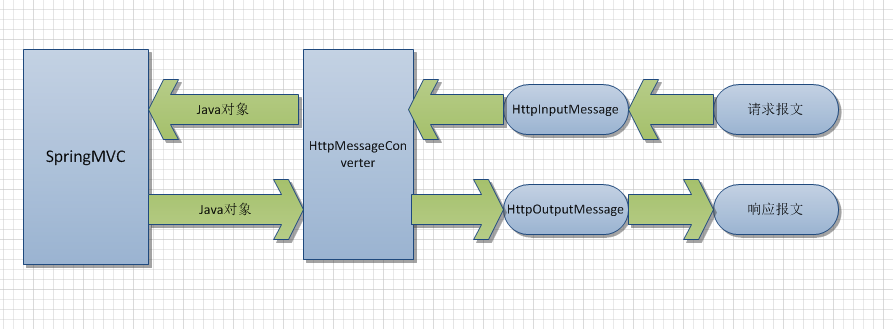
springboot 通過HttpMessageConverters 消息轉換器通過jackson將java對象轉化為json字符串。如果項目里包含多個json工具包比如jackson ,fastjson,那么就會各個年級對象的內容選擇一個合適的去轉換為json。

這是HttpMessageConverters 消息轉換器所處的位置,所以項目里采用那個json工具由該類決定。
springboot默認使用jackson,springboot默認集成的就是jackson。
指定使用fastJson的一種做法:
 public class SpringBootMain extends SpringBootServletInitializer implements WebApplicationInitializer {
    @Bean
    public HttpMessageConverters fastJsonHttpMessageConverters() {
        // 1.定義一個converters轉換消息的對象

        FastJsonHttpMessageConverter fastConverter = new FastJsonHttpMessageConverter();
        // 2.添加fastjson的配置信息,比如: 是否需要格式化返回的json數據

        FastJsonConfig fastJsonConfig = new FastJsonConfig();
        fastJsonConfig.setSerializerFeatures(SerializerFeature.PrettyFormat);
        // 3.在converter中添加配置信息
        fastConverter.setFastJsonConfig(fastJsonConfig);
        // 4.將converter賦值給HttpMessageConverter
        HttpMessageConverter<?> converter = fastConverter;
        // 5.返回HttpMessageConverters對象
        return new HttpMessageConverters(converter);
    }
}
讀到這里,這篇“fastjson轉換對象實體@JsonProperty不生效如何解決”文章已經介紹完畢,想要掌握這篇文章的知識點還需要大家自己動手實踐使用過才能領會,如果想了解更多相關內容的文章,歡迎關注億速云行業資訊頻道。
免責聲明:本站發布的內容(圖片、視頻和文字)以原創、轉載和分享為主,文章觀點不代表本網站立場,如果涉及侵權請聯系站長郵箱:is@yisu.com進行舉報,并提供相關證據,一經查實,將立刻刪除涉嫌侵權內容。