溫馨提示×
您好,登錄后才能下訂單哦!
點擊 登錄注冊 即表示同意《億速云用戶服務條款》
您好,登錄后才能下訂單哦!
本篇內容介紹了“怎么用QT UDP網絡編程實現簡單消息傳輸”的有關知識,在實際案例的操作過程中,不少人都會遇到這樣的困境,接下來就讓小編帶領大家學習一下如何處理這些情況吧!希望大家仔細閱讀,能夠學有所成!
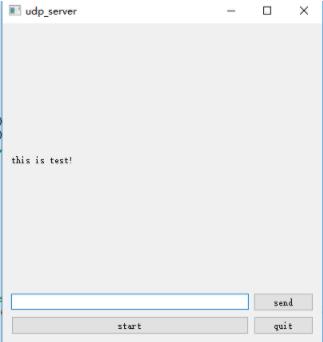
截圖如下:

代碼:
server.h
#ifndef WIDGET_H
#define WIDGET_H

#include <QWidget>
#include<QUdpSocket>
#include<QtNetwork>
#include<QLabel>
#include<QPushButton>
#include<QLineEdit>
#include<QGridLayout>
#include<QTimer>

class Widget : public QWidget
{
    Q_OBJECT

public:
    Widget(QWidget *parent = 0);
    ~Widget();
protected:
    QTimer* timer;
    QImage* image;
private slots:
    void send();
    void bordcaststart();
private:
    QPushButton* start_ptn;
    QPushButton* close_ptn;
    QPushButton* send_ptn;
    QLabel* label;
    QLineEdit* edit;
    QLabel* image_label;
    QGridLayout* layout;
    QUdpSocket* udpsocket;
};

#endif // WIDGET_H
server.cpp
#include "widget.h"

Widget::Widget(QWidget *parent)
    : QWidget(parent)
{
    start_ptn=new QPushButton("start");
    close_ptn=new QPushButton("quit");
    send_ptn=new QPushButton("send");
    label=new QLabel;
    label->setText("this is test!");
    edit=new QLineEdit;
    layout=new QGridLayout(this);
    layout->addWidget(label);
    layout->addWidget(edit);
    layout->addWidget(send_ptn,1,1);
    layout->addWidget(start_ptn,2,0);
    layout->addWidget(close_ptn,2,1);
    this->resize(400,400);

    timer=new QTimer(this);
    udpsocket=new QUdpSocket(this);
    connect(start_ptn,SIGNAL(clicked(bool)),this,SLOT(bordcaststart()));
    connect(close_ptn,SIGNAL(clicked(bool)),this,SLOT(close()));
//    connect(timer,SIGNAL(timeout()),this,SLOT(send()));
}

Widget::~Widget()
{

}

void Widget::send()
{

    QByteArray datagram= "Broadcast message " +edit->text().toUtf8();
    udpsocket->writeDatagram(datagram.data(),datagram.size(),QHostAddress::Broadcast,45454);
}

void Widget::bordcaststart()
{
   // timer->start(1000);
    start_ptn->setDisabled(true);
    connect(send_ptn,SIGNAL(clicked(bool)),this,SLOT(send()));
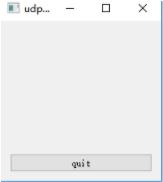
}截圖:

client.h
#ifndef WIDGET_H
#define WIDGET_H

#include <QWidget>
#include<QUdpSocket>
#include<QtNetwork>
#include<QLabel>
#include<QTimer>
#include<QPushButton>
#include<QGridLayout>

class Widget : public QWidget
{
    Q_OBJECT

public:
    Widget(QWidget *parent = 0);
    ~Widget();
protected:

private:
    QGridLayout* layout;
    QPushButton* quit_ptn;
    QLabel* label;
    QUdpSocket* udpsocket;
private slots:
    void boarcast();
};

#endif // WIDGET_H
client.cpp
#include "widget.h"

Widget::Widget(QWidget *parent)
    : QWidget(parent)
{
    label=new QLabel;
    quit_ptn=new QPushButton("quit");

    layout=new QGridLayout(this);
    layout->addWidget(label);
    layout->addWidget(quit_ptn);
    this->resize(200,200);

    udpsocket=new QUdpSocket(this);
    udpsocket->bind(45454, QUdpSocket::ShareAddress);
    connect(udpsocket,SIGNAL(readyRead()),this,SLOT(boarcast()));
    connect(quit_ptn,SIGNAL(clicked(bool)),this,SLOT(close()));
}

Widget::~Widget()
{

}

void Widget::boarcast()
{
    while (udpsocket->hasPendingDatagrams()) {
            QByteArray datagram;
            datagram.resize(udpsocket->pendingDatagramSize());
            QHostAddress sender;
            quint16 senderPort;

            udpsocket->readDatagram(datagram.data(), datagram.size(),
                                    &sender, &senderPort);

            label->setText(datagram);
    }
}
“怎么用QT UDP網絡編程實現簡單消息傳輸”的內容就介紹到這里了,感謝大家的閱讀。如果想了解更多行業相關的知識可以關注億速云網站,小編將為大家輸出更多高質量的實用文章!
免責聲明:本站發布的內容(圖片、視頻和文字)以原創、轉載和分享為主,文章觀點不代表本網站立場,如果涉及侵權請聯系站長郵箱:is@yisu.com進行舉報,并提供相關證據,一經查實,將立刻刪除涉嫌侵權內容。