您好,登錄后才能下訂單哦!
您好,登錄后才能下訂單哦!
這篇“Springboot之nocos整合與使用的方法”文章的知識點大部分人都不太理解,所以小編給大家總結了以下內容,內容詳細,步驟清晰,具有一定的借鑒價值,希望大家閱讀完這篇文章能有所收獲,下面我們一起來看看這篇“Springboot之nocos整合與使用的方法”文章吧。
Nacos 致力于幫助您發現、配置和管理微服務。Nacos 提供了一組簡單易用的特性集,幫助您快速實現動態服務發現、服務配置、服務元數據及流量管理。
Nacos 幫助您更敏捷和容易地構建、交付和管理微服務平臺。 Nacos 是構建以“服務”為中心的現代應用架構 (例如微服務范式、云原生范式) 的服務基礎設施
先創建maven工程,父工程pom如下:
<?xml version="1.0" encoding="UTF-8"?>
<project xmlns="http://maven.apache.org/POM/4.0.0"
         xmlns:xsi="http://www.w3.org/2001/XMLSchema-instance"
         xsi:schemaLocation="http://maven.apache.org/POM/4.0.0 http://maven.apache.org/xsd/maven-4.0.0.xsd">
    <modelVersion>4.0.0</modelVersion>
    <groupId>org.example</groupId>
    <artifactId>configDemo</artifactId>
    <version>1.0-SNAPSHOT</version>
    <parent>
        <groupId>org.springframework.boot</groupId>
        <artifactId>spring-boot-starter-parent</artifactId>
        <version>2.3.2.RELEASE</version>
    </parent>
    <dependencies>
        <dependency>
            <groupId>com.alibaba.cloud</groupId>
            <artifactId>spring-cloud-starter-alibaba-nacos-config</artifactId>
        </dependency>
        <dependency>
            <groupId>org.springframework.boot</groupId>
            <artifactId>spring-boot-starter-web</artifactId>
        </dependency>
    </dependencies>
    <dependencyManagement>
        <dependencies>
            <dependency>
                <groupId>com.alibaba.cloud</groupId>
                <artifactId>spring-cloud-alibaba-dependencies</artifactId>
                <version>2.2.5.RELEASE</version>
                <type>pom</type>
                <scope>import</scope>
            </dependency>
        </dependencies>
    </dependencyManagement>
</project>
訪問的url是:http://localhost:8848/nacos/ 默認端口是8848,賬號密碼是:nacos/nocos
import org.springframework.beans.factory.annotation.Value;
import org.springframework.cloud.context.config.annotation.RefreshScope;
import org.springframework.web.bind.annotation.GetMapping;
import org.springframework.web.bind.annotation.RestController;
/**
 * @author yhq
 * @version 1.0
 * @date 2022/7/15 19:07
 */
@RestController
@RefreshScope  //@RefreshScope:需要配置這個才能動態更新配置。
public class TestController {
    @Value("${name}")
    private String name;
    @GetMapping("/getName")
    public String test(){
        return name;
    }
}springboot默認加載配置文件順序:
bootstrap.properties -> bootstrap.yml -> application.properties -> application.yml 其中bootstrap.properties 配置為最高優先級先加載的會被后加載的覆蓋掉,所以.properties和.yml同時存在時,.properties會失效,.yml會起作用。”
#端口
server:
port: 8888
#配置項目名稱
spring:
application:
#configdemo默認是nacos的DateId名稱
name: configdemo
#指定test的配置文件
profiles:
active: test
cloud:
nacos:
config:
server-addr: localhost:8848
#加載yaml的nacos文件
file-extension: yaml
可以看到啟動時進行加載了文件如下:

配置了configdemo和configdemo-test.yaml
注意的是:它的加載規則是:# 1.DataId
- 用來讀取遠程配置中心的中具體配置文件其完整格式如下:
- ${prefix}-${spring.profile.active}.${file-extension}
a. prefix 默認為 spring.application.name 的值,也可以通過配置項 spring.cloud.nacos.config.prefix來配置。
b. spring.profile.active 即為當前環境對應的 profile,詳情可以參考 Spring Boot文檔。 注意:當 spring.profile.active 為空時,對應的連接符 - 也將不存在,dataId 的拼接格式變成 ${prefix}.${file-extension}
c. file-exetension 為配置內容的數據格式,可以通過配置項 spring.cloud.nacos.config.file-extension 來配置。目前只支持 properties 和 yaml 類型。
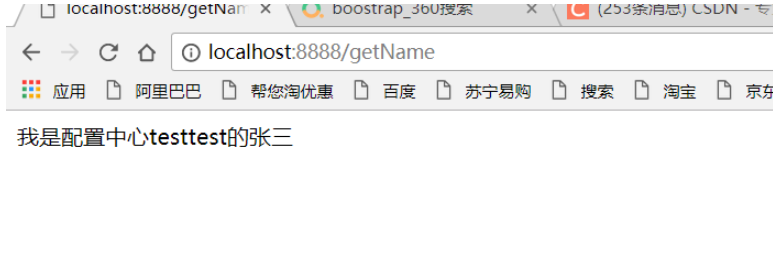
如果configdemo和configdemo-test.yaml 都存在name的配置,優先configdemo-test.yaml
訪問結果如下:

以上就是關于“Springboot之nocos整合與使用的方法”這篇文章的內容,相信大家都有了一定的了解,希望小編分享的內容對大家有幫助,若想了解更多相關的知識內容,請關注億速云行業資訊頻道。
免責聲明:本站發布的內容(圖片、視頻和文字)以原創、轉載和分享為主,文章觀點不代表本網站立場,如果涉及侵權請聯系站長郵箱:is@yisu.com進行舉報,并提供相關證據,一經查實,將立刻刪除涉嫌侵權內容。