溫馨提示×
您好,登錄后才能下訂單哦!
點擊 登錄注冊 即表示同意《億速云用戶服務條款》
您好,登錄后才能下訂單哦!
這篇文章主要介紹了Android ProgressBar怎么實現進度條效果的相關知識,內容詳細易懂,操作簡單快捷,具有一定借鑒價值,相信大家閱讀完這篇Android ProgressBar怎么實現進度條效果文章都會有所收獲,下面我們一起來看看吧。
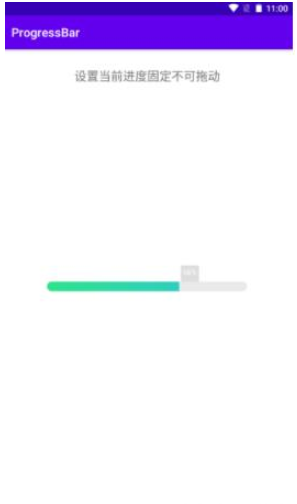
具體效果如下

1.XML布局
<RelativeLayout xmlns:android="http://schemas.android.com/apk/res/android"
    android:layout_width="match_parent"
    android:layout_height="match_parent">

    <TextView
        android:textSize="20sp"
        android:layout_marginTop="30dp"
        android:layout_centerHorizontal="true"
        android:text="設置當前進度固定不可拖動"
        android:layout_width="wrap_content"
        android:layout_height="wrap_content" />

    <LinearLayout
        android:id="@+id/full"
        android:layout_centerInParent="true"
        android:orientation="vertical"
        android:layout_width="match_parent"
        android:layout_height="60dp">

        <TextView
            android:id="@+id/progesss_value1"
            android:layout_width="wrap_content"
            android:layout_height="wrap_content"
            android:background="#ddd"
            android:gravity="center"
            android:paddingBottom="8dp"
            android:paddingLeft="4dp"
            android:paddingRight="4dp"
            android:paddingTop="2dp"
            android:textColor="@android:color/white"
            android:textSize="12sp"
            android:text="20%" />
        <ProgressBar
            android:layout_gravity="center_horizontal"
            android:id="@+id/progesss1"

            android:layout_width="330dp"
            android:layout_height="wrap_content"
            android:background="@drawable/myprogressbar"
            android:indeterminateDrawable="@android:drawable/progress_indeterminate_horizontal"
            android:indeterminateOnly="false"
            android:max="100"
            android:maxHeight="50dp"
            android:minHeight="16dp"
            android:progress="20"
            android:progressDrawable="@drawable/myprogressbar" />
    </LinearLayout>

</RelativeLayout>
2.myprogressbar布局
<?xml version="1.0" encoding="utf-8"?>
<layer-list xmlns:android="http://schemas.android.com/apk/res/android">
    <item android:id="@android:id/background">
        <shape>
            <corners android:radius="10dip" />
            <gradient
                android:angle="45"
                android:endColor="#EAEAEA"
                android:startColor="#EAEAEA" />
        </shape>
    </item>

    <item android:id="@android:id/progress">
        <clip>
            <shape>
                <corners android:radius="10dip" />
                <gradient
                    android:angle="45"
                    android:centerColor="#2FD2B3"
                    android:endColor="#30C0D0"
                    android:startColor="#2EE28B" />
            </shape>
        </clip>
    </item>

</layer-list>
3.MainActivity
public class MainActivity extends AppCompatActivity {

    private ProgressBar progesss;
    private TextView progesssValue;
    private LinearLayout full;

    @Override
    protected void onCreate(Bundle savedInstanceState) {
        super.onCreate(savedInstanceState);
        setContentView(R.layout.activity_main);


        progesss = (ProgressBar) findViewById(R.id.progesss1);
        progesssValue = (TextView) findViewById(R.id.progesss_value1);
        full = (LinearLayout) findViewById(R.id.full);

        initview();
    }

    private void initview() {

        progesss.setProgress(66);
        progesssValue.setText(new StringBuffer().append(progesss.getProgress()).append("%"));

        setPosWay1();
//        ToastUtil.showToast("進度為66");
//        Toast.makeText(this,"進度為:--66",Toast.LENGTH_SHORT).show();

        //        full.setOnTouchListener(new View.OnTouchListener() {
//
//            @Override
//            public boolean onTouch(View v, MotionEvent event) {
//                int w = getWindowManager().getDefaultDisplay().getWidth();
//                switch (event.getAction()) {
//                    case MotionEvent.ACTION_DOWN:
//                        x1 = (int) event.getRawX();
//                        progesss.setProgress(100 * x1 / w);
//                        setPos();
//                        break;
//                    case MotionEvent.ACTION_MOVE:
//                        x2 = (int) event.getRawX();
//                        dx = x2 - x1;
//                        if (Math.abs(dx) > w / 100) { //改變條件 調整進度改變速度
//                            x1 = x2; // 去掉已經用掉的距離, 去掉這句 運行看看會出現效果
//                            progesss.setProgress(progesss.getProgress() + dx * 100 / w);
//                            setPos();
//                        }
//                        break;
//                    case MotionEvent.ACTION_UP:
//                        break;
//                }
//                return true;
//            }
//        });


    }


    @Override
    public void onWindowFocusChanged(boolean hasFocus) {
        super.onWindowFocusChanged(hasFocus);
        if (hasFocus) {
            setPos();
        }
    }
    private void setPosWay1() {
        progesssValue.post(new Runnable() {
            @Override
            public void run() {
                setPos();
            }
        });
    }

    /**
     * 設置進度顯示在對應的位置
     */
    public void setPos() {
        int w = getWindowManager().getDefaultDisplay().getWidth();
        Log.e("w=====", "" + w);
        ViewGroup.MarginLayoutParams params = (ViewGroup.MarginLayoutParams) progesssValue.getLayoutParams();
        int pro = progesss.getProgress();
        int tW = progesssValue.getWidth();
        if (w * pro / 100 + tW * 0.3 > w) {
            params.leftMargin = (int) (w - tW * 1.1);
        } else if (w * pro / 100 < tW * 0.7) {
            params.leftMargin = 0;
        } else {
            params.leftMargin = (int) (w * pro / 100 - tW * 0.7);
        }
        progesssValue.setLayoutParams(params);

    }
}
關于“Android ProgressBar怎么實現進度條效果”這篇文章的內容就介紹到這里,感謝各位的閱讀!相信大家對“Android ProgressBar怎么實現進度條效果”知識都有一定的了解,大家如果還想學習更多知識,歡迎關注億速云行業資訊頻道。
免責聲明:本站發布的內容(圖片、視頻和文字)以原創、轉載和分享為主,文章觀點不代表本網站立場,如果涉及侵權請聯系站長郵箱:is@yisu.com進行舉報,并提供相關證據,一經查實,將立刻刪除涉嫌侵權內容。