您好,登錄后才能下訂單哦!
您好,登錄后才能下訂單哦!
本文小編為大家詳細介紹“Asp.Net Core怎么使用Ocelot實現服務注冊和發現”,內容詳細,步驟清晰,細節處理妥當,希望這篇“Asp.Net Core怎么使用Ocelot實現服務注冊和發現”文章能幫助大家解決疑惑,下面跟著小編的思路慢慢深入,一起來學習新知識吧。
服務注冊:我們通過在每個服務實例寫入注冊代碼,實例在啟動的時候會先去注冊中心(例如Consul、ZooKeeper、etcd、Eureka)注冊一下,那么客戶端通過注冊中心可以知道每個服務實例的地址,端口號,健康狀態等等信息,也可以通過注冊中心刪除服務實例。這里注冊中心相當于是負責維護服務實例的管控中心。
服務發現:服務實例在注冊中心注冊之后,客戶端通過注冊中心可以了解這些服務實例運行狀況。
如果要實現服務注冊與發現,需要一個注冊中心,這里主要介紹是Consul。
Consul官網:https://www.consul.io/,它主要功能有:服務注冊與發現、健康檢查、Key/Value、多數據中心。
如果在Windows上部署Consul,在consul.exe目錄下執行consul.exe agent -dev命令行即可。
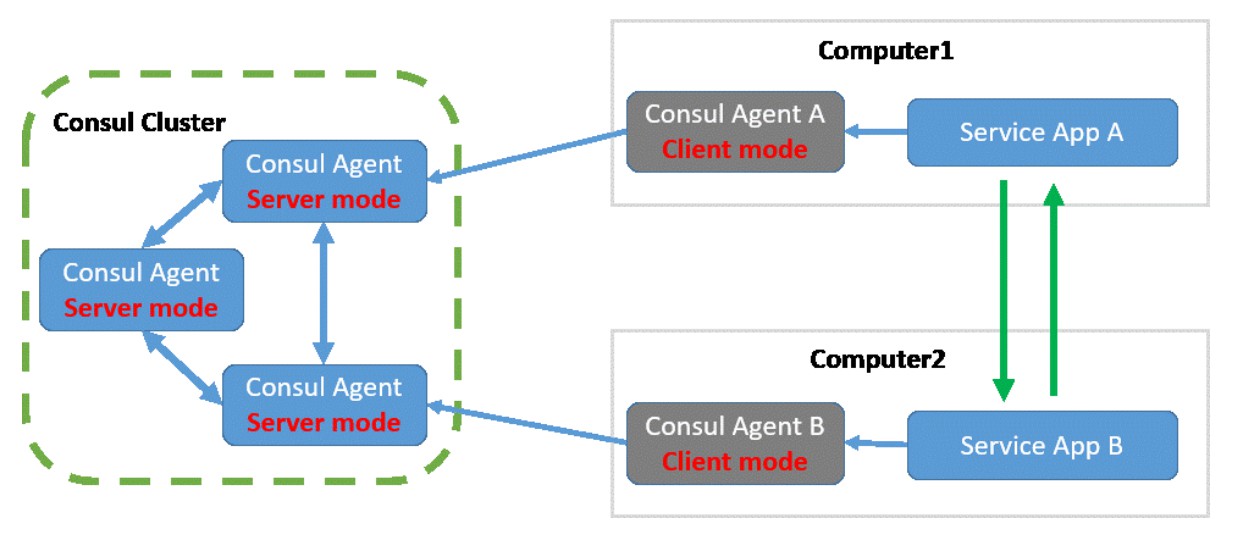
Asp.Net Core向Consul注冊服務實例調用過程如下圖所示:

Asp.Net Core向Consul注冊服務實例需要在Gateway項目中引用Consul支持的NuGet軟件包,安裝命令如下:
Install-Package Ocelot.Provider.Consul
然后將以下內容添加到您的ConfigureServices方法中:
services.AddOcelot().AddConsul();
在Ocelot服務發現項目示例中,通過APIGateway項目GlobalConfiguration選項可以配置服務注冊與發現,文件配置具體代碼如下:
{
  "Routes": [
    {
      "UseServiceDiscovery": true,
      "DownstreamPathTemplate": "/{url}",
      "DownstreamScheme": "http",
      "ServiceName": "MyService",
      "LoadBalancerOptions": {
        "Type": "RoundRobin"
      },
      "UpstreamPathTemplate": "/{url}",
      "UpstreamHttpMethod": [ "Get" ],
      "ReRoutesCaseSensitive": false
    }
  ],
  "GlobalConfiguration": {
    //服務發現配置
    "ServiceDiscoveryProvider": {
      //注冊中心Consul地址
      "Host": "192.168.113.128",
      //注冊中心Consul端口號
      "Port": 8500,
      "Type": "Consul",
      //以毫秒為單位,告訴Ocelot多久調用一次Consul來更改服務配置。
      "PollingInterval": 100,
      //如果你有在Consul上配置key/value,則在這里輸入配置key。
      "ConfigurationKey": "MyService_AB"
    }
  }
}
ServiceDiscoveryProvider選項說明:
Host:注冊中心Consul地址。
Port:注冊中心Consul端口號。
Type:注冊中心類型。
PollingInterval:以毫秒為單位,告訴Ocelot多久調用一次Consul來更改服務配置。
ConfigurationKey:如果你有在Consul上配置key/value,則在這里輸入配置key。
ConfigureServices添加Ocelot、Consul注入:
services.AddOcelot().AddConsul();
Configure添加使用Ocelot:
app.UseOcelot().Wait();
服務發現配置如Ocelot服務發現項目示例一樣。
先安裝Consul的NuGet軟件包,安裝命令如下:
Install-Package Consul
在該項目添加一個AppExtensions擴展類,用來對服務APIServiceA、APIServiceB項目在Consul注冊實例,為了展示效果,具體代碼稍作修改如下:
public static class AppExtensions
{
    public static IServiceCollection AddConsulConfig(this IServiceCollection services, IConfiguration configuration)
    {
        services.AddSingleton<IConsulClient, ConsulClient>(p => new ConsulClient(consulConfig =>
        {
            var address = configuration.GetValue<string>("Consul:Host");
            consulConfig.Address = new Uri(address);
        }));
        return services;
    }
    public static IApplicationBuilder UseConsul(this IApplicationBuilder app, string host = null, string port = null)
    {
        //獲取consul客戶端實例
        var consulClient = app.ApplicationServices.GetRequiredService<IConsulClient>();
        var logger = app.ApplicationServices.GetRequiredService<ILoggerFactory>().CreateLogger("AppExtensions");
        var lifetime = app.ApplicationServices.GetRequiredService<IApplicationLifetime>();

        if (!(app.Properties["server.Features"] is FeatureCollection features)) return app;

        //var addresses = features.Get<IServerAddressesFeature>();
        //var address = addresses.Addresses.FirstOrDefault();
        //if (address == null)
        //{
        //    return app;
        //}

        var address = host + ":" + port;
        if (string.IsNullOrWhiteSpace(host) || string.IsNullOrWhiteSpace(port))
        {
            Console.WriteLine($"host或者port為空!");
            return app;
        }

        Console.WriteLine($"address={address}");
        var uri = new Uri(address);
        Console.WriteLine($"host={uri.Host},port={uri.Port}");

        var registration = new AgentServiceRegistration()
        {
            ID = $"MyService-{uri.Port}",
            Name = "MyService",
            Address = $"{uri.Host}",
            Port = uri.Port,
            Check = new AgentServiceCheck()
            {
                DeregisterCriticalServiceAfter = TimeSpan.FromSeconds(5),//服務啟動多久后注冊
                Interval = TimeSpan.FromSeconds(10),//健康檢查時間間隔
                HTTP = $"{address}/HealthCheck",//健康檢查地址
                Timeout = TimeSpan.FromSeconds(5)//超時時間
            }
        };
        logger.LogInformation("Registering with Consul");
        logger.LogInformation($"Consul RegistrationID:{registration.ID}");
        //注銷
        consulClient.Agent.ServiceDeregister(registration.ID).ConfigureAwait(true);
        //注冊
        consulClient.Agent.ServiceRegister(registration).ConfigureAwait(true);
        //應用程序關閉時候
        lifetime.ApplicationStopping.Register(() =>
        {
            //正在注銷
            logger.LogInformation("Unregistering from Consul");
            consulClient.Agent.ServiceDeregister(registration.ID).ConfigureAwait(true);
        });
        //每個服務都需要提供一個用于健康檢查的接口,該接口不具備業務功能。服務注冊時把這個接口的地址也告訴注冊中心,注冊中心會定時調用這個接口來檢測服務是否正常,如果不正常,則將它移除,這樣就保證了服務的可用性。
        app.Map("/HealthCheck", s =>
        {
            s.Run(async context =>
            {
                await context.Response.WriteAsync("ok");
            });
        });
        return app;
    }
}項目添加一個Get方法,對應APIGateway項目的路由上下游配置,具體代碼如下:
[Route("api/[controller]")]
[ApiController]
public class ValuesController : ControllerBase
{
    // GET api/values
    [HttpGet]
    public ActionResult<IEnumerable<string>> Get()
    {
        var port = Request.Host.Port;
        return new string[] { "value1", "value2", port.Value.ToString() };
    }
}
appsettings.json配置加入Consul地址:
"Consul": {
  "Host": "http://192.168.113.128:8500"
}項目添加一個Get方法,對應APIGateway項目的路由上下游配置,具體代碼如下:
[Route("api/[controller]")]
[ApiController]
public class ValuesController : ControllerBase
{
    // GET api/values
    [HttpGet]
    public ActionResult<IEnumerable<string>> Get()
    {
        var port = Request.Host.Port;
        return new string[] { "value3", "value4", port.Value.ToString() };
    }
}
appsettings.json配置加入Consul地址:
"Consul": {
  "Host": "http://192.168.113.128:8500"
}在APIServiceA、APIServiceB項目的ConfigureServices添加Consul配置:
services.AddConsulConfig(Configuration);
在Configure添加Consul服務注冊:
APIServiceA:app.UseConsul("http://172.168.18.73", "9999");
APIServiceB:app.UseConsul("http://172.168.18.73", "9998");
把APIGateway、APIServiceA、APIServiceB三個項目部署到IIS上:

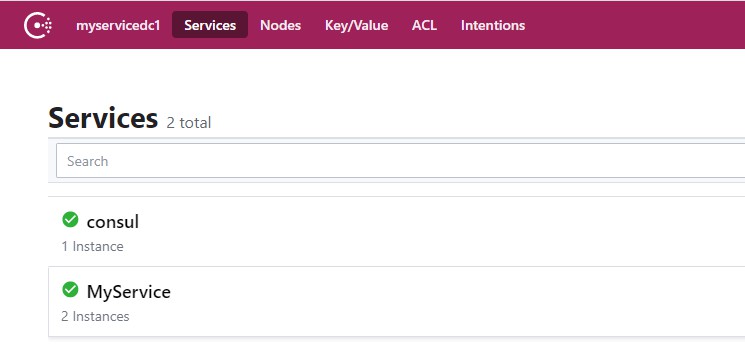
三個項目運行起來后,通過瀏覽器Consul客戶端可以看到MyService節點服務情況:

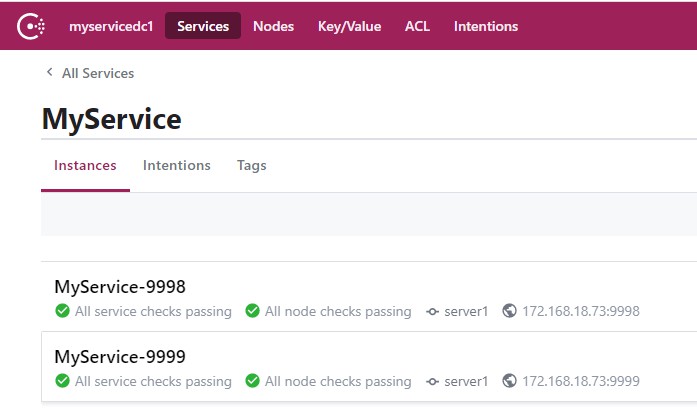
點擊打開MyService節點可以看到注冊到Consul的APIServiceA、APIServiceB服務狀況:

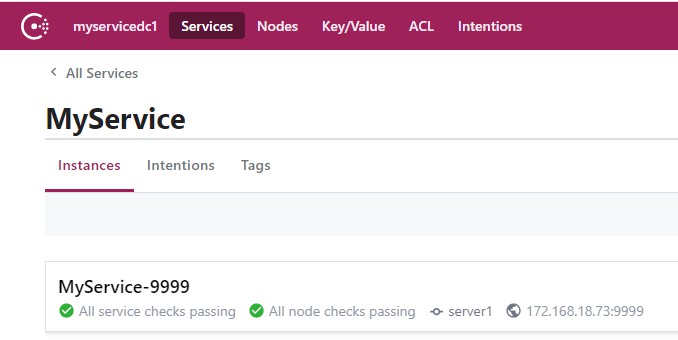
如果把APIServiceB服務實例站點停掉:

通過Consul客戶端會看到APIServiceB服務實例已經被剔除了:

如果輸入CTRL+C把集群中某一個Consul服務關閉,那么集群會重新選舉一個新的leader,負責處理所有服務實例的查詢和事務:


讀到這里,這篇“Asp.Net Core怎么使用Ocelot實現服務注冊和發現”文章已經介紹完畢,想要掌握這篇文章的知識點還需要大家自己動手實踐使用過才能領會,如果想了解更多相關內容的文章,歡迎關注億速云行業資訊頻道。
免責聲明:本站發布的內容(圖片、視頻和文字)以原創、轉載和分享為主,文章觀點不代表本網站立場,如果涉及侵權請聯系站長郵箱:is@yisu.com進行舉報,并提供相關證據,一經查實,將立刻刪除涉嫌侵權內容。