您好,登錄后才能下訂單哦!
您好,登錄后才能下訂單哦!
這篇文章主要介紹“Android組件LinearLayout怎么使用”,在日常操作中,相信很多人在Android組件LinearLayout怎么使用問題上存在疑惑,小編查閱了各式資料,整理出簡單好用的操作方法,希望對大家解答”Android組件LinearLayout怎么使用”的疑惑有所幫助!接下來,請跟著小編一起來學習吧!
LinearLayout是線性布局組件,放置在其中的組件按列或者按行(就是垂直或者水平)的方式排序分布。
設置LinearLayout容器布局組件的方式:只能取值:horizontal(水平的),vertical(垂直的)
設置布局在LinearLayout容器內的組件對齊方式。
取值包括top, bottom, left, right, center, start, end(上,下,左,右,中,開始,結束)
(包括android:background ,android:visibility等。還有一些改善美觀的放置組件的間隔)
1. android:layout_width和android:layout_height (match_parent/wrap_content)
2 .android:layout_gravity 設置組件在容器中的布局
3. android:layout_weight 設置組件占用空間的空余顯示空間的比列
4. android:layout_margin ,android:layout_marginTop ,android:layout_marginBottom ,android:layout_marginLeft ,android:layout_marginRight 設置組件的外邊界,類似我們搞網頁設計HTML/CSS中margin用法。
activity_main.xml
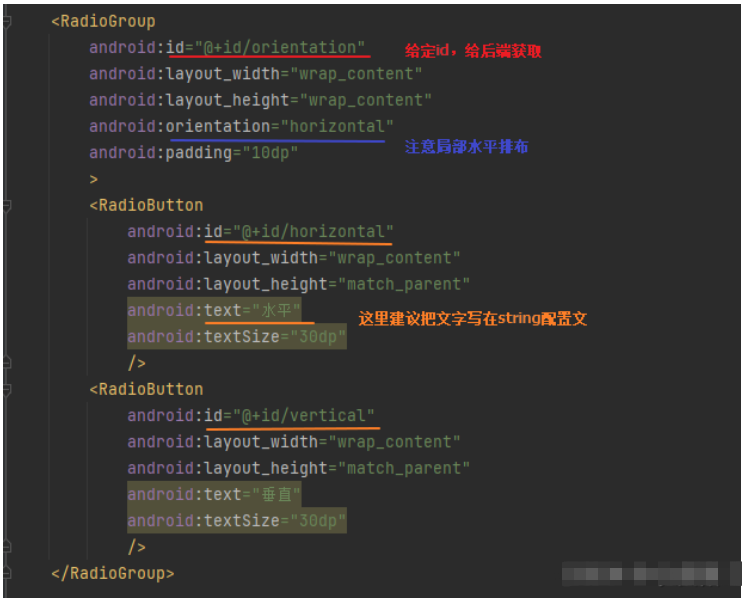
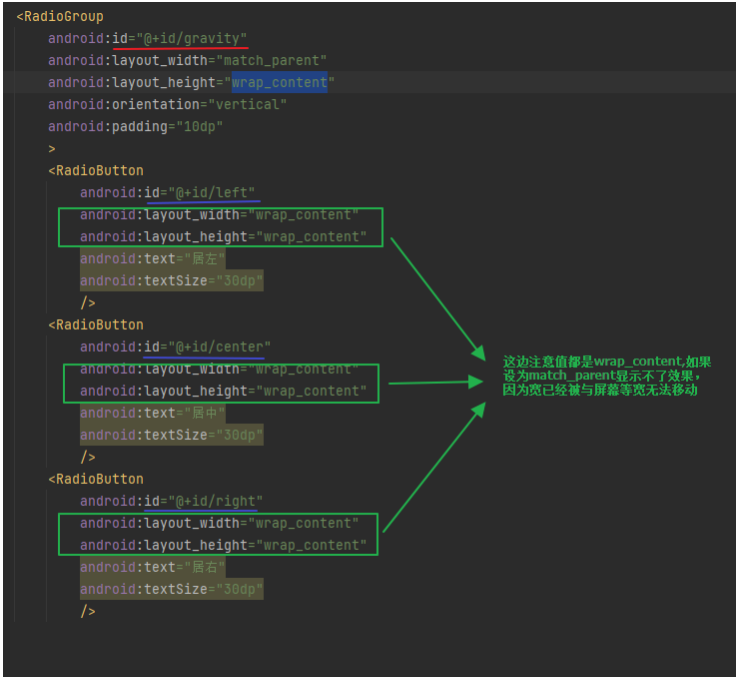
<?xml version="1.0" encoding="utf-8"?>
<LinearLayout xmlns:android="http://schemas.android.com/apk/res/android"
    xmlns:app="http://schemas.android.com/apk/res-auto"
    xmlns:tools="http://schemas.android.com/tools"
    android:layout_width="match_parent"
    android:layout_height="match_parent"
    android:orientation="vertical">
    <RadioGroup
        android:id="@+id/orientation"
        android:layout_width="wrap_content"
        android:layout_height="wrap_content"
        android:orientation="horizontal"
        android:padding="10dp"
        >
        <RadioButton
            android:id="@+id/horizontal"
            android:layout_width="wrap_content"
            android:layout_height="match_parent"
            android:text="水平"
            android:textSize="30dp"
            />
        <RadioButton
            android:id="@+id/vertical"
            android:layout_width="wrap_content"
            android:layout_height="match_parent"
            android:text="垂直"
            android:textSize="30dp"
            />
    </RadioGroup>

    <RadioGroup
        android:id="@+id/gravity"
        android:layout_width="match_parent"
        android:layout_height="wrap_content"
        android:orientation="vertical"
        android:padding="10dp"
        >
        <RadioButton
            android:id="@+id/left"
            android:layout_width="wrap_content"
            android:layout_height="wrap_content"
            android:text="居左"
            android:textSize="30dp"
            />
        <RadioButton
            android:id="@+id/center"
            android:layout_width="wrap_content"
            android:layout_height="wrap_content"
            android:text="居中"
            android:textSize="30dp"
            />
        <RadioButton
            android:id="@+id/right"
            android:layout_width="wrap_content"
            android:layout_height="wrap_content"
            android:text="居右"
            android:textSize="30dp"
            />


    </RadioGroup>

</LinearLayout>
MainActivity.java
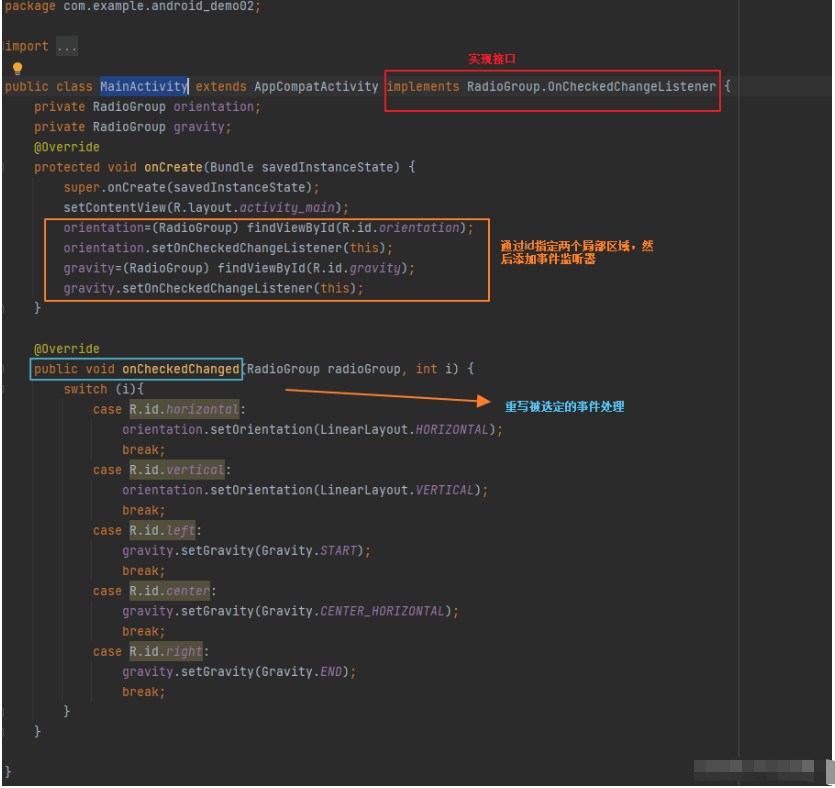
package com.example.android_demo02;

import androidx.appcompat.app.AppCompatActivity;

import android.os.Bundle;
import android.view.Gravity;
import android.widget.LinearLayout;
import android.widget.RadioGroup;

public class MainActivity extends AppCompatActivity implements RadioGroup.OnCheckedChangeListener {
    private RadioGroup orientation;
    private RadioGroup gravity;
    @Override
    protected void onCreate(Bundle savedInstanceState) {
        super.onCreate(savedInstanceState);
        setContentView(R.layout.activity_main);
        orientation=(RadioGroup) findViewById(R.id.orientation);
        orientation.setOnCheckedChangeListener(this);
        gravity=(RadioGroup) findViewById(R.id.gravity);
        gravity.setOnCheckedChangeListener(this);
    }

    @Override
    public void onCheckedChanged(RadioGroup radioGroup, int i) {
        switch (i){
            case R.id.horizontal:
                orientation.setOrientation(LinearLayout.HORIZONTAL);
                break;
            case R.id.vertical:
                orientation.setOrientation(LinearLayout.VERTICAL);
                break;
            case R.id.left:
                gravity.setGravity(Gravity.START);
                break;
            case R.id.center:
                gravity.setGravity(Gravity.CENTER_HORIZONTAL);
                break;
            case R.id.right:
                gravity.setGravity(Gravity.END);
                break;
        }
    }

}
實現效果:
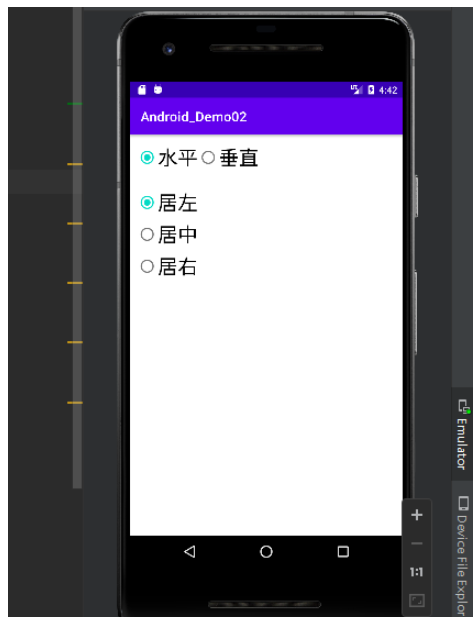
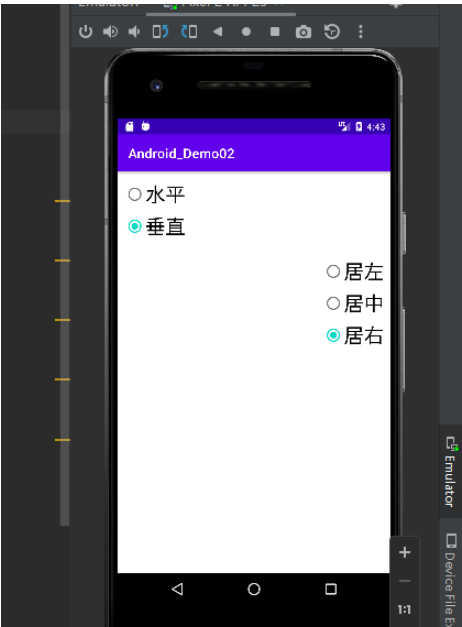
到此,關于“Android組件LinearLayout怎么使用”的學習就結束了,希望能夠解決大家的疑惑。理論與實踐的搭配能更好的幫助大家學習,快去試試吧!若想繼續學習更多相關知識,請繼續關注億速云網站,小編會繼續努力為大家帶來更多實用的文章!
免責聲明:本站發布的內容(圖片、視頻和文字)以原創、轉載和分享為主,文章觀點不代表本網站立場,如果涉及侵權請聯系站長郵箱:is@yisu.com進行舉報,并提供相關證據,一經查實,將立刻刪除涉嫌侵權內容。