您好,登錄后才能下訂單哦!
您好,登錄后才能下訂單哦!
本篇內容主要講解“Java程序圖形用戶界面的按鈕與布局怎么實現”,感興趣的朋友不妨來看看。本文介紹的方法操作簡單快捷,實用性強。下面就讓小編來帶大家學習“Java程序圖形用戶界面的按鈕與布局怎么實現”吧!
JButton組件表示一個普通的按鈕
| 方法 | 作用 |
|---|---|
| public JButton() throws HeadlessException | 創建一個Button對象 |
| public JButton(String label) throws HeadlessException | 創建一個Button對象,同時指定其顯示內容 |
| public JButton(Icon icon) | 創建一個帶圖片的按鈕 |
| public JButton(String text,Icon icon) | 創建一個帶圖片和文字的按鈕 |
| public void setLabel(String label) | 設置Button的顯示內容 |
| public String getLabel() | 得到Button的顯示內容 |
| public void setBounds(int x,int y,int width,int height) | 設置組件的大小及顯示方式 |
| public void setMnemonic(int mnemonic) | 設置按鈕的快捷鍵 |
演示
import javax.swing.*;
import java.awt.*;

public class Hello {
    public static void main(String[] args) {
        JFrame frame = new JFrame("一");
        JButton but = new JButton("點擊");
        Font font = new Font("Serief",Font.BOLD,25);
        but.setFont(font);
        frame.add(but);
        frame.setSize(200,70);
        frame.setLocation(500,300);
        frame.setVisible(true);
    }
}
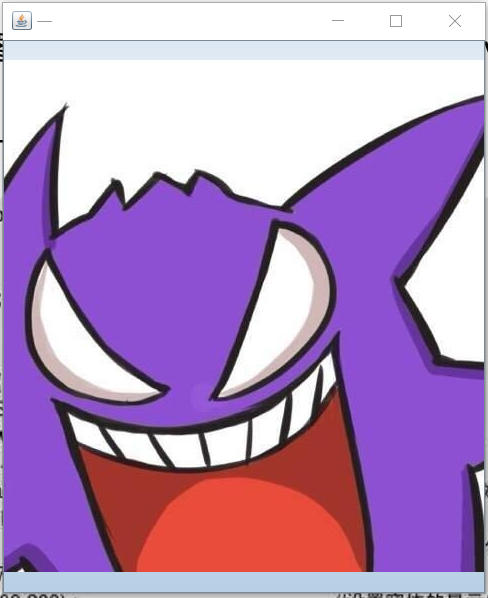
import javax.swing.*;

public class Hello {
    public static void main(String[] args) {
        JFrame frame = new JFrame("一");
        String Path="C:\\Users\\30452\\Desktop\\123.jpg";
        Icon icon = new ImageIcon(Path,"MLDN");
        JButton but = new JButton(icon);
        frame.add(but);
        frame.setSize(500,600);
        frame.setLocation(300,200);
        frame.setVisible(true);
    }
}
在Swing中主要使用以下5種常見的布局管理器:FlowLayout、BorderLayout、GridLayout、CardLayout、絕對定位。
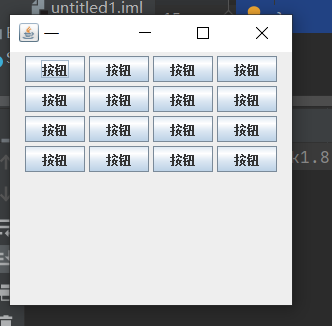
流式布局管理器,使用此種布局方式會使所有的組件像流水一樣依次進行排列
| 常量 | 作用 |
|---|---|
| public static final int CENTER | 居中對齊 |
| public static final int LEADING | 與容器的開始端對齊方式一樣 |
| public static final int LEFT | 左對齊 |
| public static final int RIGHT | 右對齊 |
| public static final int TRAILING | 與容器的結束端對齊方式一樣 |
| 方法 | 作用 |
|---|---|
| public FlowLayout() | 構造一個新的FlowLayout,居中對齊 |
| public FlowLayout(int align) | 構造一個FlowLayout,并指定對齊方式 |
| public FlowLayout(int align,int hgap,int vgap) | 指定對齊方式、水平、垂直間距 |
演示:
import javax.swing.*;
import java.awt.*;

public class Hello {
    public static void main(String[] args) {
        JFrame frame = new JFrame("一");
        frame.setLayout(new FlowLayout(FlowLayout.CENTER,4,4));
        JButton but = null;
        for(int i=0;i<16;i++){
            but = new JButton("按鈕");
            frame.add(but);
        }
        frame.setSize(300,300);
        frame.setVisible(true);
    }
}
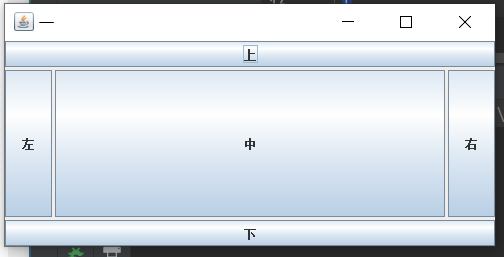
BorderLayout將一個窗體的版面劃分成東、西、南、北、中5個區域
| 常量 | 作用 |
|---|---|
| public static final String EAST | 將組件設置在東區 |
| public static final String WEST | 將組件設置在西區 |
| public static final String SOUTH | 將組件設置在南區 |
| public static final String NORTH | 將組件設置在北區 |
| public static final String CENTER | 將組件設置在中區 |
| 方法 | 作用 |
|---|---|
| public BorderLayout() | 構造沒有間距的布局器 |
| public BorderLayout(int hgap,int vgap) | 構造有水平和垂直間距的布局器 |
演示:
import javax.swing.*;
import java.awt.*;

public class Hello {
    public static void main(String[] args) {
        JFrame frame = new JFrame("一");
        frame.setLayout(new BorderLayout(3,3));
        frame.add(new JButton("上"),BorderLayout.NORTH);
        frame.add(new JButton("下"),BorderLayout.SOUTH);
        frame.add(new JButton("左"),BorderLayout.WEST);
        frame.add(new JButton("右"),BorderLayout.EAST);
        frame.add(new JButton("中"),BorderLayout.CENTER);
        frame.pack();
        frame.setVisible(true);
    }
}
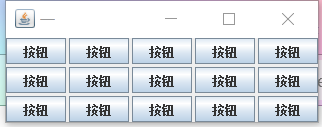
GridLayout布局管理器是以表格的形式進行管理
| 方法 | 作用 |
|---|---|
| public GridLayout(int rows,int cols) | 構造一個指定行和列的布局管理器 |
| public GridLayout(int rows,int cols,int hgap,int vgap) | 構造時指定行和列、水平和垂直間距 |
演示:
import javax.swing.*;
import java.awt.*;

public class Hello {
    public static void main(String[] args) {
        JFrame frame = new JFrame("一");
        frame.setLayout(new GridLayout(3,5,3,3));
        JButton but = null;
        for(int i=0;i<15;i++){
            but = new JButton("按鈕");
            frame.add(but);
        }
        frame.pack();
        frame.setVisible(true);
    }
}
CardLayout就是將一組組件彼此重疊地進行布局,就像一張張卡片一樣,這樣每次只會展現一個界面
| 方法 | 作用 |
|---|---|
| public CardLayout() | 構造CardLayout對象,各組件間距為0 |
| public CardLayout(int hgap,int vgap) | 構造CardLayout對象,指定組件間距 |
| public void next(Container parent) | 翻轉到下一張卡片 |
| public void previous(Container parent) | 翻轉到上一張卡片 |
| public void first(Container parent) | 翻轉到第一張卡片 |
| public void last(Container parent) | 翻轉到最后一張卡片 |
| public void show(Container parent,String name) | 顯示具有指定組件名稱的卡片 |
import javax.swing.*;
import java.awt.*;

public class Hello {
    public static void main(String[] args) {
        JFrame frame = new JFrame("一");
//        取得窗體容器
        Container cont = frame.getContentPane();
        CardLayout card = new CardLayout();
        frame.setLayout(card);
        cont.add(new JLabel("A",JLabel.CENTER),"first");
        cont.add(new JLabel("B",JLabel.CENTER),"second");
        cont.add(new JLabel("C",JLabel.CENTER),"third");
        cont.add(new JLabel("D",JLabel.CENTER),"fourth");
        cont.add(new JLabel("E",JLabel.CENTER),"fifth");
        frame.pack();
        frame.setVisible(true);
        card.show(cont,"third");
        for(int i=0;i<5;i++){
            try {
                Thread.sleep(3000);
            }catch (InterruptedException e){
            }
            card.next(cont);
        }
    }
}

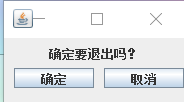
Component中提供了setBounds()方法,可以定位一個組件的坐標,使用X、Y的坐標表示方式
public void setBounds(int x,int y,int width,int height)
演示:
import javax.swing.*;
import javax.swing.plaf.ButtonUI;

public class Hello {
    public static void main(String[] args) {
        JFrame frame = new JFrame("一");
        frame.setLayout(null);
        JLabel title = new JLabel("確定要退出嗎?");
        JButton a = new JButton("確定");
        JButton b = new JButton("取消");
        frame.setSize(200,90);
        title.setBounds(45,5,150,20);
        a.setBounds(10,30,80,20);
        b.setBounds(100,30,80,20);
        frame.add(title);
        frame.add(a);
        frame.add(b);
        frame.setVisible(true);
    }
}
到此,相信大家對“Java程序圖形用戶界面的按鈕與布局怎么實現”有了更深的了解,不妨來實際操作一番吧!這里是億速云網站,更多相關內容可以進入相關頻道進行查詢,關注我們,繼續學習!
免責聲明:本站發布的內容(圖片、視頻和文字)以原創、轉載和分享為主,文章觀點不代表本網站立場,如果涉及侵權請聯系站長郵箱:is@yisu.com進行舉報,并提供相關證據,一經查實,將立刻刪除涉嫌侵權內容。