您好,登錄后才能下訂單哦!
您好,登錄后才能下訂單哦!
這篇文章主要介紹“springboot jpaRepository為什么一定要對Entity序列化”,在日常操作中,相信很多人在springboot jpaRepository為什么一定要對Entity序列化問題上存在疑惑,小編查閱了各式資料,整理出簡單好用的操作方法,希望對大家解答”springboot jpaRepository為什么一定要對Entity序列化”的疑惑有所幫助!接下來,請跟著小編一起來學習吧!
一開始,我沒有對實體類Inventory序列化,導致在使用內嵌數據庫H2的JPA時,它直接安裝字母序列把表Inventory的字段生成。
舉例,原來我按照
inventory(id, name, quantity, type, comment)
順序寫的數據庫導入表,但是因為沒有序列化,導致表結構變成
inventory(id, comment,name, quantity, type )
所以后面JPA處理失敗。
順便記錄一下寫spring cloud 基于和H2 database的jpa簡單restful 程序。
實體類Inventory
package com.example.demo;
import java.io.Serializable;
import javax.persistence.Column;
import javax.persistence.Entity;
import javax.persistence.GeneratedValue;
import javax.persistence.Id;
import javax.persistence.SequenceGenerator;

@Entity
public class Inventory implements Serializable{
    private static final long serialVersionUID = 1L;
    @Id
    @SequenceGenerator(name="inventory_generator", sequenceName="inventory_sequence", initialValue = 2)
    @GeneratedValue(generator = "inventory_generator")
    private Integer id;
    @Column(nullable = false)
    private String name;
    @Column(nullable = false)
    private Integer quantity;
    @Column(nullable = false)
    private Integer type;
    @Column(nullable = false)
    private String comment;
    public Inventory(Integer id, String name, Integer quantity, Integer type, String comment) {
        super();
        this.id = id;
        this.name = name;
        this.quantity = quantity;
        this.type = type;
        this.comment = comment;
    }
    public Inventory() {
        super();
    }
    public Integer getId() {
        return id;
    }
    public void setId(Integer id) {
        this.id = id;
    }
    public String getName() {
        return name;
    }
    public void setName(String name) {
        this.name = name;
    }
    public Integer getQuantity() {
        return quantity;
    }
    public void setQuantity(Integer quantity) {
        this.quantity = quantity;
    }
    public Integer getType() {
        return type;
    }
    public void setType(Integer type) {
        this.type = type;
    }
    public String getComment() {
        return comment;
    }
    public void setComment(String comment) {
        this.comment = comment;
    }
    @Override
    public String toString() {
        return "Inventory [id=" + id + ", name=" + name + ", quantity=" + quantity + ", type=" + type + ", comment="
                + comment + "]";
    }
}
下面使用JpaRepository簡化開發流程,非常舒服地定義簡單的service 接口即可,會自動實現,大贊。
package com.example.demo;
import org.springframework.data.jpa.repository.JpaRepository;
public interface InventoryRepository extends JpaRepository<Inventory, Integer> {
    Inventory findById(Integer id);
}
我把controller方法放到了springboot啟動類里面,這又是一個大問題,因為我的項目只有放在這才能被dispatcher轉發,簡直了。
這里的@EnableDiscoveryClient 是因為我在做spring cloud的eureka 服務發現,需要這個注解讓注冊中心發現這個服務。
package com.example.demo;
import java.time.LocalTime;
import org.springframework.beans.factory.annotation.Autowired;
import org.springframework.beans.factory.annotation.Value;
import org.springframework.boot.SpringApplication;
import org.springframework.boot.autoconfigure.SpringBootApplication;
import org.springframework.cloud.client.discovery.EnableDiscoveryClient;
import org.springframework.transaction.annotation.Transactional;
import org.springframework.web.bind.annotation.GetMapping;
import org.springframework.web.bind.annotation.PathVariable;
import org.springframework.web.bind.annotation.RequestMapping;
import org.springframework.web.bind.annotation.ResponseBody;
import org.springframework.web.bind.annotation.RestController;

@SpringBootApplication
@EnableDiscoveryClient
@RestController
public class InventoryApplication {
    public static void main(String[] args) {
        SpringApplication.run(InventoryApplication.class, args);
    }
    @Autowired
    private InventoryRepository inventoryRepository;

    @Value("${server.port}")
    private Integer port;
    @RequestMapping("/info")
    public String info(){
        inventoryRepository.save(new Inventory(1, "火鍋底料", 10000, 1, "你吃火鍋,我吃底料"));
        inventoryRepository.save(new Inventory(2, "微服務架構", 100, 2, "微服務還是要考慮 一波"));
        return "{Inventory[port:"+port+", info:庫存微服務"+"]}";
    }

    @GetMapping("/get/{id}")
    @ResponseBody
    @Transactional
    public String getById(@PathVariable("id")Integer id){
        return inventoryRepository.findById(id).toString();
    }

    @GetMapping("/")
    @ResponseBody
    @Transactional
    public String re(){
        return inventoryRepository.findAll().toString();
    }

    @GetMapping("/delete/{id}")
    @ResponseBody
    @Transactional
    public String delete(@PathVariable("id")Integer id){
        inventoryRepository.delete(id);
        return "delete successfully";
    }

    @GetMapping("/save/id={id}&name={name}&quantity={quantity}&type={type}&comment={comment}")
/*  @ResponseBody
    @Transactional*/
    public String save(@PathVariable("id")Integer id,@PathVariable("name")String name,
            @PathVariable("quantity")Integer quantity,@PathVariable("type")Integer type,
            @PathVariable("comment")String comment){
        inventoryRepository.save(new Inventory(id,name,quantity,type,comment));
        System.out.println(new Inventory(id,name,quantity,type,comment));
        //強調一下identity和auto
        return "save successfully";
    }

    @GetMapping("/update/id={id}&name={name}&quantity={quantity}&type={type}&comment={comment}")
    @ResponseBody
    @Transactional
    public String update(@PathVariable("id")Integer id,@PathVariable("name")String name,
            @PathVariable("quantity")Integer quantity,@PathVariable("type")Integer type,
            @PathVariable("comment")String comment){
        Inventory inventory=inventoryRepository.findById(id);
        if(inventory.getComment().length()<LocalTime.now().toString().length()){
            inventory.setComment(inventory.getComment()+LocalTime.now());
        }else{
            inventory.setComment(inventory.getComment().substring(0,inventory.getComment().length()-
                    LocalTime.now().toString().length())+LocalTime.now());
        }
        inventoryRepository.save(inventory);
        inventoryRepository.flush();
        return "update successfully";
    }
}
application.properties的配置很關鍵,搜了不少教程。
spring.jpa.show-sql=true
logging.pattern.level=trace
server.port=8765
spring.application.name=inventory
server.tomcat.max-threads=1000
eureka.instance.leaseRenewalIntervalInSeconds= 10
eureka.client.registryFetchIntervalSeconds= 5
eureka.client.serviceUrl.defaultZone=http://localhost:8889/eureka
#eureka.client.service-url.defaultZone=http://${eureka.instance.hostname}:${eureka.instance.server.port}/eureka

#spring.thymeleaf.prefix=classpath:/templates/
#spring.thymeleaf.suffix=.html
#spring.thymeleaf.mode=HTML5
#spring.thymeleaf.encoding=UTF-8
# ;charset=<encoding> is added
#spring.thymeleaf.content-type=text/html
# set to false for hot refresh
spring.h3.console.enabled=true
spring.thymeleaf.cache=false
spring.jpa.hibernate.ddl-auto=update
#這里是把h3持久化到本地文件夾,這可以保持數據
spring.datasource.url=jdbc:h3:file:C\:/h3/h3cache;AUTO_SERVER=TRUE;DB_CLOSE_DELAY=-1
logging.file=c\:/h3/logging.log
logging.level.org.hibernate=debug
#spring.datasource.data=classpath:import.sql
數據庫是自動導入的,只要命名方式是import.sql, 放在src/main/resources下面就可以
insert into inventory(id, name, quantity, type, comment) values (1, "火鍋底料", 10000, 1, "你吃火鍋,我吃底料")
insert into inventory(id, name, quantity, type, comment) values (2, "微服務架構", 100, 2, "微服務還是要考慮 一波")
junit測試一波
package com.example.demo;
import org.junit.Test;
import org.junit.runner.RunWith;
import org.springframework.beans.factory.annotation.Autowired;
import org.springframework.boot.test.context.SpringBootTest;
import org.springframework.test.context.junit4.SpringRunner;
@RunWith(SpringRunner.class)
@SpringBootTest
public class InventoryApplicationTests {

    @Autowired
    private InventoryRepository inventoriRepository;

    @Test
    public void test2() {
        System.out.println(inventoriRepository.findAll());
    }
}
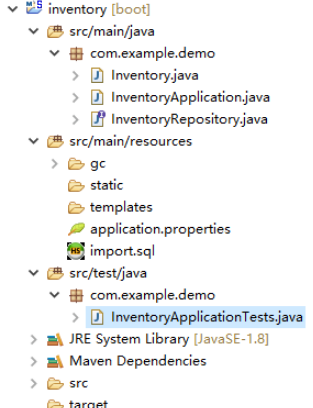
上圖是項目結構圖
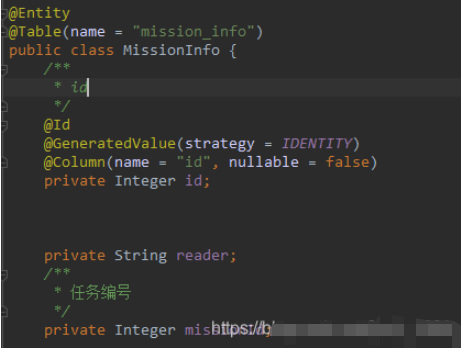
在對數據庫操作時使用 MissionInfoRepository,對應的實體類必須用下面兩個注解修飾
@Entity
@Table(name = "mission_info")
主鍵用下面修飾
 @Id
 @GeneratedValue(strategy = IDENTITY)
 @Column(name = "id", nullable = false)

到此,關于“springboot jpaRepository為什么一定要對Entity序列化”的學習就結束了,希望能夠解決大家的疑惑。理論與實踐的搭配能更好的幫助大家學習,快去試試吧!若想繼續學習更多相關知識,請繼續關注億速云網站,小編會繼續努力為大家帶來更多實用的文章!
免責聲明:本站發布的內容(圖片、視頻和文字)以原創、轉載和分享為主,文章觀點不代表本網站立場,如果涉及侵權請聯系站長郵箱:is@yisu.com進行舉報,并提供相關證據,一經查實,將立刻刪除涉嫌侵權內容。