溫馨提示×
您好,登錄后才能下訂單哦!
點擊 登錄注冊 即表示同意《億速云用戶服務條款》
您好,登錄后才能下訂單哦!
這篇文章主要介紹“怎么用vue實現頁面div盒子拖拽排序功能”,在日常操作中,相信很多人在怎么用vue實現頁面div盒子拖拽排序功能問題上存在疑惑,小編查閱了各式資料,整理出簡單好用的操作方法,希望對大家解答”怎么用vue實現頁面div盒子拖拽排序功能”的疑惑有所幫助!接下來,請跟著小編一起來學習吧!
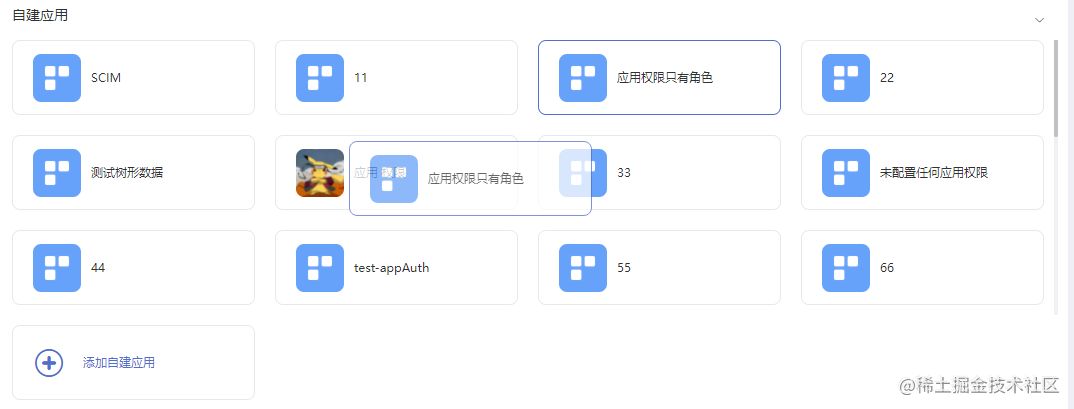
vue 實現頁面div盒子拖拽排序功能前言:目前市面上有很多實現拖拽排序功能的插件和方法,本節不過多累述,只講一種:css3的transition-group方法
效果圖:

1. DOM中使用:
<transition-group class="container" name="sort">
        <div class="app-item" v-for="app in customApps" :key="app.id" :draggable="true"
            @dragstart="dragstart(app)"
            @dragenter="dragenter(app,$event)"
            @dragend="getDragend(customApps, 'customer', $event)">
            <div>
                <img class="icon_a" v-if="app.logo" :src="app.logo" >
                <div class="ellipsis" >{{app.name}}</div>
            </div>
        </div>
    </transition-group>
2. data中定義數據
import { APi } from '@/api/enterpriseAPi'
    <script>
        export default {
            data() {
                return {
                    oldData: [],
                    newData: [],
                    customApps: [],
                    dragStartId: '',
                    dragEndId: ''
                }
            }
        }
    </script>
3. methods方法中使用
dragstart(value) {
        this.oldData = value
        this.dragStartId = value.id
    },
    dragenter(value) {
        this.newData = value
        this.dragEndId = value.id
    },
    getDragend(listData, type) {
            if (this.oldData !== this.newData) {
                let oldIndex = listData.indexOf(this.oldData)
                let newIndex = listData.indexOf(this.newData)
                let newItems = [...listData]
                // 刪除之前DOM節點
                newItems.splice(oldIndex, 1)
                // 在拖拽結束目標位置增加新的DOM節點
                newItems.splice(newIndex, 0, this.oldData)
                // 每次拖拽結束后,將拖拽處理完成的數據,賦值原數組,使DOM視圖更新,頁面顯示拖拽動畫
                this.customApps = newItems
                // 每次拖拽結束后調用接口時時保存數據
               Api(this.dragStartId, this.dragEndId).then((res) => {})
            }
        },
拖拽完成動畫樣式:
<style lang="scss" scoped>
        .sort-move {
            transition: transform 1s;
        }
    </style>
到此,關于“怎么用vue實現頁面div盒子拖拽排序功能”的學習就結束了,希望能夠解決大家的疑惑。理論與實踐的搭配能更好的幫助大家學習,快去試試吧!若想繼續學習更多相關知識,請繼續關注億速云網站,小編會繼續努力為大家帶來更多實用的文章!
免責聲明:本站發布的內容(圖片、視頻和文字)以原創、轉載和分享為主,文章觀點不代表本網站立場,如果涉及侵權請聯系站長郵箱:is@yisu.com進行舉報,并提供相關證據,一經查實,將立刻刪除涉嫌侵權內容。