溫馨提示×
您好,登錄后才能下訂單哦!
點擊 登錄注冊 即表示同意《億速云用戶服務條款》
您好,登錄后才能下訂單哦!
這篇文章給大家分享的是有關C#中ThreadPool之QueueUserWorkItem怎么用的內容。小編覺得挺實用的,因此分享給大家做個參考,一起跟隨小編過來看看吧。
先看代碼:
//設置可以同時處于活動狀態的線程池的請求數目。
bool pool = ThreadPool.SetMaxThreads(8, 8);
if (pool) {
    ThreadPool.QueueUserWorkItem(o => this.DoSomethingLong("參數1"));
    ThreadPool.QueueUserWorkItem(o => this.DoSomethingLong("參數2"));
    ThreadPool.QueueUserWorkItem(o => this.DoSomethingLong("參數3"));
    ThreadPool.QueueUserWorkItem(o => this.DoSomethingLong("參數4"));
    ThreadPool.QueueUserWorkItem(o => this.DoSomethingLong("參數5"));
    ThreadPool.QueueUserWorkItem(o => this.DoSomethingLong("參數6"));
    ThreadPool.QueueUserWorkItem(o => this.DoSomethingLong("參數7"));
    ThreadPool.QueueUserWorkItem(o => this.DoSomethingLong("參數8"));
    ThreadPool.QueueUserWorkItem(o => this.DoSomethingLong("參數9"));
    ThreadPool.QueueUserWorkItem(o => this.DoSomethingLong("參數10"));
    ThreadPool.QueueUserWorkItem(o => this.DoSomethingLong("參數11"));
};
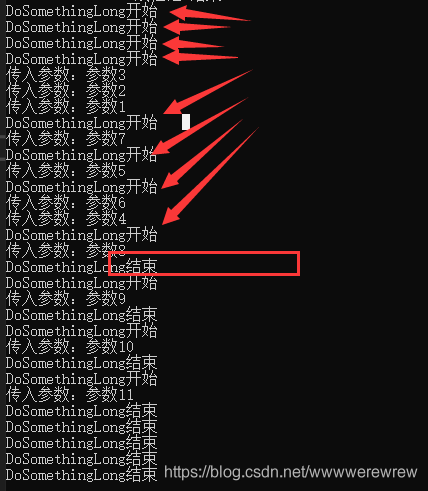
上面代碼先設置線程池中最大并發量為8個,然后通過QueueUserWorkItem向線程池中添加11個方法,運行,輸出結果:

可以看出,先運行了8個,當有一個任務結束后線程池中有空閑線程時,排隊的下一個任務才會執行,
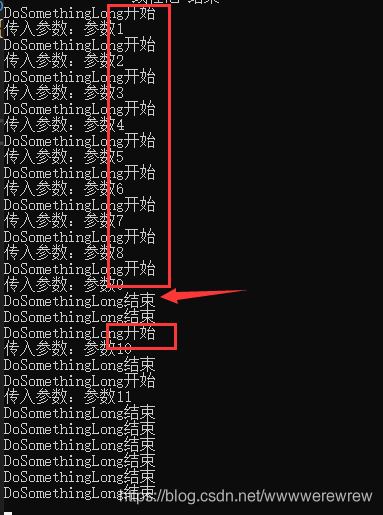
把最大并發量改成9試試:
{
    //設置可以同時處于活動狀態的線程池的請求數目。
    bool pool = ThreadPool.SetMaxThreads(9, 9);
    if (pool) {
        ThreadPool.QueueUserWorkItem(o => this.DoSomethingLong("參數1"));
        ThreadPool.QueueUserWorkItem(o => this.DoSomethingLong("參數2"));
        ThreadPool.QueueUserWorkItem(o => this.DoSomethingLong("參數3"));
        ThreadPool.QueueUserWorkItem(o => this.DoSomethingLong("參數4"));
        ThreadPool.QueueUserWorkItem(o => this.DoSomethingLong("參數5"));
        ThreadPool.QueueUserWorkItem(o => this.DoSomethingLong("參數6"));
        ThreadPool.QueueUserWorkItem(o => this.DoSomethingLong("參數7"));
        ThreadPool.QueueUserWorkItem(o => this.DoSomethingLong("參數8"));
        ThreadPool.QueueUserWorkItem(o => this.DoSomethingLong("參數9"));
        ThreadPool.QueueUserWorkItem(o => this.DoSomethingLong("參數10"));
        ThreadPool.QueueUserWorkItem(o => this.DoSomethingLong("參數11"));
    };
}
運行結果:

感謝各位的閱讀!關于“C#中ThreadPool之QueueUserWorkItem怎么用”這篇文章就分享到這里了,希望以上內容可以對大家有一定的幫助,讓大家可以學到更多知識,如果覺得文章不錯,可以把它分享出去讓更多的人看到吧!
免責聲明:本站發布的內容(圖片、視頻和文字)以原創、轉載和分享為主,文章觀點不代表本網站立場,如果涉及侵權請聯系站長郵箱:is@yisu.com進行舉報,并提供相關證據,一經查實,將立刻刪除涉嫌侵權內容。