您好,登錄后才能下訂單哦!
您好,登錄后才能下訂單哦!
本篇內容介紹了“BeautifulSoup的介紹及作用有哪些”的有關知識,在實際案例的操作過程中,不少人都會遇到這樣的困境,接下來就讓小編帶領大家學習一下如何處理這些情況吧!希望大家仔細閱讀,能夠學有所成!
from bs4 import BeautifulSoup

html = """
<html><head><title>The Dormouse's story</title></head>
<body>
<p class="story">Once upon a time there were three little sisters; and their names were
</p>
"""

soup = BeautifulSoup(html, 'html.parser')
print(soup.prettify())
from bs4 import BeautifulSoup

with open(r"F:\tmp\etree.html") as fp:
    soup = BeautifulSoup(fp,"lxml")

print(soup.prettify())
如果一個節點只包含文本節點,可以通過string直接訪問文本節點
如果不止包含文本節點,那么string為None
如果不止包含文本節點,可以通過strings、stripped_strings獲取文本節點內容,strings、stripped_strings獲取的都是生成器。
只獲取文本節點
soup.get_text()
#可以指定不同節點之間的文本使用|分割。
soup.get_text("|")
# 可以指定去除空格
soup.get_text("|", strip=True)tag.attrs是一個字典類型,可以通過tag['id']這樣的方式獲取值。下標訪問的方式可能會拋出異常KeyError,所以可以使用tag.get('id')方式,如果id屬性不存在,返回None。
都是節點的子節點,不過: contents是列表 children是生成器
contents、children只包含直接子節點,descendants也是一個生成器,不過包含節點的子孫節點
parent:父節點 parents:遞歸父節點
next_sibling:后一個兄弟節點 previous_sibling:前一個兄弟節點
next_element:后一個節點 previous_element:前一個節點
next_element與next_sibling的區別是:
next_sibling從當前tag的結束標簽開始解析
next_element從當前tag的開始標簽開始解析
find_parent:查找父節點 find_parents:遞歸查找父節點 find_next_siblings:查找后面的兄弟節點 find_next_sibling:查找后面滿足條件的第一個兄弟節點 find_all_next:查找后面所有節點 find_next:查找后面第一個滿足條件的節點 find_all_previous:查找前面所有滿足條件的節點 find_previous:查找前面第一個滿足條件的節點
# 查找所有p節點
soup.find_all('p')
# 查找title節點,不遞歸
soup.find_all("title", recursive=False)
# 查找p節點和span節點
soup.find_all(["p", "span"])
# 查找第一個a節點,和下面一個find等價
soup.find_all("a", limit=1)
soup.find('a')# 查找id為id1的節點
soup.find_all(id='id1')
# 查找name屬性為tim的節點
soup.find_all(name="tim")
soup.find_all(attrs={"name": "tim"})
#查找class為clazz的p節點
soup.find_all("p", "clazz")
soup.find_all("p", class_="clazz")
soup.find_all("p", class_="body strikeout")import re
# 查找與p開頭的節點
soup.find_all(class_=re.compile("^p"))# 查找有class屬性并且沒有id屬性的節點
soup.find_all(hasClassNoId)
def hasClassNoId(tag):
return tag.has_attr('class') and not tag.has_attr('id')soup.find_all(string="tim")
soup.find_all(string=["alice", "tim", "allen"])
soup.find_all(string=re.compile("tim"))
def onlyTextTag(s):
return (s == s.parent.string)
# 查找只有文本節點的節點
soup.find_all(string=onlyTextTag)
# 查找文本節點為tim的a節點
soup.find_all("a", string="tim")相比于find,select方法就少了很多,就2個,一個是select,另一個是select_one,區別是select_one只選擇滿足條件的第一個元素。
select的重點在于選擇器上,所以接下來我們重點通過介紹示例介紹一些常用的選擇器。如果對應css選擇器不熟悉的朋友,可以先看一下后面CSS選擇器的介紹。
# 選擇title節點
soup.select("title")
# 選擇body節點下的所有a節點
soup.select("body a")
# 選擇html節點下的head節點下的title節點
soup.select("html head title")
通過tag選擇非常簡單,就是按層級,通過tag的名稱使用空格分割就可以了。
# 選擇類名為article的節點
soup.select(".article")
# 選擇id為id1的a節點
soup.select("a#id1")
# 選擇id為id1的節點
soup.select("#id1")
# 選擇id為id1、id2的節點
soup.select("#id1,#id2")
id和類選擇器也比較簡單,類選擇器使用.開頭,id選擇器使用#開頭。
# 選擇有href屬性的a節點
soup.select('a[href]')
# 選擇href屬性為http://mycollege.vip/tim的a節點
soup.select('a[href="http://mycollege.vip/tim"]')
# 選擇href以http://mycollege.vip/開頭的a節點
soup.select('a[href^="http://mycollege.vip/"]')
# 選擇href以png結尾的a節點
soup.select('a[href$="png"]')
# 選擇href屬性包含china的a節點
soup.select('a[href*="china"]')
# 選擇href屬性包含china的a節點
soup.select("a[href~=china]")# 父節點為div節點的p節點
soup.select("div > p")
# 節點之前有div節點的p節點
soup.select("div + p")
# p節點之后的ul節點(p和ul有共同父節點)
soup.select("p~ul")
# 父節點中的第3個p節點
soup.select("p:nth-of-type(3)")最后我們還是通過一個小例子,來看一下BeautifulSoup的使用。
from bs4 import BeautifulSoup

text = '''
<li class="subject-item">
    <div class="pic">
      <a class="nbg" href="https://mycollege.vip/subject/25862578/">
        <img class="" src="https://mycollege.vip/s27264181.jpg" width="90">
      </a>
    </div>
    <div class="info">
      <h3 class=""><a href="https://mycollege.vip/subject/25862578/" title="解憂雜貨店">解憂雜貨店</a></h3>
      <div class="pub">[日] 東野圭吾 / 李盈春 / 南海出版公司 / 2014-5 / 39.50元</div>
      <div class="star clearfix">
        <span class="allstar45"></span>
        <span class="rating_nums">8.5</span>
        <span class="pl">
            (537322人評價)
        </span>
      </div>
      <p>現代人內心流失的東西,這家雜貨店能幫你找回——僻靜的街道旁有一家雜貨店,只要寫下煩惱投進卷簾門的投信口,
      第二天就會在店后的牛奶箱里得到回答。因男友身患絕... </p>
    </div>
</li>
'''

soup = BeautifulSoup(text, 'lxml')

print(soup.select_one("a.nbg").get("href"))
print(soup.find("img").get("src"))
title = soup.select_one("h3 a")
print(title.get("href"))
print(title.get("title"))

print(soup.find("div", class_="pub").string)
print(soup.find("span", class_="rating_nums").string)
print(soup.find("span", class_="pl").string.strip())
print(soup.find("p").string)
非常簡單,如果對CSS選擇器熟悉的話,很多復雜的結構也能輕松搞定。
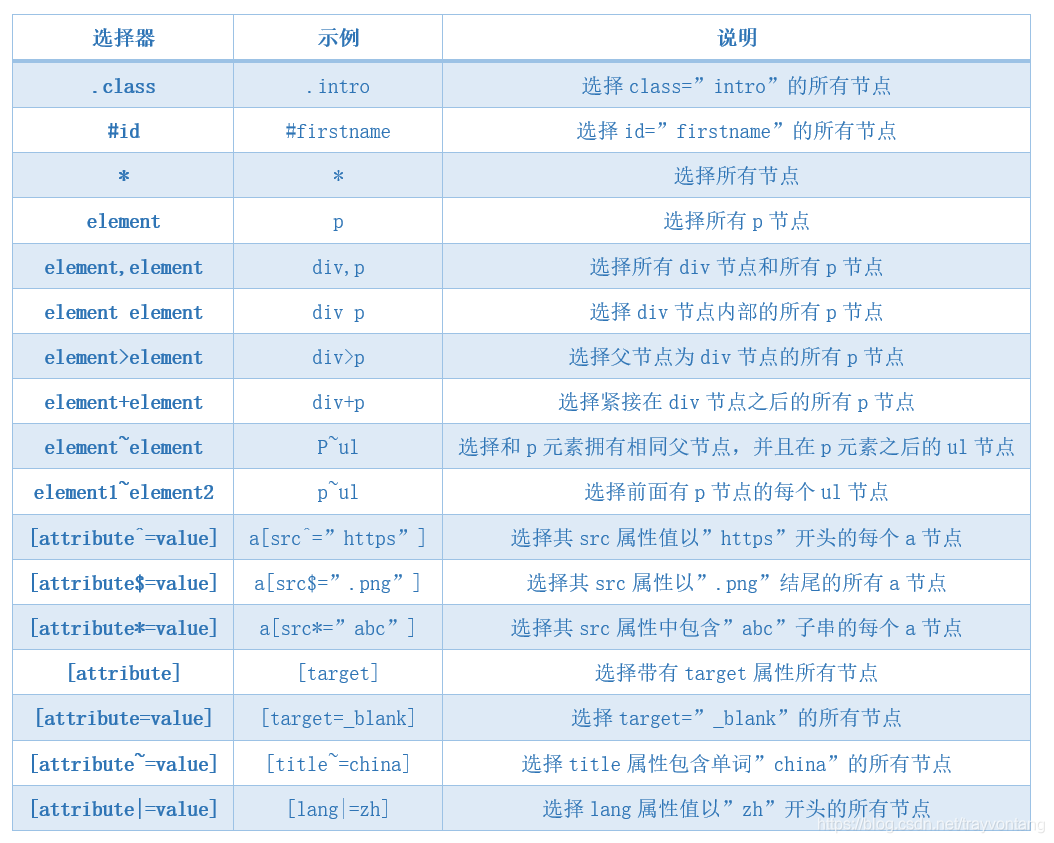
| 選擇器 | 示例 | 說明 |
|---|---|---|
| .class | .intro | 選擇class="intro"的所有節點 |
| #id | #firstname | 選擇id="firstname"的所有節點 |
| * | * | 選擇所有節點 |
| element | p | 選擇所有p節點 |
| element,element | div,p | 選擇所有div節點和所有p節點 |
| element element | div p | 選擇div節點內部的所有p節點 |
| element>element | div>p | 選擇父節點為div節點的所有p節點 |
| element+element | div+p | 選擇緊接在div節點之后的所有p節點 |
| element~element | p~ul | 選擇和p元素擁有相同父節點,并且在p元素之后的ul節點 |
| [attribute^=value] | a[src^="https"] | 選擇其src屬性值以"https"開頭的每個a節點 |
| [attribute$=value] | a[src$=".png"] | 選擇其src屬性以".png"結尾的所有a節點 |
| [attribute*=value] | a[src*="abc"] | 選擇其src屬性中包含"abc"子串的每個a節點 |
| [attribute] | [target] | 選擇帶有target屬性所有節點 |
| [attribute=value] | [target=_blank] | 選擇target="_blank"的所有節點 |
| [attribute~=value] | [title~=china] | 選擇title屬性包含單詞"china"的所有節點 |
| [attribute|=value] | [lang|=zh] | 選擇lang屬性值以"zh"開頭的所有節點 |
div p是包含孫子節點,div > p只選擇子節點
element~element選擇器有點不好理解,看下面的例子:
<!DOCTYPE html>
<html>

<head>
    <meta charset="utf-8">
    <style>
    p~ul {
        background: red;
    }
    </style>
</head>

<body>
    <div>
        <ul>
            <li>ul-li1</li>
            <li>ul-li1</li>
            <li>ul-li1</li>
        </ul>
        <p>p標簽</p>
        <ul>
            <li>ul-li2</li>
            <li>ul-li2</li>
            <li>ul-li2</li>
        </ul>
        <h3>h3 tag</h3>
        <ul>
            <li>ul-li3</li>
            <li>ul-li3</li>
            <li>ul-li3</li>
        </ul>
    </div>
</body>

</html>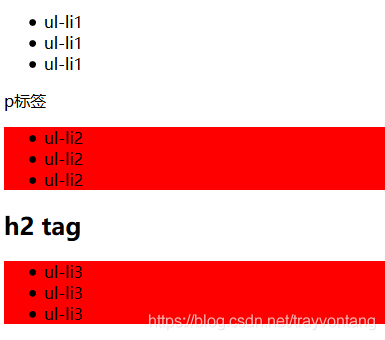
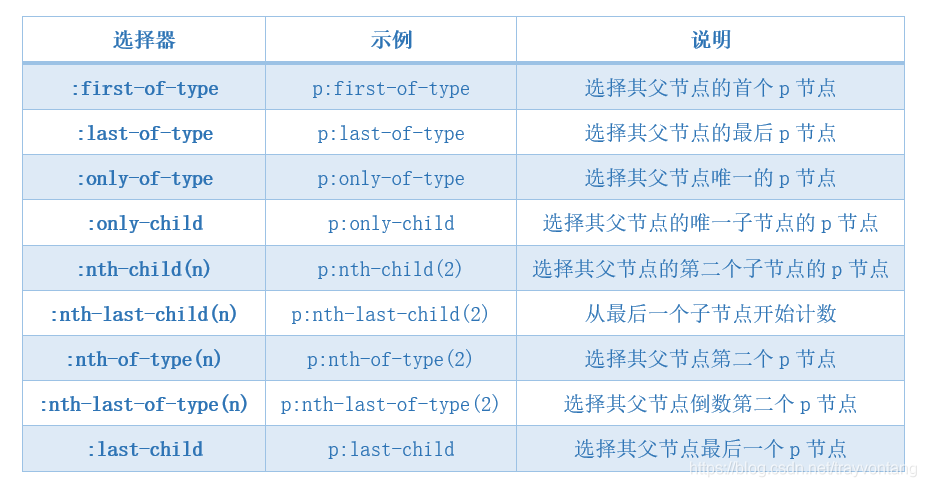
| 選擇器 | 示例 | 說明 |
|---|---|---|
| :first-of-type | p:first-of-type | 選擇其父節點的首個p節點 |
| :last-of-type | p:last-of-type | 選擇其父節點的最后p節點 |
| :only-of-type | p:only-of-type | 選擇其父節點唯一的p節點 |
| :only-child | p:only-child | 選擇其父節點的唯一子節點的p節點 |
| :nth-child(n) | p:nth-child(2) | 選擇其父節點的第二個子節點的p節點 |
| :nth-last-child(n) | p:nth-last-child(2) | 從最后一個子節點開始計數 |
| :nth-of-type(n) | p:nth-of-type(2) | 選擇其父節點第二個p節點 |
| :nth-last-of-type(n) | p:nth-last-of-type(2) | 選擇其父節點倒數第二個p節點 |
| :last-child | p:last-child | 選擇其父節點最后一個p節點 |
需要主要的是tag:nth-child(n)與tag:nth-of-type(n),nth-child計算的時候不要求類型相同,nth-of-type計算的時候必須是相同的tag。
有點繞,可以看一下下面的示例。
<!DOCTYPE html>
<html>
<head>
    <title>nth</title>
     <style>
        #wrap p:nth-of-type(3) {
            background: red;
        }

        #wrap p:nth-child(3) {
            background: yellow;
        }
    </style>
</head>
<body>
    <div id="wrap">
        <p>1-1p</p>
        <div>2-1div</div>
        <p>3-2p</p>
        <p>4-3p</p>
        <p>5-4p</p>
    </div>
</body>
</html>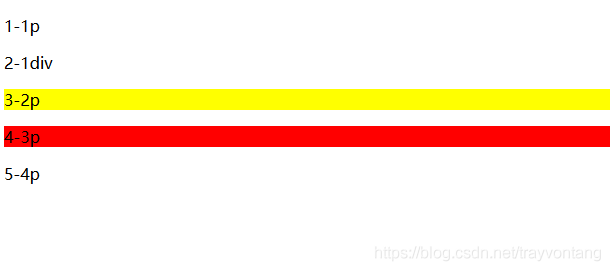
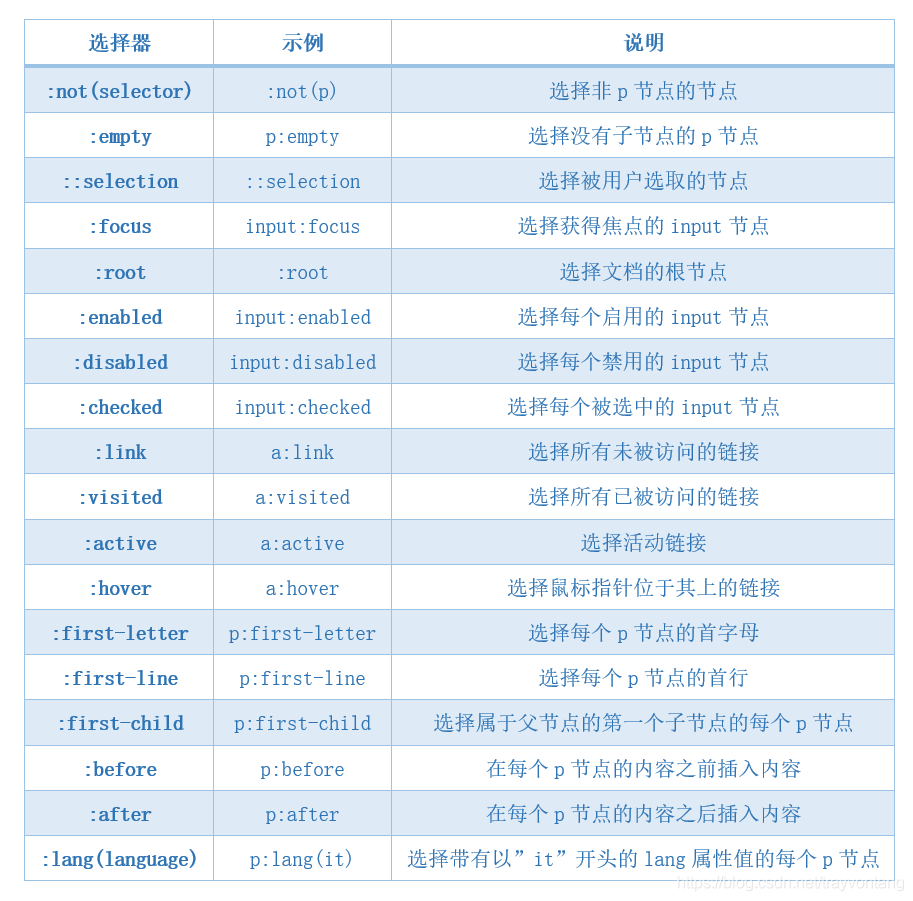
| 選擇器 | 示例 | 說明 |
|---|---|---|
| :not(selector) | :not(p) | 選擇非p節點的節點 |
| :empty | p:empty | 選擇沒有子節點的p節點 |
| ::selection | ::selection | 選擇被用戶選取的節點 |
| :focus | input:focus | 選擇獲得焦點的input節點 |
| :root | :root | 選擇文檔的根節點 |
| :enabled | input:enabled | 選擇每個啟用的input節點 |
| :disabled | input:disabled | 選擇每個禁用的input節點 |
| :checked | input:checked | 選擇每個被選中的input節點 |
| :link | a:link | 選擇所有未被訪問的鏈接 |
| :visited | a:visited | 選擇所有已被訪問的鏈接 |
| :active | a:active | 選擇活動鏈接 |
| :hover | a:hover | 選擇鼠標指針位于其上的鏈接 |
| :first-letter | p:first-letter | 選擇每個p節點的首字母 |
| :first-line | p:first-line | 選擇每個p節點的首行 |
| :first-child | p:first-child | 選擇屬于父節點的第一個子節點的每個p節點 |
| :before | p:before | 在每個p節點的內容之前插入內容 |
| :after | p:after | 在每個p節點的內容之后插入內容 |
| :lang(language) | p:lang(it) | 選擇帶有以"it"開頭的lang屬性值的每個p節點 |
“BeautifulSoup的介紹及作用有哪些”的內容就介紹到這里了,感謝大家的閱讀。如果想了解更多行業相關的知識可以關注億速云網站,小編將為大家輸出更多高質量的實用文章!
免責聲明:本站發布的內容(圖片、視頻和文字)以原創、轉載和分享為主,文章觀點不代表本網站立場,如果涉及侵權請聯系站長郵箱:is@yisu.com進行舉報,并提供相關證據,一經查實,將立刻刪除涉嫌侵權內容。