您好,登錄后才能下訂單哦!
您好,登錄后才能下訂單哦!
這篇“centos6.5 oracle開機自啟動的環境怎么配置”文章的知識點大部分人都不太理解,所以小編給大家總結了以下內容,內容詳細,步驟清晰,具有一定的借鑒價值,希望大家閱讀完這篇文章能有所收獲,下面我們一起來看看這篇“centos6.5 oracle開機自啟動的環境怎么配置”文章吧。
centos 6.5 oracle開機自啟動的環境配置詳解
環境:centos 6.5 + oracle 11g
自啟動之前問題
虛擬機里的oracle環境,每次重啟完系統,用plsql developer連接,先是報錯:
無tns監聽程序
解決方法是切換到系統的oracle用戶,執行lsnrctl start,但是執行之前,因為oracle_home環境變量沒有生效,還要是環境變量文件生效,步驟如下:
[oracle@localhost ~]$ source .bash_profile

[oracle@localhost ~]$ echo $oracle_home
/home/oracle/app/oracle/product/11.2.0/dbhome_1

[oracle@localhost ~]$ lsnrctl start
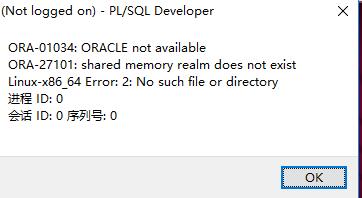
啟動完成后,再次連接,又報錯:

oracle沒有啟動。啟動步驟如下:
[oracle@localhost ~]$ sqlplus /nolog

sql*plus: release 11.2.0.1.0 production on wed oct 19 14:29:10 2016

copyright (c) 1982, 2009, oracle. all rights reserved.

sql> conn / as sysdba
connected to an idle instance.
sql> startup
oracle instance started.

total system global area 776646656 bytes
fixed size         2217384 bytes
variable size       490736216 bytes
database buffers     281018368 bytes
redo buffers        2674688 bytes
database mounted.
database opened.
配置自啟動
下面把上述過程都配置成開機啟動。
環境變量生效
可能是因為我的oracle用戶不是桌面登錄的,是從終端su切換過來的,.bash_profile文件沒有運行。我把文件里的內容寫入.bashrc文件后,重啟就可以了。
tns監聽以及oracle服務自啟動
編輯: /etc/oratab文件,把最后一行的n改成y
# this file is used by oracle utilities. it is created by root.sh
# and updated by the database configuration assistant when creating
# a database.

# a colon, ':', is used as the field terminator. a new line terminates
# the entry. lines beginning with a pound sign, '#', are comments.
#
# entries are of the form:
#  $oracle_sid:$oracle_home:<n|y>:
#
# the first and second fields are the system identifier and home
# directory of the database respectively. the third filed indicates
# to the dbstart utility that the database should , "y", or should not,
# "n", be brought up at system boot time.
#
# multiple entries with the same $oracle_sid are not allowed.
#
#
orcl:/home/oracle/app/product/11.2.0/dbhome_1:y
路徑可能不同
編輯 /etc/rc.local 文件,增加 最后兩行:
#!/bin/sh
#
# this script will be executed *after* all the other init scripts.
# you can put your own initialization stuff in here if you don't
# want to do the full sys v style init stuff.

touch /var/lock/subsys/local
service smb restart
su - oracle -c 'lsnrctl start'
su - oracle -c 'dbstart'
su - oracle -c 'emctl start dbconsole'
dbstart是數據庫自帶的啟動腳本,我們只要加到rc.local中讓它開機調用就可以了。但是還需要編輯一下它。修改dbstart的oracle_home_listner,使其指向$oracle_home:
# first argument is used to bring up oraclenet listener
oracle_home_listner=$oracle_home
重啟虛擬機,發現plsql developer可以直接連接上了。
以上就是關于“centos6.5 oracle開機自啟動的環境怎么配置”這篇文章的內容,相信大家都有了一定的了解,希望小編分享的內容對大家有幫助,若想了解更多相關的知識內容,請關注億速云行業資訊頻道。
免責聲明:本站發布的內容(圖片、視頻和文字)以原創、轉載和分享為主,文章觀點不代表本網站立場,如果涉及侵權請聯系站長郵箱:is@yisu.com進行舉報,并提供相關證據,一經查實,將立刻刪除涉嫌侵權內容。